Nikon COOLPIX P90 P90 User's Manual - Page 36
Basic Photography and Playback: Auto Mode, Step 1 Turn the Camera On and Select Auto Mode
 |
View all Nikon COOLPIX P90 manuals
Add to My Manuals
Save this manual to your list of manuals |
Page 36 highlights
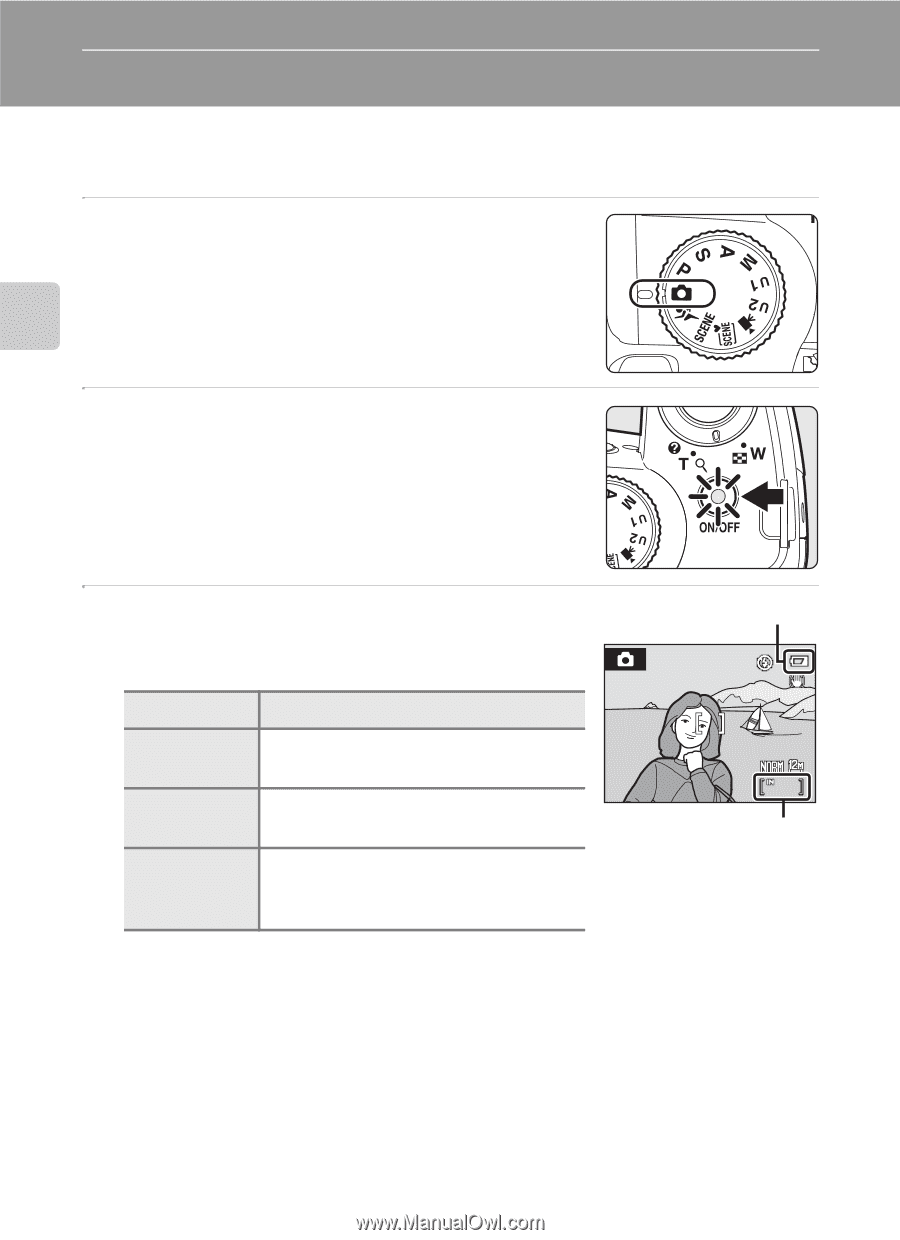
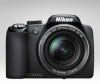
Basic Photography and Playback: Auto Mode Step 1 Turn the Camera On and Select A (Auto) Mode This section describes how to take pictures in A (auto) mode, an automatic, "pointand-shoot" mode recommended for first-time users of digital cameras. 1 Rotate the mode dial to A. Basic Photography and Playback: Auto Mode 2 Remove the lens cap and press the power switch. • The power will be turned on, and the lens will extend. • The power-on lamp (green) will light for a moment and the monitor will turn on. 3 Check the battery level and number of exposures remaining in the monitor. Battery Level Monitor Description NO INDICATOR Battery fully charged. B Battery level low; prepare to charge or replace the battery. N Battery exhausted. Cannot shoot. Recharge or replace with a fully-charged battery. Battery level indicator 1/125 F2.8 16 Number of exposures remaining Number of Exposures Remaining The number of exposures remaining will be displayed. The number of pictures that can be stored depends on the remaining capacity of the internal memory or memory card, the image quality, and the image size (A109). 24
-
 1
1 -
2
-
3
-
4
-
5
-
6
-
7
-
8
-
9
-
10
-
11
-
12
-
13
-
14
-
15
-
16
-
17
-
18
-
19
-
20
-
21
-
22
-
23
-
24
-
25
-
26
-
27
-
28
-
29
-
30
-
 31
31 -
 32
32 -
 33
33 -
 34
34 -
 35
35 -
 36
36 -
 37
37 -
 38
38 -
 39
39 -
 40
40 -
 41
41 -
42
-
43
-
44
-
45
-
46
-
47
-
48
-
49
-
50
-
51
-
52
-
53
-
54
-
55
-
56
-
57
-
58
-
59
-
60
-
61
-
62
-
63
-
64
-
65
-
66
-
67
-
68
-
69
-
70
-
71
-
72
-
73
-
74
-
75
-
76
-
77
-
78
-
79
-
80
-
81
-
82
-
83
-
84
-
85
-
86
-
87
-
88
-
89
-
90
-
91
-
92
-
93
-
94
-
95
-
96
-
97
-
98
-
99
-
100
-
101
-
102
-
103
-
104
-
105
-
106
-
107
-
108
-
109
-
110
-
111
-
112
-
113
-
114
-
115
-
116
-
117
-
118
-
119
-
120
-
121
-
122
-
123
-
124
-
125
-
126
-
127
-
128
-
129
-
130
-
131
-
132
-
133
-
134
-
135
-
136
-
137
-
138
-
139
-
140
-
141
-
142
-
143
-
144
-
145
-
146
-
147
-
148
-
149
-
150
-
151
-
152
-
153
-
154
-
155
-
156
-
157
-
158
-
159
-
160
-
161
-
162
-
163
-
164
-
165
-
166
-
167
-
168
-
169
-
170
-
171
-
172
-
173
-
174
-
175
-
176
-
177
-
178
-
179
-
180
-
181
-
182
-
183
-
184
-
185
-
186
-
187
-
188
-
189
-
190
-
191
-
192
 |
 |