Nikon COOLPIX P90 P90 User's Manual - Page 51
Exposure Compensation - camera manual
 |
View all Nikon COOLPIX P90 manuals
Add to My Manuals
Save this manual to your list of manuals |
Page 51 highlights
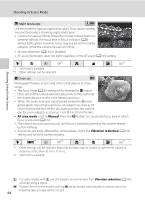
Basic Photography and Playback: Auto Mode Exposure Compensation Exposure compensation is used to alter the exposure from the value suggested by the camera to make pictures brighter or darker. 1 Press o (exposure compensation). • The exposure compensation guide is displayed. • Exposure compensation is not available for D (manual) mode. 2 Press H or I on the multi selector to adjust the exposure. • When the subject is too dark: adjust the exposure compensation to "+" side. • When the subject is too bright: adjust the exposure compensation to "-" side. • Exposure compensation can be set to values between -2.0 and +2.0 EV in increments of 1/3 EV. 3 Exit the exposure compensation setting by pressing the k button. • When an exposure compensation value other than 0.0 is applied, the value is displayed with the H icon in the monitor. • To cancel the exposure compensation setting, change the value to 0.0 and press the k button. 4 Press the shutter-release button to take the picture. • Pictures can also be taken with a specified exposure compensation value by pressing the shutter-release button after step 2 (face priority (A123) will not be available). 1/125 F2.8 16 C Exposure Compensation Value For A, B and C shooting modes, the setting for exposure compensation will be stored in the camera's memory even after the camera is turned off. D Using Exposure Compensation • The camera tends to lower exposure when the frame is dominated by brightly lit objects (for example, sunlit expanses of water, sand, or snow) or when the background is much brighter than the main subject. • Negative compensation may be called for when large areas of the frame contain very dark objects (for example, a swath of dark green leaves) or when the background is much darker than the main subject. 39
-
 1
1 -
2
-
3
-
4
-
5
-
6
-
7
-
8
-
9
-
10
-
11
-
12
-
13
-
14
-
15
-
16
-
17
-
18
-
19
-
20
-
21
-
22
-
23
-
24
-
25
-
26
-
27
-
28
-
29
-
30
-
31
-
32
-
33
-
34
-
35
-
36
-
37
-
38
-
39
-
40
-
41
-
42
-
43
-
44
-
45
-
 46
46 -
 47
47 -
 48
48 -
 49
49 -
 50
50 -
 51
51 -
 52
52 -
 53
53 -
 54
54 -
 55
55 -
 56
56 -
57
-
58
-
59
-
60
-
61
-
62
-
63
-
64
-
65
-
66
-
67
-
68
-
69
-
70
-
71
-
72
-
73
-
74
-
75
-
76
-
77
-
78
-
79
-
80
-
81
-
82
-
83
-
84
-
85
-
86
-
87
-
88
-
89
-
90
-
91
-
92
-
93
-
94
-
95
-
96
-
97
-
98
-
99
-
100
-
101
-
102
-
103
-
104
-
105
-
106
-
107
-
108
-
109
-
110
-
111
-
112
-
113
-
114
-
115
-
116
-
117
-
118
-
119
-
120
-
121
-
122
-
123
-
124
-
125
-
126
-
127
-
128
-
129
-
130
-
131
-
132
-
133
-
134
-
135
-
136
-
137
-
138
-
139
-
140
-
141
-
142
-
143
-
144
-
145
-
146
-
147
-
148
-
149
-
150
-
151
-
152
-
153
-
154
-
155
-
156
-
157
-
158
-
159
-
160
-
161
-
162
-
163
-
164
-
165
-
166
-
167
-
168
-
169
-
170
-
171
-
172
-
173
-
174
-
175
-
176
-
177
-
178
-
179
-
180
-
181
-
182
-
183
-
184
-
185
-
186
-
187
-
188
-
189
-
190
-
191
-
192
 |
 |
