Oki OKIPAGE10i Users' Guide for the OKIPAGE10i - Page 14
Installing Toner
 |
View all Oki OKIPAGE10i manuals
Add to My Manuals
Save this manual to your list of manuals |
Page 14 highlights
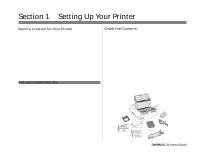
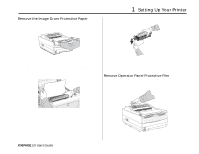
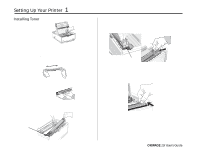
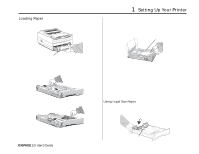
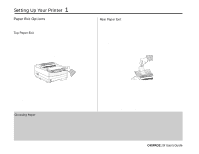
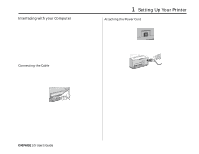
Setting Up Your Printer 1 Installing Toner 1. Remove the sponge. 5. Lower the right side, aligning the lock lever slot with the ridge in the drum cartridge. 2. Unwrap the toner cartridge. Shake the cartridge from side to side to distribute the toner. ¶ Only the OKIPAGE 10i Type 5 Series Toner Cartridge will fit in this unit (Part# 52109001) PUSH slot ridge 3. Peel tape off the bottom. 6. When the cartridge is in place, push the lock lever forward until it stops. 4. Grasp the lock lever and place the left side of the toner cartridge into the toner well, under the tab. tab 7. Lower the printer cover and press firmly to close. ¯4 OKIPAGE 10i User's Guide
-
 1
1 -
2
-
3
-
4
-
5
-
6
-
7
-
8
-
 9
9 -
 10
10 -
 11
11 -
 12
12 -
 13
13 -
 14
14 -
 15
15 -
 16
16 -
 17
17 -
 18
18 -
 19
19 -
20
-
21
-
22
-
23
-
24
-
25
-
26
-
27
-
28
-
29
-
30
-
31
-
32
-
33
-
34
-
35
-
36
-
37
-
38
-
39
-
40
-
41
-
42
-
43
-
44
-
45
-
46
-
47
-
48
-
49
-
50
-
51
-
52
-
53
-
54
-
55
-
56
-
57
-
58
-
59
-
60
-
61
-
62
 |
 |

4
OKIPAGE
10i
User’s Guide
Setting Up Your Printer
1
Installing Toner
1.
Remove the sponge.
2.
Unwrap the toner cartridge. Shake the cartridge from side to side
to distribute the toner.
Only the OKIPAGE 10i Type 5 Series Toner Cartridge will fit in
this unit (Part# 52109001)
3.
Peel tape off the bottom.
4.
Grasp the lock lever and place the left side of the toner cartridge
into the toner well, under the tab.
5.
Lower the right side, aligning the lock lever slot with the ridge in
the drum cartridge.
PUSH
6.
When the cartridge is in place, push the lock lever forward until
it stops.
7.
Lower the printer cover and press firmly to close.
ridge
slot
tab