Oki OKIPAGE10i Users' Guide for the OKIPAGE10i - Page 17
Interfacing with your Computer
 |
View all Oki OKIPAGE10i manuals
Add to My Manuals
Save this manual to your list of manuals |
Page 17 highlights
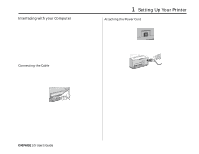
1 Setting Up Your Printer Interfacing with your Computer Your printer has a high-speed, bi-directional parallel IEEE 1284 interface port. Purchase a cable marked IEEE 1284 compliant. To comply with FCC regulations, the cable must be shielded and UL and CSA approved. Consult your PC manual for details on cable requirements and interface ports on your computer. Attaching the Power Cord 1. Make sure the printer power switch (on left side) is set off. POWER O OFF ON F ¶ OKIDATA has tested and approved the following bi-directional cable: Part# 70000803. See Section 5 for purchasing information. ¶ An optional RS-232 Serial I/O Card is available: Part# 00025302. See Section 5 for purchasing information. 2. Plug the power cord into the printer first, then into a grounded outlet. Connecting the Cable Make sure the printer and computer are off. 1. Insert the printer end of the cable firmly into the connector on the back of the printer). Fasten the cable to the printer securely. 3. Turn the printer on. It takes about 10 seconds for the printer to initialize, warm up, and display the ON-LINE message, indicating the printer is ready to receive data. 2. Connect the other end of the cable to the proper connector on your computer. Fasten the cable securely to your computer. ° OKIPAGE 10i User's Guide 7
-
 1
1 -
2
-
3
-
4
-
5
-
6
-
7
-
8
-
9
-
10
-
11
-
 12
12 -
 13
13 -
 14
14 -
 15
15 -
 16
16 -
 17
17 -
 18
18 -
 19
19 -
 20
20 -
 21
21 -
 22
22 -
23
-
24
-
25
-
26
-
27
-
28
-
29
-
30
-
31
-
32
-
33
-
34
-
35
-
36
-
37
-
38
-
39
-
40
-
41
-
42
-
43
-
44
-
45
-
46
-
47
-
48
-
49
-
50
-
51
-
52
-
53
-
54
-
55
-
56
-
57
-
58
-
59
-
60
-
61
-
62
 |
 |
