Olympus D-490 D-490 Zoom Instruction Manual (2.6 MB) - Page 26
Displaying Images Frame by, Frame - zoom card
 |
UPC - 050332130517
View all Olympus D-490 manuals
Add to My Manuals
Save this manual to your list of manuals |
Page 26 highlights
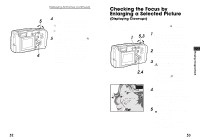
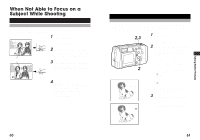
Displaying Images Frame by Frame To display one frame at a time on the monitor, follow the same steps as those for displaying still pictures (p.46). 1 1 Press the monitor button with the lens barrier closed. • The power turns on in playback mode and the monitor displays the last image taken. 2 Checking the images. 3 Battery check (Record mode) (Print reserve) (Protect) Monitor (Movie) HQ 12. 23. '00 23 : 45 124 (Time) Frame number (Date) • Information shown in the lower left diagram is displayed together with the images on the monitor. Information in parentheses may be displayed depending on the setting and type of the image. • The battery level, record mode marks and others go off automatically after about 3 seconds. 3 Check other images recorded by pressing the arrow pad. ୵: Displays the previous image. ୴: Displays the next image. ̅: Displays the 10th image back. ̃: Displays the 10th image ahead. 50 Displaying All Frames (Index-Display Setting) The index-display setting simultaneously displays several images stored on the card. This is useful when searching for a specific photo. 12 1 With the lens barrier closed, push the monitor button. • The power turns on in playback mode and the monitor displays the most last image taken. 2 Push the zoom lever toward (Wide angle). 3 Playing Images Back 3 Monitor 120 121 122 123 124 125 126 127 128 • Several frames are displayed, including the currentlyselected picture. • It may take approximately 2 seconds before the pictures are displayed. • To select the number of frames to be displayed, see 3 p.113. In the index-display setting, press the arrow pad to display the next set of frames. ̅: The monitor displays the previous set of frames starting with the frame immediately preceding the one appearing in the upper left corner. ̃: The monitor displays the following set of frames starting with the frame immediately after the one appearing in the lower right corner. 51
-
 1
1 -
2
-
3
-
4
-
5
-
6
-
7
-
8
-
9
-
10
-
11
-
12
-
13
-
14
-
15
-
16
-
17
-
18
-
19
-
20
-
 21
21 -
 22
22 -
 23
23 -
 24
24 -
 25
25 -
 26
26 -
 27
27 -
 28
28 -
 29
29 -
 30
30 -
 31
31 -
32
-
33
-
34
-
35
-
36
-
37
-
38
-
39
-
40
-
41
-
42
-
43
-
44
-
45
-
46
-
47
-
48
-
49
-
50
-
51
-
52
-
53
-
54
-
55
-
56
-
57
-
58
-
59
-
60
-
61
-
62
-
63
-
64
-
65
-
66
-
67
-
68
-
69
-
70
-
71
-
72
-
73
 |
 |
