Olympus D-490 D-490 Zoom Instruction Manual (2.6 MB) - Page 30
Points to Remember - how to use zoom
 |
UPC - 050332130517
View all Olympus D-490 manuals
Add to My Manuals
Save this manual to your list of manuals |
Page 30 highlights
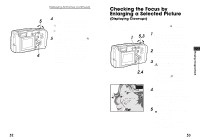
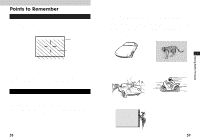
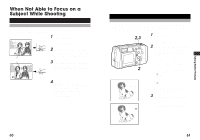
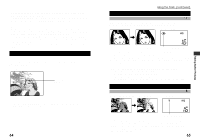
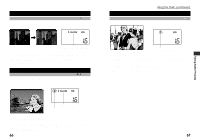
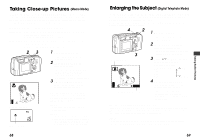
Chapter 4 Taking Better Pictures Points to Remember Viewfinder Discrepancies Depending on Distance The image as seen through the viewfinder does not always match up with the final picture depending on the distance between the subject and the camera. Viewfinder Picture frame Close-up working range When shooting subjects 59 inches to ∞, the viewfinder picture frame shows the area that can be shot. However, the picture area will move lower in the viewfinder as you get closer to the subject. Zooming in (pulling the zoom lever towards T) makes this discrepancy even larger. When shooting close-ups, you can determine the exact picture area by viewing the monitor. However, it is more difficult to hold the camera steady using the monitor, which may result in blurry images. The batteries will also drain more quickly. Subjects Difficult to Get in Focus In most cases you need not worry about focusing a shot, as the autofocus feature takes care of most situations. However, focusing is more difficult under conditions 1 to 3 listed on the next page. In such cases, the green lamp next to the viewfinder will blink to indicate the shot is out of focus. Additionally, in conditions 4 and 5, a picture may still be out of focus even though the green lamp lights up to indicate that the subject is focused correctly. In these situations, first focus your camera on an object that is the same distance from the camera as your subject, then aim back at the subject to take the picture (focus lock: p.60). Alternatively, set the focus on 8ft or ∞ (quick focus: p.61) before taking the shot. When setting up shots that do not contain vertical lines like as shown in 3, first hold the camera vertically and lock the focus on the subject. Then shift the camera back to the horizontal position and take the picture. 1 Subjects with low contrast 4 Subjects of varying distances 4 2 Subjects that appear 5 Fast-moving subjects excessively bright in the center Taking Better Pictures 3 Subjects with no vertical lines 58 59
-
 1
1 -
2
-
3
-
4
-
5
-
6
-
7
-
8
-
9
-
10
-
11
-
12
-
13
-
14
-
15
-
16
-
17
-
18
-
19
-
20
-
21
-
22
-
23
-
24
-
 25
25 -
 26
26 -
 27
27 -
 28
28 -
 29
29 -
 30
30 -
 31
31 -
 32
32 -
 33
33 -
 34
34 -
 35
35 -
36
-
37
-
38
-
39
-
40
-
41
-
42
-
43
-
44
-
45
-
46
-
47
-
48
-
49
-
50
-
51
-
52
-
53
-
54
-
55
-
56
-
57
-
58
-
59
-
60
-
61
-
62
-
63
-
64
-
65
-
66
-
67
-
68
-
69
-
70
-
71
-
72
-
73
 |
 |
