Olympus E-PL2 E-PL2 Instruction Manual (English) - Page 21
Using the menus
 |
View all Olympus E-PL2 manuals
Add to My Manuals
Save this manual to your list of manuals |
Page 21 highlights
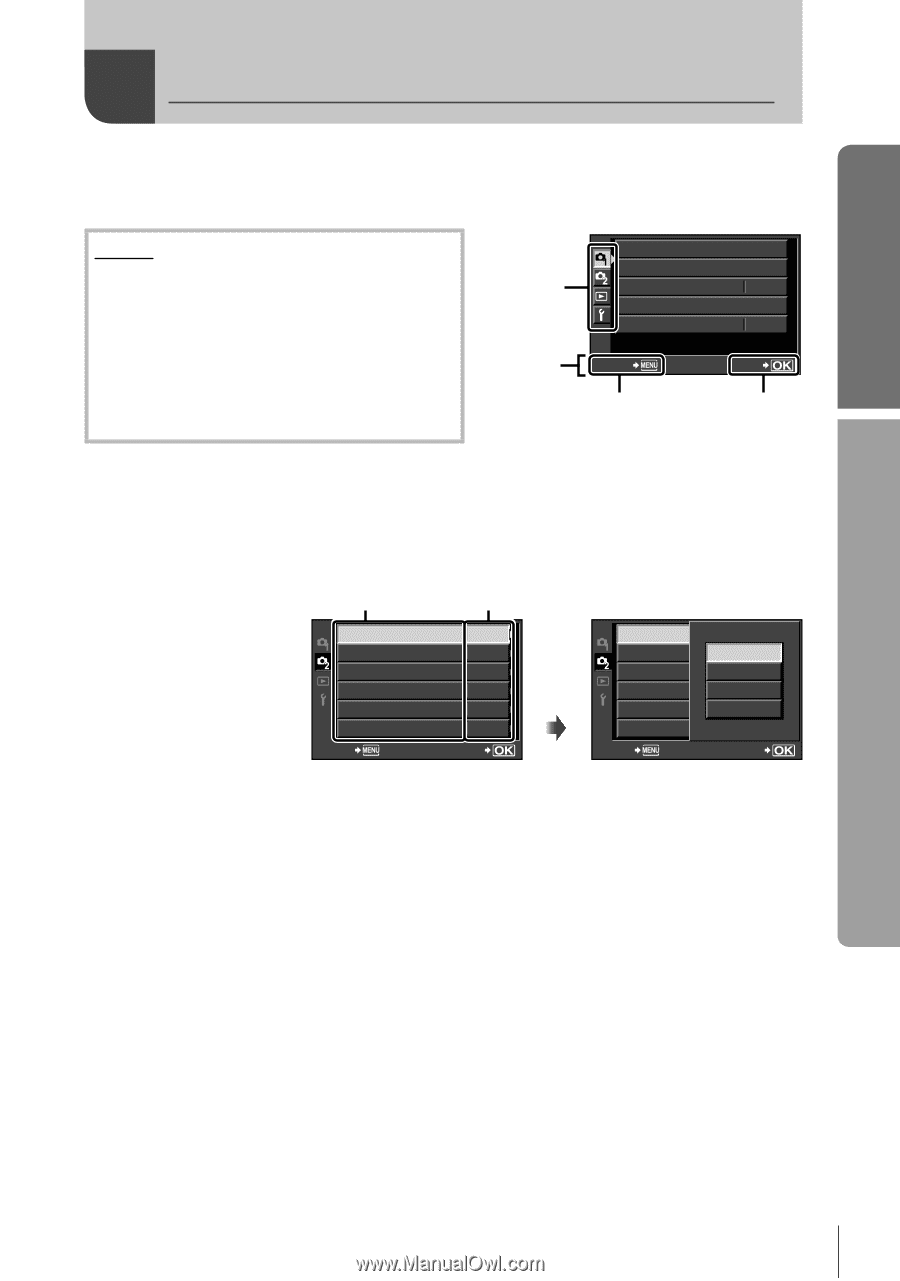
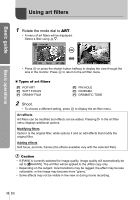
Using the menus Basic guide Basic operations 1 Press the MENU button to display the menus. Menus W Preliminary and basic shooting options X Advanced shooting options q Playback and retouch options c Custom menu* # Accessory port menu* d Camera setup (e.g., date and language) * Not displayed at default settings. Tab Operation guide CARD SETUP RESET/MYSET PICTURE MODE j K IMAGE ASPECT 4:3 BACK SET Press the MENU button to go back one screen Press the Q button to confirm the setting 2 Use FG to select a tab and press Q. 3 Select an item using FG and press Q to display options for the selected item. Function The current setting is displayed j/ Y o IMAGE STABILIZER OFF BRACKETING MULTIPLE EXPOSURE OFF w 0.0 # RC MODE OFF BACK SET Q j/ Y j/ Yo IMAGE STABILIZER o OFF BRACKETING j MULTIPLE EXPOSUREW OFF w Y 0.0 # RC MODE OFF BACK SET 4 Use FG to highlight an option and press Q to select. • Press the MENU button repeatedly to exit the menu. $ Notes • For details on the functions that can be set with the menu, refer to "Menu directory" (P. 108). % Tips • Camera settings can be customized to your shooting style: Use the custom menus to customize camera settings to your own goals or taste. Custom menus are not displayed by default, and you will need to display the menus before proceeding. g "Custom menu" (P. 78) • Using accessory port devices: Settings for the EVF and OLYMPUS PENPAL accessories are accessed from the accessory port menu. This menu is not displayed by default, and you will need to display it before proceeding. g "Accessory port menu options" (P. 90) EN 21
-
 1
1 -
2
-
3
-
4
-
5
-
6
-
7
-
8
-
9
-
10
-
11
-
12
-
13
-
14
-
15
-
 16
16 -
 17
17 -
 18
18 -
 19
19 -
 20
20 -
 21
21 -
 22
22 -
 23
23 -
 24
24 -
 25
25 -
 26
26 -
27
-
28
-
29
-
30
-
31
-
32
-
33
-
34
-
35
-
36
-
37
-
38
-
39
-
40
-
41
-
42
-
43
-
44
-
45
-
46
-
47
-
48
-
49
-
50
-
51
-
52
-
53
-
54
-
55
-
56
-
57
-
58
-
59
-
60
-
61
-
62
-
63
-
64
-
65
-
66
-
67
-
68
-
69
-
70
-
71
-
72
-
73
-
74
-
75
-
76
-
77
-
78
-
79
-
80
-
81
-
82
-
83
-
84
-
85
-
86
-
87
-
88
-
89
-
90
-
91
-
92
-
93
-
94
-
95
-
96
-
97
-
98
-
99
-
100
-
101
-
102
-
103
-
104
-
105
-
106
-
107
-
108
-
109
-
110
-
111
-
112
-
113
-
114
-
115
-
116
-
117
-
118
-
119
-
120
-
121
-
122
-
123
-
124
 |
 |