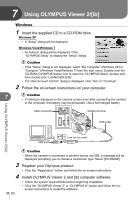
Olympus E-PL2 E-PL2 Instruction Manual (English) - Page 65
Image overlay, Audio recording, select [IMAGE OVERLAY].
 |
View all Olympus E-PL2 manuals
Add to My Manuals
Save this manual to your list of manuals |
Page 65 highlights
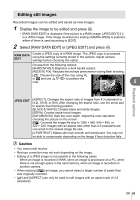
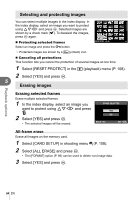
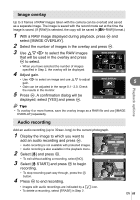
Image overlay Up to 3 frames of RAW images taken with the camera can be overlaid and saved as a separate image. The image is saved with the record mode set at the time the image is saved. (If [RAW] is selected, the copy will be saved in [YN+RAW] format.) 1 With a RAW image displayed during playback, press Q and select [IMAGE OVERLAY]. 2 Select the number of images in the overlay and press Q. 3 Use FGHI to select the RAW images that will be used in the overlay and press Q to select. • When you have selected the number of images specified in Step 2, the overlay will be displayed. 4 Adjust gain. IMAGE OVERLAY RAW RAW RAW RAW RAW BACK RAW RAW SET • Use HI to select an image and use FG to adjust gain. IMAGE OVERLAY 5 • Gain can be adjusted in the range 0.1 - 2.0. Check the results in the monitor. 5 Press Q. A confirmation dialog will be displayed; select [YES] and press Q. x0.3 x0.3 x0.1 BACK SET % Tips • To overlay 4 or more frames, save the overlay image as a RAW file and use [IMAGE OVERLAY] repeatedly. Playback options Audio recording Add an audio recording (up to 30 sec. long) to the current photograph. 1 Display the image to which you want to add an audio recording and press Q. • Audio recording is not available with protected images. • Audio recording is also available in the playback menu. 2 Select [R] and press Q. BACK JPEG JPEG EDIT R ROTATE m < SET • To exit without adding a recording, select [NO]. 3 Select [R START] and press Q to begin recording. • To stop recording part-way through, press the Q button. 4 Press Q to end recording. BACK R NO R START ERASE SET • Images with audio recordings are indicated by a H icon. • To delete a recording, select [ERASE] in Step 2. EN 65
-
 1
1 -
2
-
3
-
4
-
5
-
6
-
7
-
8
-
9
-
10
-
11
-
12
-
13
-
14
-
15
-
16
-
17
-
18
-
19
-
20
-
21
-
22
-
23
-
24
-
25
-
26
-
27
-
28
-
29
-
30
-
31
-
32
-
33
-
34
-
35
-
36
-
37
-
38
-
39
-
40
-
41
-
42
-
43
-
44
-
45
-
46
-
47
-
48
-
49
-
50
-
51
-
52
-
53
-
54
-
55
-
56
-
57
-
58
-
59
-
 60
60 -
 61
61 -
 62
62 -
 63
63 -
 64
64 -
 65
65 -
 66
66 -
 67
67 -
 68
68 -
 69
69 -
 70
70 -
71
-
72
-
73
-
74
-
75
-
76
-
77
-
78
-
79
-
80
-
81
-
82
-
83
-
84
-
85
-
86
-
87
-
88
-
89
-
90
-
91
-
92
-
93
-
94
-
95
-
96
-
97
-
98
-
99
-
100
-
101
-
102
-
103
-
104
-
105
-
106
-
107
-
108
-
109
-
110
-
111
-
112
-
113
-
114
-
115
-
116
-
117
-
118
-
119
-
120
-
121
-
122
-
123
-
124
 |
 |
