Olympus FE 140 FE-140 Advanced Manual (English) - Page 37
Select [PRINT], and press, In the [PRINT MODE SELECT] screen, press the, button.
 |
UPC - 050332157910
View all Olympus FE 140 manuals
Add to My Manuals
Save this manual to your list of manuals |
Page 37 highlights
Printing pictures Setting the number of prints and data to be printed PRINT INFO < DATE FILE NAME P BACK MENU 1 WITHOUT WITHOUT SET OK
-
 1
1 -
2
-
3
-
4
-
5
-
6
-
7
-
8
-
9
-
10
-
11
-
12
-
13
-
14
-
15
-
16
-
17
-
18
-
19
-
20
-
21
-
22
-
23
-
24
-
25
-
26
-
27
-
28
-
29
-
30
-
31
-
 32
32 -
 33
33 -
 34
34 -
 35
35 -
 36
36 -
 37
37 -
 38
38 -
 39
39 -
 40
40 -
 41
41 -
 42
42 -
43
-
44
-
45
-
46
-
47
-
48
-
49
-
50
-
51
-
52
-
53
-
54
-
55
-
56
-
57
-
58
-
59
-
60
-
61
-
62
-
63
-
64
-
65
-
66
-
67
-
68
-
69
-
70
-
71
-
72
-
73
-
74
-
75
-
76
-
77
-
78
-
79
-
80
 |
 |

37
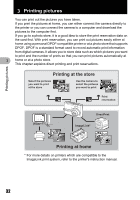
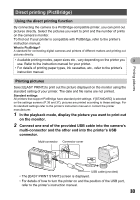
Printing pictures
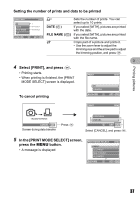
3
4
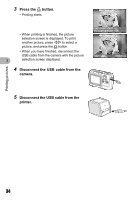
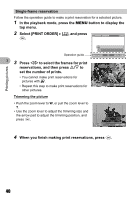
Select [PRINT], and press
F
.
• Printing starts.
• When printing is finished, the [PRINT
MODE SELECT] screen is displayed.
To cancel printing
5
In the [PRINT MODE SELECT] screen,
press the
MENU
button.
• A message is displayed.
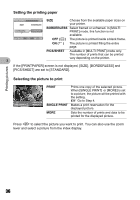
Setting the number of prints and data to be printed
PRINT INFO
P
FILE NAME
DATE
<
1
WITHOUT
WITHOUT
OK
SET
BACK
MENU
<
×
Sets the number of prints. You can
select up to 10 prints.
DATE (
)
If you select [WITH], pictures are printed
with the date.
FILE NAME (
)
If you select [WITH], pictures are printed
with the file name.
P
Crops part of a picture and prints it.
•
Use the zoom lever to adjust the
trimming size and the arrow pad to adjust
the trimming position, and press
F
.
PRINT
OK
CANCEL
OK
SET
BACK
MENU
OK
CANCEL
TRANSFERRING
PRINT
CONTINUE
CANCEL
OK
SET
Screen during data transfer
Press
F
Select [CANCEL], and press
F
.
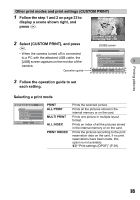
ALL INDEX
MULTI PRINT
ALL PRINT
PRINT
PRINT MODE SELECT
OK
SET
MENU
EXIT