Optoma WU1500 User manual - Page 35
Reset to Default, About Color Matching, Meter Adjustment, Enter the target values for x
 |
View all Optoma WU1500 manuals
Add to My Manuals
Save this manual to your list of manuals |
Page 35 highlights
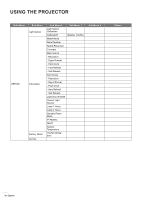
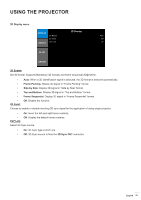
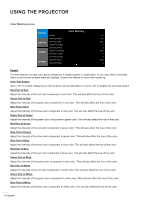
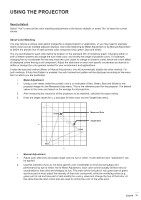
USING THE PROJECTOR Reset to Default Select "Yes" to reset all the color matching adjustments to the factory defaults or select "No" to keep the current values. About Color Matching You may require a unique color gamut (range) for a single projector or application, or you may need to precisely match colors across multiple adjacent displays. Use Color Matching by Meter Adjustment or by Manual Adjustment to define the precise hue of each primary color component (red, green, blue and white). The x/y coordinates for each color define its location on the standard CIE chromaticity graph. Changing either or both of these numbers will change the hue of the color, and modify the range of possible colors. For example, changing the x/y coordinates for red may move the color closer to orange or closer to violet, which will in turn affect all displayed colors having a red component. Adjust the slide bars or enter new specific coordinates as desired to define or change the color gamuts needed for your environment and applications. Enable the selected method (Meter or Manual Adjustment)- this will automatically disable the other method. For both methods, if Auto Test Pattern is enabled, the solid colored test pattern will be displayed according to the menu item on which you are positioned. ‡‡ Meter Adjustment 1. Using a color meter, enter the current x and y co-ordinates of Red, Green, Blue and White for the projector image into the Measured Data menu. This is the reference point for the projector. The default values in the menu are based on the average for all projectors. 2. After measuring the values for all the projectors to be matched, calculate the target values. 3. Enter the target values for x, y and gain for each color into the Target Data menu. Green Measured Data Target Data Red y Blue x ‡‡ Manual Adjustment 1. Adjust color slide bars and judge image color by eye or meter. A user-defined color "adjustment" can be applied. 2. Use this submenu if you do not have specific color coordinates in mind and will judge color performance by eye or meter. As for Meter Adjustment, each color control actually defines new x/y coordinates for that color and changes its hue. The main colors (red part of red, green part of green and blue part of blue) adjust the intensity of that color component, while the modifying colors (e.g. green part of red and blue part of red) modify the x and y value and change the hue of that color. At the same time the main colors also are used to control the color of the white point. English 35
-
 1
1 -
2
-
3
-
4
-
5
-
6
-
7
-
8
-
9
-
10
-
11
-
12
-
13
-
14
-
15
-
16
-
17
-
18
-
19
-
20
-
21
-
22
-
23
-
24
-
25
-
26
-
27
-
28
-
29
-
 30
30 -
 31
31 -
 32
32 -
 33
33 -
 34
34 -
 35
35 -
 36
36 -
 37
37 -
 38
38 -
 39
39 -
 40
40 -
41
-
42
-
43
-
44
-
45
-
46
-
47
-
48
-
49
-
50
-
51
-
52
-
53
-
54
-
55
-
56
-
57
-
58
-
59
-
60
-
61
-
62
-
63
-
64
-
65
-
66
-
67
-
68
-
69
-
70
-
71
-
72
-
73
-
74
-
75
-
76
-
77
 |
 |
