Panasonic AW-HE42 Operating Instructions - Page 22
Wireless remote controller (optional accessory), GAIN buttons [OFF] [LOW] [HI] [AUTO]
 |
View all Panasonic AW-HE42 manuals
Add to My Manuals
Save this manual to your list of manuals |
Page 22 highlights
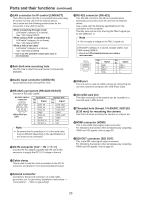
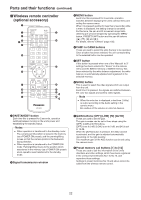
Parts and their functions (continued) ■■Wireless remote controller (optional accessory) cMENU button Each time this is pressed for 2 seconds, operation switches between displaying the unit's camera menu and exiting the camera menu. When it is pressed quickly (for less than 2 seconds) while a menu is displayed, the setting change is canceled. Furthermore, the pan and tilt movement range limits (limiters) are set and released by operating the MENU button, PRESET/LIMIT button and the pan‑tilt buttons and [►]). For details, refer to "Limiters" (page 135). dCAM1 to CAM4 buttons These are used to select the units that are to be operated. Once a button has been selected, the unit corresponding to the selected button can be operated. eSET button If this button is pressed when one of the "Manual1 to 3" settings has been selected for "Scene" on the camera menu and the AWB A memory or AWB B memory has been selected by the white balance adjustment, the white balance is automatically adjusted and registered in the selected memory. fMODE button This is used to select the video signals which are output from the unit. Each time it is pressed, the signals are switched between the color bar signals and camera video signals. Note ●● When the color bar is displayed, a test tone (1 kHz) is output according to the Audio setting in the camera menu. Be cautious of the volume on external devices. aON/STANDBY button Each time this is pressed for 2 seconds, operation switches between turning on the unit's power and establishing the standby status. Notes ●● When operation is transferred to the standby mode: The current pan-tilt position is stored in the memory (as a POWER ON preset), and the panning/tilting moves so that the camera points in the backwardfacing direction. ●● When operation is transferred to the POWER ON mode: Panning/tilting moves to the position which was stored in the memory (as a POWER ON preset) when operation was transferred to the standby mode. bSignal transmission window gGAIN buttons [OFF] [LOW] [HI] [AUTO] These are used to set the gain. The gain increase can be set in three steps using the [OFF], [LOW] and [HI] buttons. [OFF] is set to 0 dB, [LOW] is set to 9 dB, and [HI] is set to 18 dB. When the [AUTO] button is pressed, the AGC function is activated, and the gain is adjusted automatically depending on the light quantity. The maximum gain of the AGC function can be set using the camera menu. hPreset memory call buttons [1] to [12] These are used to call the information on the unit's directions and other settings, which have been registered in the unit's preset memories No.1 to No.12, and reproduce those settings. Settings in preset memories No.13 and above cannot be called from the wireless remote control. 22
-
 1
1 -
2
-
3
-
4
-
5
-
6
-
7
-
8
-
9
-
10
-
11
-
12
-
13
-
14
-
15
-
16
-
 17
17 -
 18
18 -
 19
19 -
 20
20 -
 21
21 -
 22
22 -
 23
23 -
 24
24 -
 25
25 -
 26
26 -
 27
27 -
28
-
29
-
30
-
31
-
32
-
33
-
34
-
35
-
36
-
37
-
38
-
39
-
40
-
41
-
42
-
43
-
44
-
45
-
46
-
47
-
48
-
49
-
50
-
51
-
52
-
53
-
54
-
55
-
56
-
57
-
58
-
59
-
60
-
61
-
62
-
63
-
64
-
65
-
66
-
67
-
68
-
69
-
70
-
71
-
72
-
73
-
74
-
75
-
76
-
77
-
78
-
79
-
80
-
81
-
82
-
83
-
84
-
85
-
86
-
87
-
88
-
89
-
90
-
91
-
92
-
93
-
94
-
95
-
96
-
97
-
98
-
99
-
100
-
101
-
102
-
103
-
104
-
105
-
106
-
107
-
108
-
109
-
110
-
111
-
112
-
113
-
114
-
115
-
116
-
117
-
118
-
119
-
120
-
121
-
122
-
123
-
124
-
125
-
126
-
127
-
128
-
129
-
130
-
131
-
132
-
133
-
134
-
135
-
136
-
137
-
138
-
139
-
140
-
141
-
142
-
143
-
144
-
145
-
146
-
147
-
148
-
149
-
150
-
151
-
152
-
153
-
154
-
155
-
156
-
157
-
158
-
159
-
160
 |
 |
