Panasonic AW-UE4 Advanced Operating Instructions
Panasonic AW-UE4 Manual
 |
View all Panasonic AW-UE4 manuals
Add to My Manuals
Save this manual to your list of manuals |
Panasonic AW-UE4 manual content summary:
- Panasonic AW-UE4 | Advanced Operating Instructions - Page 1
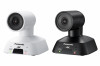
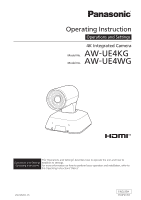
Operations and Settings 4K Integrated Camera Model No. AW-UE4KG Model No. AW-UE4WG This "Operations and Settings" describes how to operate the unit and how to Operations and Settings establish its settings. Operating Instructions For more information on how to perform basic operation and - Panasonic AW-UE4 | Advanced Operating Instructions - Page 2
software provided with this unit are expressly prohibited. Abbreviations For the purposes of this manual, the model numbers of the units are given as listed in the table below. Model number of unit Model number given in manual AW-UE4KG, AW-UE4WG AW-UE4KGN, AW-UE4WGN AW-UE4 AW-HS50N, AW-HS50E - Panasonic AW-UE4 | Advanced Operating Instructions - Page 3
Disclaimer of Warranty IN NO EVENT SHALL Panasonic Corporation BE LIABLE TO ANY PARTY OR ANY IMAGES ARE NOT DISPLAYED, DUE TO ANY REASON OR CAUSE INCLUDING ANY FAILURE OR PROBLEM OF THE PRODUCT; 5. ANY PROBLEM, CONSEQUENTIAL INCONVENIENCE, OR LOSS OR DAMAGE, ARISING OUT OF THE SYSTEM COMBINED BY - Panasonic AW-UE4 | Advanced Operating Instructions - Page 4
Precautions...12 Names and Functions of Parts ...14 Tilting the Camera Up and Down...15 Panning the Camera Right and Left ...15 Wireless Remote Control(optional accessory 16 Network Settings ...18 Use the Easy IP setup Software ...18 Setting the Initial Account ...20 Basic Shooting Operation...21 - Panasonic AW-UE4 | Advanced Operating Instructions - Page 5
or Zoom Speed 28 What to do when Encountering Problems in the Basic Shooting Operations 29 Advanced Operations ...30 operations using the wireless remote control 33 Menu Items ...35 Main Menu Screen ...35 Camera Menu...35 Scene ...36 Picture Level ...37 AGC Max Gain...37 Slow Shutter ...37 - Panasonic AW-UE4 | Advanced Operating Instructions - Page 6
System Menu ...40 Priority Mode...40 Frequency...41 Format ...42 Install Position...42 Mirror ...43 Digital Zoom...43 Tally ...43 IR ID ...43 OSD of with Tally...44 OSD Status ...44 Color Bar ...44 Mic ...44 Maintenance Menu ...45 Language...45 FW Version ...45 IP Address ...45 Subnet Mask...46 - Panasonic AW-UE4 | Advanced Operating Instructions - Page 7
...68 RTMP Setting...70 Maintenance Settings ...71 Language...71 Product Info...72 Upgrading the firmware (Firmware file 73 Default Reset ...74 Web Camera Functions...75 Controllable functions ...75 Troubleshooting...76 Operation ...76 Video ...77 IP images...78 USB ...78 Specification ...79 Index - Panasonic AW-UE4 | Advanced Operating Instructions - Page 8
for the web browser to work and cause other kinds of problems. [Note] Depending on the software version of the unit, an update may be necessary. For the latest information on compatible operating systems, and web browsers, visit the support site at the website: https://pro-av.panasonic.net/ 8 - Panasonic AW-UE4 | Advanced Operating Instructions - Page 9
the users, for example, to prevent setting information stored on the unit from leaking over the network. Do not install the camera in locations where the camera or the cables can be destroyed or damaged by persons with malicious intent. Avoid connections that use public lines. [Note] Notes - Panasonic AW-UE4 | Advanced Operating Instructions - Page 10
PoE power supply and RTMP / RTSP support, the affinity with the remote camera series is further enhanced. USB camera It is also possible to use USB camera with easy connection one USB cable by USB power supply from PC. 1/2.5" MOS sensor and ultra-wide angle 111 ° fixed focus lens With the - Panasonic AW-UE4 | Advanced Operating Instructions - Page 11
wire M4 screw 10 mm length (4 screws) Mount kit L-Mount kit M4 screw 5 mm length(4 screws) Optional Accessories Wireless remote control AW-RM50G (Size "AA" dry battery x 2, obtained separately) Direct ceiling mount bracket WV-Q105A" [Note] For details on optional accessories, refer to - Panasonic AW-UE4 | Advanced Operating Instructions - Page 12
service angle or manual settings as required. When using the ATW (auto tracking white adjustment) function under fluorescent lights, the white balance may vary. Concerning the IP address setting Do not run the Easy IP Setup Software on a multiple number of personal computers for a single camera - Panasonic AW-UE4 | Advanced Operating Instructions - Page 13
has reached the end of its service life and is to be disposed contact with water. Otherwise, problems may occur. Use software: (1) the software developed independently by or for Panasonic Corporation, (2) the software owned by third party and licensed to Panasonic Corporation, (3) the software - Panasonic AW-UE4 | Advanced Operating Instructions - Page 14
1 2 7 3 3 11 4 5 6 8 9 10 1. Lens 2. Camera head 3. Internal microphone 4. Power status indicator - Orange light: Standby mode - Green with a different remote control ID - Flash red light: Firmware updating - Red light: Firmware update failure or other abnormal. 5. Tally status indicator 6. - Panasonic AW-UE4 | Advanced Operating Instructions - Page 15
be tilted approximately 25 °up or down. After adjusting the position of the camera, firmly tighten the screw to fix the camera in position. Panning the Camera Right and Left When the horizontal fixing screw B is loosened, the camera can be pan 110 ° in the horizontal right or left. After adjusting - Panasonic AW-UE4 | Advanced Operating Instructions - Page 16
can operate the unit with the optional wireless remote control (AW-RM50G). Consult your dealer concerning the purchase of a wireless press the button, the signal switches between the color bar signal output and the camera image output. 6 1 to 12 buttons These are used to call the information - Panasonic AW-UE4 | Advanced Operating Instructions - Page 17
These are used to adjust the digital zoom. The zoom is adjusted in the wide-angle using the [W] button and in the 6 telephoto using the [T] button 13 FAST the below. The signal sensing distance is reduced if the angle at which the wireless remote control signals are sensed is increased. The - Panasonic AW-UE4 | Advanced Operating Instructions - Page 18
it from the following website. https://pro-av.panasonic.net/ To establish the settings for a multiple number of units, the settings must be selected for each camera involved. If the settings cannot be established using the Easy IP Setup Software, select the settings separately for the unit and - Panasonic AW-UE4 | Advanced Operating Instructions - Page 19
4. Input the network items, and click the [Save] button. [Note] When a DHCP server is being used, [DNS] of the Easy IP Setup Software can be set to [Auto]. After the [Save] button is clicked, it takes about 1 minute for the settings in the unit to be completed. If - Panasonic AW-UE4 | Advanced Operating Instructions - Page 20
Setting the Initial Account 1. Set the initial account. In the initial state, the initial account setting screen is displayed when the web screen is displayed. Set a user name and password. [Note] The usable symbols for user name is following Do not set character strings that can be easily - Panasonic AW-UE4 | Advanced Operating Instructions - Page 21
still be selected from the wireless remote control. 4. Select the scene (shooting) mode. Select one of the three (Full Auto, Shutter Priority, and Manual) scene modes, each of which corresponds to a set of circumstances in which the subject will be shot. Select the mode that satisfies the shooting - Panasonic AW-UE4 | Advanced Operating Instructions - Page 22
ID has been received, and it blinks orange when a signal that is not matched by the remote control ID has been received. Power off the Camera Unit When performing the operations using the wireless remote control 1. Press one of the [CAM1] to [CAM4] buttons on the wireless remote control to select - Panasonic AW-UE4 | Advanced Operating Instructions - Page 23
images on the Live screen. To display H.264/H.265 images, use an external device or external software that supports H.264/H.265 images. USB(4K): Enables the unit to be used as a 4K Web camera. The camera can also be controlled from a personal computer. When the unit is used as a 4K-compatible Web - Panasonic AW-UE4 | Advanced Operating Instructions - Page 24
Power Supply Priority Mode HDMI [50 Hz] 1080/25p [59.94 Hz] PoE IP 1080/29.97p [60 Hz] 1080/30p USB (4K) - USB (PC Power) Standard - USB (AC adapter) 5 V/1 A or more HDMI (4K) [50 Hz] 2160/25p [59.94 Hz] 2160/29.97p [60 Hz] 2160/30p IP(4K) - Output terminal USB - LAN RTSP/RTMP - Panasonic AW-UE4 | Advanced Operating Instructions - Page 25
Power Supply Priority Mode HDMI USB [50Hz] 1080/25p (AC adapter) [59.94Hz] IP 5 V/1 A or 1080/29.97p more [60Hz] 1080/30p USB - Output terminal LAN RTSP/RTMP Web(HTTP) H264 or H.265: [50Hz] 1080/50 fps、25 fps、10 fps、 5 fps 720/50 fps、25 fps、10 fps、 5 fps 360/50 fps、25 fps、10 fps、 - Panasonic AW-UE4 | Advanced Operating Instructions - Page 26
Press the [CAM1], [CAM2], [CAM3] or [CAM4] button. The camera unit's status indicator LED blinks green when a signal matched by the remote picture level, AGC MaxGain, shutter speed, Chroma level, and white balance. Manual User can adjust the shutter speed, Gain, Chroma level, and white balance. - Panasonic AW-UE4 | Advanced Operating Instructions - Page 27
4 Press the [ ] button. The "CAMERA" sub-menu is displayed on the monitor. 5 Press the [▲] or [▼] button to bring the highlight to "Scene". 6 Press the [ ] button. 7 Press the [▲] or [▼] button to select the scene mode (Full Auto, Shutter priority, or Manual) and press the [ ] button to confirm the - Panasonic AW-UE4 | Advanced Operating Instructions - Page 28
diagonally: Press the [▲] or [▼] button and [◄] or [►] button at the same time. Returning the camera to the reference position: Press the [HOME] button for 2 seconds. Zoom In/Out Function Zooming in (the subject becomes magnified in size): Press the [T] button - Panasonic AW-UE4 | Advanced Operating Instructions - Page 29
when Encountering Problems in the Basic Shooting Operations If the trouble is not resolved by taking the action suggested below, refer to "Troubleshooting" section. that the unit's power is not on. - Refer to "Power on the Camera Unit" section. - If the unit's status display lamp does not blink even - Panasonic AW-UE4 | Advanced Operating Instructions - Page 30
preset can be performed while the recalling of a preset can be performed while manual operations, such as pan, tilt, zoom. Nothing will occur if a preset the monitor. Operate the pan, tilt or zoom buttons to determine the camera view. 2 While holding down the [PRESET] button, press the button - Panasonic AW-UE4 | Advanced Operating Instructions - Page 31
a new setting is entered, the previous setting will be erased. [Note] When scene mode (Scene) on the camera unit is set to "Full Auto", the white balance cannot be manually adjusted (ATW mode is activated). For details, refer to "Selecting the Scene Mode" section. Automatic Adjustment (AWB: AWB - Panasonic AW-UE4 | Advanced Operating Instructions - Page 32
white balance setting is entered. [Note] The white balance cannot be adjusted when color bars are displayed. Press the [MODE] button to switch to the camera picture. White balance may not be correctly set if the lighting of the object is too weak. Since the unit has a built-in memory, the - Panasonic AW-UE4 | Advanced Operating Instructions - Page 33
are displayed on the monitor when the unit's settings are to be selected. The monitor is connected to the video signal output connector. The basic camera menu operations involve displaying sub-menus from the main menu items, and selecting settings on the sub-menus. Some sub-menus have menu items for - Panasonic AW-UE4 | Advanced Operating Instructions - Page 34
6. Press the [ ] button. The value of the item to be selected or comfirmed. 7. Press the [▲] or [▼] button to change the setting. The setting can be changed in the same way using the [◄] and [►] buttons. 8. Press the [ ] button. The value of the item to be set is entered, and it has a mark sing - Panasonic AW-UE4 | Advanced Operating Instructions - Page 35
is connected to the video signal output connector. The basic camera menu operations involve displaying sub-menus from the Top Menu firmware versions, checking the IP address and initialize the settings. [Note] The main Menu does not have a "Return" setting. Camera Menu This menu is for the camera - Panasonic AW-UE4 | Advanced Operating Instructions - Page 36
are three scene modes - Full Auto, Shutter priority, and Manual. Full Auto: In this mode, the optimum settings and Level, AGC MaxGain, Shutter Speed, Chroma Level, and White Balance Mode. Manual: In this mode, user can adjust the value of Shutter Speed, Gain, Chroma Level, and White Balance - Panasonic AW-UE4 | Advanced Operating Instructions - Page 37
Picture Level Adjust the brightness level (0, 1, 2, 3, 4, -1, -2, -3, -4). AGC Max Gain Set up the maximum gain-up amount value. Slow Shutter Set slow shutter function to "On" or "Off". This can only be configured when "Scene" is set to "Full Auto". Shutter Speed Adjust the shutter speed. When a - Panasonic AW-UE4 | Advanced Operating Instructions - Page 38
Gain In locations which are too dark, adjust the gain upward; conversely, in locations which are too bright, adjust it downward. When "Full Auto" mode is set, the light quantity is adjusted automatically. The noise increases when the gain is increased. Chroma Level Set the color intensity (Chroma - Panasonic AW-UE4 | Advanced Operating Instructions - Page 39
Contrast Adjust the contrast level (0, 1, 2, 3, 4) of the image. DRS Set here is the DRS function which provides just the right amount of compensation when images with significant light/dark differences are displayed. Depending on the shooting conditions, however, the picture quality may drop with - Panasonic AW-UE4 | Advanced Operating Instructions - Page 40
camera can also be controlled from a personal computer. IP: Enables IP image transmission. The IP transmission of H.264/H.265 images is also supported. This unit cannot display H.264/H.265 format images on the Live screen. To display H.264/H.265 images, use an external device or external software - Panasonic AW-UE4 | Advanced Operating Instructions - Page 41
Frequency Set the frame frequency - 50Hz, 59.94Hz, or 60Hz. When the frequency is switched, "Format" is set as following: Frequency Format 50Hz 2160/25p 1080/50p 1080/25p 720/50p 59.94Hz 2160/29.97p 1080/59.94p 1080/29.97p 720/59.94p 60Hz 2160/30p 1080/60p 1080/30p 720/60p When changing the - Panasonic AW-UE4 | Advanced Operating Instructions - Page 42
Format Change the image format. The image format can different by the frequency. Frequency Format 50Hz 2160/25p 1080/50p 1080/25p 720/50p 59.94Hz 2160/29.97p 1080/59.94p 1080/29.97p 720/59.94p 60Hz 2160/30p 1080/60p 1080/30p 720/60p When changing the format, select "OK" to confirm the changing. - Panasonic AW-UE4 | Advanced Operating Instructions - Page 43
Mirror Set the mirror the image to On or Off. Digital Zoom Set the digital zoom to "On" or "Off". Picture quality degrades as zoom increases with digital zoom. Tally "Enable" or "Disable" is set here for the function which turns on or turns off the tally lamp using the tally control signal. IR ID - Panasonic AW-UE4 | Advanced Operating Instructions - Page 44
or contacts. When the red tally signal releases, the menu display will return OSD Status Error display when an error occurs Color Bar Switch between camera images and color bars. Color Bar [Note] Only HDMI can output color bar. IP and USB cannot output color bar. Mic Turn audio input off - Panasonic AW-UE4 | Advanced Operating Instructions - Page 45
Maintenance Menu Language The system supports three language - English, Japanese, and Simple Chinese. FW Version Display the current firmware version of the unit. IP Address Display the IP address of the unit. 45 - Panasonic AW-UE4 | Advanced Operating Instructions - Page 46
Subnet Mask Display the subnet mask of the unit. Default Gateway Display the default gateway which has been set for the unit. MAC Address Display the MAC address of the unit. Initialize Reset the unit back to the factory default. 46 - Panasonic AW-UE4 | Advanced Operating Instructions - Page 47
Menu Table Main menu CAMERA SYSTEM Sub menu Scene Brightness Picture Position Mirror Digital Zoom Tally IR ID OSD off with Tally OSD Status Color Bar Mic Value Full Auto, Shutter Priority, Manual --4, -3, -2, -1, 0, 1, 2, 3, 4 24dB, 30dB, 36dB, 42dB Off, On [50Hz] 1/1, 1/2, 1/5, 1/10, 1/20, - Panasonic AW-UE4 | Advanced Operating Instructions - Page 48
Main menu MAINTENANCE Sub menu Language FW Version IP Network IP Address Subnet Mask Default Gateway MAC Address Initialize Value English, Japanese, Simplified Chinese Version at shipping -192.168.0.10 255.255.255.0 192.168.0.1 MAC Address of the unit Execute Default English - - 48 - Panasonic AW-UE4 | Advanced Operating Instructions - Page 49
Web Screen Start-up With a personal computer connected to the unit, it is possible to view the camera's IP videos or select various settings from the web browser. The LAN crossover cable is used when connecting a personal computer directly to the unit's LAN - Panasonic AW-UE4 | Advanced Operating Instructions - Page 50
Google Chrome 2. Enter the IP address you configured on the Easy IP Setup Software in the address bar of the web browser. IPv4 address entry example If the HTTP port number has been changed from "80", enter "http://:" in the address bar. Example: http://192.168.0. - Panasonic AW-UE4 | Advanced Operating Instructions - Page 51
Switching between Live and Setup Screen When the live screen is displayed, click the [Setup] button. For details on the web setup screen, see "Web Screen Configuration" section. When the web setup screen is displayed, click the [Live] button to switch to live screen. For details on the live screen, - Panasonic AW-UE4 | Advanced Operating Instructions - Page 52
[Setup] to switch to setup screen. Setup for uploading the camera's live view to the broadcasting platform (ex: YouTube). Click [ RTMP, please refer "RTMP setting" section. : Use this to select whether the camera's on- screen displays are to be shown. The items are selected using the buttons. - Panasonic AW-UE4 | Advanced Operating Instructions - Page 53
(magnification) to 1.0x : Use this to adjust the zoom (magnification) in the "Tele" direction. : Use this to adjust the zoom (magnification) in the "Wide" direction. : Select the speed at which zoom operations are to be performed. To adjust the image in the horizontal or vertical direction (panning - Panasonic AW-UE4 | Advanced Operating Instructions - Page 54
Web Screen Configuration Select the Setup Screen In live screen, click the [Setup] button to switch to setup screen. Setup menu Functions settings area Power ON/Standby mode switching 54 - Panasonic AW-UE4 | Advanced Operating Instructions - Page 55
camera can also be controlled from a personal computer. IP: Enables IP image transmission. The IP transmission of H.264/H.265 images is also supported. This unit cannot display H.264/H.265 format images on the Live screen. To display H.264/H.265 images, use an external device or external software - Panasonic AW-UE4 | Advanced Operating Instructions - Page 56
here. Click [Setup] > [Basic] > [Priority Mode] When the [Set] button is clicked, the input name appears in the camera title display area. [Note] The factory default setting is the model number of the unit. You can enter between 0 to 20 characters. The following characters - Panasonic AW-UE4 | Advanced Operating Instructions - Page 57
Image/Audio Settings Video over IP The JPEG image and H.264/H.265 image settings as well as the settings related to image quality are selected in here. Click [Setup] > [Image/Audio] > [Video over IP] [Note] IP control can be performed but if you do not want to perform IP image transmission, set - Panasonic AW-UE4 | Advanced Operating Instructions - Page 58
) Frame rate Set the frame rate for H.264 /H.265 images. 50Hz 59.94Hz/60Hz 5fps, 10fps, 25fps, 50fps* *not support in IP(4K)Priority mode 5fps, 15fps, 30fps, 60fps* *not support in IP(4K) Priority mode Max bit rate (per client) Specify the H.264/H.265 bit rate per client (1024kbps, 1536kbps - Panasonic AW-UE4 | Advanced Operating Instructions - Page 59
Mode. Shutter Priority: In this mode, user can adjust the value of Picture Level, AGC MaxGain, Shutter Speed, Chroma Level, and Whit Balance Mode. Manual: In this mode, user can adjust the value of Shutter Speed, Gain, Chroma Level, and Whit Balance Mode. Each adjustable function will be described - Panasonic AW-UE4 | Advanced Operating Instructions - Page 60
Slow Shutter Set slow shutter function to "Off" or "On". This can only be configured when "Scene" is set to "Full Auto". Shutter Speed Adjust the shutter speed. When a higher shutter speed is selected, fast-moving subjects do not become blurred easily but the images will be darker. Value: 1/1, 1/2, - Panasonic AW-UE4 | Advanced Operating Instructions - Page 61
Detail Adjust the sharpness (0, 1, 2, 3) of the image. Move the scroll bar to adjust the value. The default is 2. Contrast Adjust the Contrast level (0,1,2,3,4). The default is 2. DRS Set here is the DRS function which provides just the right amount of compensation when images with significant light - Panasonic AW-UE4 | Advanced Operating Instructions - Page 62
the zoom (magnification) to 1.0x : Use this to adjust the zoom (magnification) in the "Tele" direction. : Use this to adjust the zoom (magnification) in the "Wide" direction. Select the speed at which zoom operations are to be performed. 62 - Panasonic AW-UE4 | Advanced Operating Instructions - Page 63
System Settings Click [Setup] > [Image/Audio] > [System] Output Click [Set] button to save the configuration Format Change the image format. The image format can different by the frequency. Frequency Format 50Hz 2160/25p 1080/50p 1080/25p 720/50p 59.94Hz 2160/29.97p 1080/59.94p 1080/29.97p 720 - Panasonic AW-UE4 | Advanced Operating Instructions - Page 64
Frequency Set the frame frequency - 50Hz, 59.94Hz, or 60Hz. When the frequency is switched, "Format" is set as following: Frequency Format 50Hz 2160/25p 1080/50p 1080/25p 720/50p 59.94Hz 2160/29.97p 1080/59.94p 1080/29.97p 720/59.94p 60Hz 2160/30p 1080/60p 1080/30p 720/60p Others Click [Set] - Panasonic AW-UE4 | Advanced Operating Instructions - Page 65
Turn the status display during preset operation, or error display when an error occurs. The default is off. Color Bar Switch between camera images and color bars. The default is camera. [Note] Only HDMI can output color bar. IP and USB cannot output color bar. Mic Turn audio input off/on. The - Panasonic AW-UE4 | Advanced Operating Instructions - Page 66
User Mng.(User Management) Click [Setup] > [User Mng.] User auth.( User authentication) Configure the user authentication settings for the personal computers and mobile terminals that can access the unit. Up to 24 users can be registered. [Note] If user authentication fails more than 8 times within - Panasonic AW-UE4 | Advanced Operating Instructions - Page 67
to 32 characters). Re-enter the password to confirm. Access level: Select the user access level(Administrator or Camera control). Click [Set] button to save the configuration. The default is Camera control. 1.Administrator This access level allows the user to perform all the unit's operations - Panasonic AW-UE4 | Advanced Operating Instructions - Page 68
going to be used. Input an address that will not .duplicate an existing IP address which has been set for a personal computer or another network camera. The default IP is 192.168.0.10 [Note] Multiple IP addresses cannot be used even when the DHCP function is used. For details on the - Panasonic AW-UE4 | Advanced Operating Instructions - Page 69
settings, consult your network administrator. DNS Whether the DNS server address is to be acquired automatically (Auto) or manually (Manual) is input here. The default is Manual. If [Manual] has been selected, the DNS settings must be established. If [Auto] is selected when the DHCP function is - Panasonic AW-UE4 | Advanced Operating Instructions - Page 70
for the RTMP server to be transmitted to. Stream Key The stream key obtained from the RTMP server is set during streaming only when the service is set to [Type1]. 70 - Panasonic AW-UE4 | Advanced Operating Instructions - Page 71
[Default reset]. Click [Setup] > [Maintenance]. Language Set the unit system's language. Click [Setup] > [Maintenance] > [Language]. Click [Set] button to save the configuration. The language only supports [English], [Simplified Chinese], and [Japanese]. The default is English. 71 - Panasonic AW-UE4 | Advanced Operating Instructions - Page 72
unit's MAC address. Serial no. Display the unit's serial number. Firmware version Display the overall system version of the unit. Operation time Display the the OSS (Open Source Software) file. The OSS license file include all OSS license for AW-UE4. The download file name is "License.zip". - Panasonic AW-UE4 | Advanced Operating Instructions - Page 73
the same subnet as the camera to upgrade the software version. Before using the version upgrading software, be absolutely sure to check the precautions to be observed, and follow the instructions. Use the files specified by Panasonic Corporation as the software used for version upgrading. Do - Panasonic AW-UE4 | Advanced Operating Instructions - Page 74
Default Reset The unit's setting data is initialized and the unit is restarted in here. Reset to the default (Except the network settings) When the [Execute] button is clicked, the unit's settings are returned to their defaults. When the initialization operation is started, the unit is restarted - Panasonic AW-UE4 | Advanced Operating Instructions - Page 75
camera if you connect the unit and a personal computer or other device with a commercially available USB cable. The unit is compliant with USB Video Class and USB Audio Class. The video and audio of the unit can be transmitted to a personal computer or other device by using communication software - Panasonic AW-UE4 | Advanced Operating Instructions - Page 76
Troubleshooting Operation Symptom Cause and solution No power Is the network Easy IP Setup Software. For Mac: Using the OS X terminal, execute > ping -c 10 [IP address which has been set in the camera] A reply returned from the unit signifies that there are no problems in operation. If - Panasonic AW-UE4 | Advanced Operating Instructions - Page 77
are especially noticeable when any of the SD formats is used: This is normal and not indicative of any trouble. The resolution of the characters in the camera menu displays changes as the background image changes. Depending on the edge enhancement setting established for the monitor, white - Panasonic AW-UE4 | Advanced Operating Instructions - Page 78
you want to empty the cache?] pop- up screen. The unit's ports may be filtered by the firewall or other function of the anti-virus software. → Change the HTTP port number of the unit to a port number that will not be filtered. If the web browser screen stops, reload the web - Panasonic AW-UE4 | Advanced Operating Instructions - Page 79
. 0.5 kg (1.1 lb.) (Excluding ceiling mount bracket) OUTPUT HDMI: HDMI Type-A HDCP is not supported. VIERA Link is not supported. INPUT /OUTPUT LAN: LAN connector for IP control (RJ45) USB: Type-C port FUNCTIONS AND PERFORMANCE [Camera - Panasonic AW-UE4 | Advanced Operating Instructions - Page 80
[Camera unit](Continue) Shutter speed: Full Auto mode Slow Shutter ON/Shutter Priority mode/Manual mode [60 Hz/59. 1/8000, 1/16000 Zoom: 4x Digital Zoom Pan/tilt angle: ±34 °/±21 ° (Digital Zoom 2x) ±45 °/±30 25p 720/50p [USB connection] Supported devices: Equipped with USB2.0 - Panasonic AW-UE4 | Advanced Operating Instructions - Page 81
rate may be lower than the setting depending on the operating conditions. Audio compression mode Audio compression format: AAC-LC, 48 kHz, 16 bit, 2 channels. Supported protocol IPv4 TCP/IP, UDP/IP, HTTP, RTSP, RTP, RTP/RTCP, DHCP, DNS, ICMP, ARP, RTMP, RTMPS IPv6 TCP/IP, UDP/IP, HTTP, RTSP - Panasonic AW-UE4 | Advanced Operating Instructions - Page 82
DNS 69 Drop-prevention wire 11 DRS 39, 47, 61 E Easy IP setup software 12, 18 F Format 42, 47, 63 Frame rate 58, 80, 81 compensation 75 Bar 47 Basic Settings 55 Brightness 47 C Camera 35, 47 Camera head 14 Camera menu 33, 35, 47 Camera title 56 Characteristics 10 Chroma leve 38, 47, - Panasonic AW-UE4 | Advanced Operating Instructions - Page 83
LDC 39, 47 Len 14, 79 Live Page 56 L-Mount kit 11 M MAC address 46, 48, 72 Main menu 35 Maintenance 35, 45, 48, 71 Manual 36, 47, 59 Max bit rate 58 Memory 8 Mic 44, 47, 65 Microphone 80 Mirror 43, 47, 64 Model no 72 Mount kit 11 N Network - Panasonic AW-UE4 | Advanced Operating Instructions - Page 84
System 35, 40, 47, 63 T Tally 43, 44, 47, 64 Tally status indicator 14 Tilt 80 Tilting 15 Transfer mode 80, 81 Tripod screw 11 Troubleshooting 76 U URL 70 Usage restrictions 9 USB 78, 79 USB cable 10, 11, 14 USB connection 80 USB terminal 14 USB(4K 23, 40, 47, 55 - Panasonic AW-UE4 | Advanced Operating Instructions - Page 85
Web Site: http://www.panasonic.com © Panasonic Corporation 2019
-
 1
1 -
 2
2 -
 3
3 -
 4
4 -
 5
5 -
 6
6 -
 7
7 -
8
-
9
-
10
-
11
-
12
-
13
-
14
-
15
-
16
-
17
-
18
-
19
-
20
-
21
-
22
-
23
-
24
-
25
-
26
-
27
-
28
-
29
-
30
-
31
-
32
-
33
-
34
-
35
-
36
-
37
-
38
-
39
-
40
-
41
-
42
-
43
-
44
-
45
-
46
-
47
-
48
-
49
-
50
-
51
-
52
-
53
-
54
-
55
-
56
-
57
-
58
-
59
-
60
-
61
-
62
-
63
-
64
-
65
-
66
-
67
-
68
-
69
-
70
-
71
-
72
-
73
-
74
-
75
-
76
-
77
-
78
-
79
-
80
-
81
-
82
-
83
-
84
-
85
 |
 |

DVQP2109Z
V0619MY0 -PS
ENGLISH
Model No.
AW-UE4KG
Model No.
AW-UE4WG
Operating Instruction
Operations and Settings
4K Integrated Camera
Operations and Settings
Operating Instructions
This "Operations and Settings" describes how to operate the unit and how to
establish its settings.
For more information on how to perform basic operation and installation, refer to
the Operating Instructions "Basics".