Panasonic AW-UE4 Advanced Operating Instructions - Page 16
Wireless Remote Control(optional accessory
 |
View all Panasonic AW-UE4 manuals
Add to My Manuals
Save this manual to your list of manuals |
Page 16 highlights
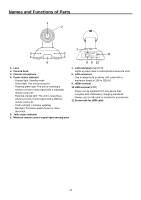
Wireless Remote Control(optional accessory) You can operate the unit with the optional wireless remote control (AW-RM50G). Consult your dealer concerning the purchase of a wireless remote control. Buttons used for operating this unit are described. 1 1 Signal transmission window 2 10 2 ON/STANDBY button 3 Each time this is pressed for 2 seconds, operation switches between turning 54 on the unit's power and establishing the standby status. 3 CAM1 to CAM4 buttons Selects a camera to be operated. 6 Once a button has been selected, the unit corresponding to the selected button can be operated. 7 11 4 SET button 8 If this button is pressed when the [AWB A] memory or [AWB B] memory has been selected for the white balance adjustment, the white balance is automatically adjusted and registered in the selected memory. 12 5 MODE button 9 13 Each time you press the button, the signal switches between the color bar signal output and the camera image output. 6 1 to 12 buttons These are used to call the information on the unit's directions and other settings, which have been registered in the units preset memories No.1 to No.12, and reproduce those settings. Setting in preset memories No.13 and above cannot be called from the wireless remote control 7 PRESET button Press this button and any of the buttons from 1 to 12 simultaneously to register a preset memory. 8 Pan-tilt buttons and menu operation buttons (1)These are used to change the unit's direction. The unit is tilted in the up/down direction using the [▲] and [▼] buttons and panned in the left/right direction using the [◄] and [►] buttons. The [○] button does not work during tilting and panning. When the [▲] or [▼] and [◄] or [►] buttons are pressed at the same time, the unit moves diagonally. (2) The buttons are used for menu operations when the unit displays the camera menus. Use the [▲] and [▼] buttons to select the menu items. When a selected item has a sub-menu, the sub-menu will be displayed by pressing the [] or [►] button. When the [] or [►] button is pressed on the setting menu at the bottom hierarchical level, the new setting is entered. 9 SLOW button Changes the pan/tilt or zoom speed to low speed. 10 MENU button Press and hold for 2 seconds to display the camera menu of the unit. 16
-
 1
1 -
2
-
3
-
4
-
5
-
6
-
7
-
8
-
9
-
10
-
 11
11 -
 12
12 -
 13
13 -
 14
14 -
 15
15 -
 16
16 -
 17
17 -
 18
18 -
 19
19 -
 20
20 -
 21
21 -
22
-
23
-
24
-
25
-
26
-
27
-
28
-
29
-
30
-
31
-
32
-
33
-
34
-
35
-
36
-
37
-
38
-
39
-
40
-
41
-
42
-
43
-
44
-
45
-
46
-
47
-
48
-
49
-
50
-
51
-
52
-
53
-
54
-
55
-
56
-
57
-
58
-
59
-
60
-
61
-
62
-
63
-
64
-
65
-
66
-
67
-
68
-
69
-
70
-
71
-
72
-
73
-
74
-
75
-
76
-
77
-
78
-
79
-
80
-
81
-
82
-
83
-
84
-
85
 |
 |
