Panasonic AW-UE4 Advanced Operating Instructions - Page 50
Connecting to Web Screen by Using a PC
 |
View all Panasonic AW-UE4 manuals
Add to My Manuals
Save this manual to your list of manuals |
Page 50 highlights
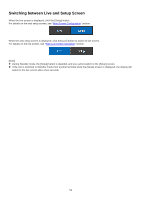
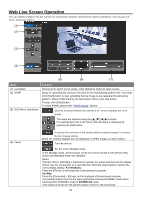
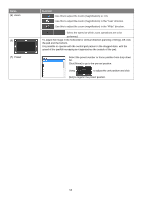
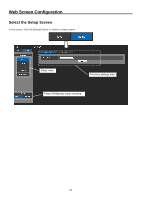
Connecting to Web Screen by Using a PC The procedure is explained here using Windows screens (Internet Explorer). When using other browsers, some screen displays will be different, but the procedure is similar. 1. Start the web browser of the personal computer. Use one of the web browsers below depending on the operating system installed in the personal computer. Operating system Web browser Windows Windows 7 64/32-bit/Internet Explorer 11 Windows 10/Internet Explorer 11 Windows 10/Microsoft Edge Windows 10/Google Chrome Mac OS macOS 10.14 macOS 10.13 macOS 10.12 OS X 10.11 Safari Google Chrome 2. Enter the IP address you configured on the Easy IP Setup Software in the address bar of the web browser. IPv4 address entry example: http://URL registered with IPv4 address http://192.168.0.10/ IPv6 address entry example: http://[URL registered with IPv6 address] http://[2001:db8::10]/ [Note] If the HTTP port number has been changed from "80", enter "http://:" in the address bar. Example: http://192.168.0.11:8080 If the unit is located on the local network, configure proxy server settings on the web browser ([Setup] > [Network]) so that a proxy server is not used for the local address. 3. Display the live screen [Live]. The web screen appears. You can switch to the web setup screen [Setup] when necessary. [Note] Standby mode is the factory default setting, so switch to Power ON mode. Depending on the firewall settings on your personal computer, transmitted images may not be displayed. If this occurs, change the firewall settings and change the settings to permit communications with your web browser. When an attempt is made to display multiple IP images on one personal computer, IP videos may not be displayed depending on the performance of the personal computer concerned. Images on the web screen are displayed in JPEG. The JPEG image frame rate may be slower depending on the network environment, performance of your personal computer, subject of the video, and access volume. 50
-
 1
1 -
2
-
3
-
4
-
5
-
6
-
7
-
8
-
9
-
10
-
11
-
12
-
13
-
14
-
15
-
16
-
17
-
18
-
19
-
20
-
21
-
22
-
23
-
24
-
25
-
26
-
27
-
28
-
29
-
30
-
31
-
32
-
33
-
34
-
35
-
36
-
37
-
38
-
39
-
40
-
41
-
42
-
43
-
44
-
 45
45 -
 46
46 -
 47
47 -
 48
48 -
 49
49 -
 50
50 -
 51
51 -
 52
52 -
 53
53 -
 54
54 -
 55
55 -
56
-
57
-
58
-
59
-
60
-
61
-
62
-
63
-
64
-
65
-
66
-
67
-
68
-
69
-
70
-
71
-
72
-
73
-
74
-
75
-
76
-
77
-
78
-
79
-
80
-
81
-
82
-
83
-
84
-
85
 |
 |
