Panasonic DMC-G1K Digital Still Camera - Page 118
Connecting to other equipment, Connecting to a PC
 |
UPC - 037988988334
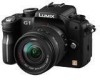
View all Panasonic DMC-G1K manuals
Add to My Manuals
Save this manual to your list of manuals |
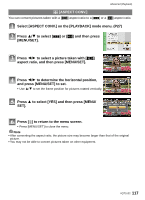
Page 118 highlights
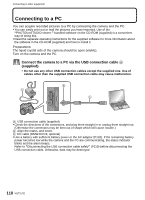
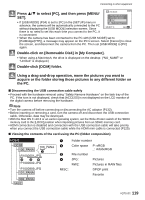
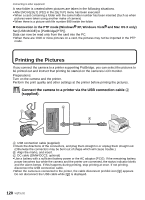
Connecting to other equipment Connecting to other equipment Connecting to a PC You can acquire recorded pictures to a PC by connecting the camera and the PC. • You can easily print out or mail the pictures you have imported. Use of the "PHOTOfunSTUDIO-viewer-" bundled software on the CD-ROM (supplied) is a convenient way of doing this. • Read the separate operating instructions for the supplied software for more information about the software in the CD-ROM (supplied) and how to install it. Preparations: The liquid crystal side of the camera should be open (visible). Turn on the camera and the PC. Connect the camera to a PC via the USB connection cable A (supplied). • Do not use any other USB connection cables except the supplied one. Use of cables other than the supplied USB connection cable may cause malfunction. A USB connection cable (supplied) • Check the directions of the connectors, and plug them straight in or unplug them straight out. (Otherwise the connectors may be bent out of shape which will cause trouble.) B Align the marks, and insert. C DC cable (DMW-DCC3; optional) • Use a battery with sufficient battery power or the AC adaptor (P132). If the remaining battery power becomes low while the camera and the PC are communicating, the status indicator blinks and the alarm beeps. Refer to "Disconnecting the USB connection cable safely" (P119) before disconnecting the USB connection cable. Otherwise, data may be destroyed. 118 VQT1U32
-
 1
1 -
2
-
3
-
4
-
5
-
6
-
7
-
8
-
9
-
10
-
11
-
12
-
13
-
14
-
15
-
16
-
17
-
18
-
19
-
20
-
21
-
22
-
23
-
24
-
25
-
26
-
27
-
28
-
29
-
30
-
31
-
32
-
33
-
34
-
35
-
36
-
37
-
38
-
39
-
40
-
41
-
42
-
43
-
44
-
45
-
46
-
47
-
48
-
49
-
50
-
51
-
52
-
53
-
54
-
55
-
56
-
57
-
58
-
59
-
60
-
61
-
62
-
63
-
64
-
65
-
66
-
67
-
68
-
69
-
70
-
71
-
72
-
73
-
74
-
75
-
76
-
77
-
78
-
79
-
80
-
81
-
82
-
83
-
84
-
85
-
86
-
87
-
88
-
89
-
90
-
91
-
92
-
93
-
94
-
95
-
96
-
97
-
98
-
99
-
100
-
101
-
102
-
103
-
104
-
105
-
106
-
107
-
108
-
109
-
110
-
111
-
112
-
 113
113 -
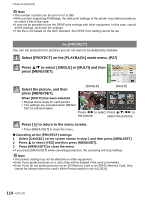 114
114 -
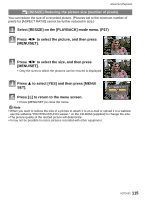 115
115 -
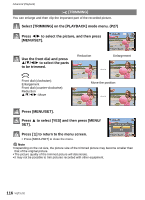 116
116 -
 117
117 -
 118
118 -
 119
119 -
 120
120 -
 121
121 -
 122
122 -
 123
123 -
124
-
125
-
126
-
127
-
128
-
129
-
130
-
131
-
132
-
133
-
134
-
135
-
136
-
137
-
138
-
139
-
140
-
141
-
142
-
143
-
144
-
145
-
146
-
147
-
148
-
149
-
150
-
151
-
152
-
153
-
154
-
155
-
156
-
157
-
158
-
159
-
160
-
161
-
162
-
163
-
164
-
165
-
166
-
167
-
168
 |
 |
