Panasonic DMC-G1K Digital Still Camera - Page 121
Single picture, Print Settings, to select [SINGLE PICTURE] and then
 |
UPC - 037988988334
View all Panasonic DMC-G1K manuals
Add to My Manuals
Save this manual to your list of manuals |
Page 121 highlights
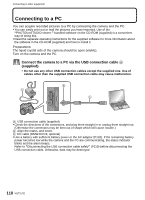
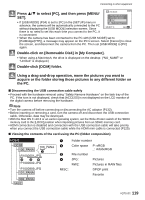
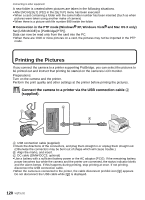
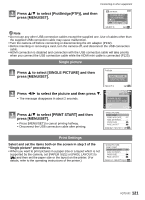
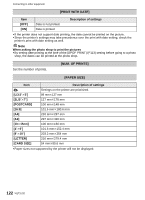
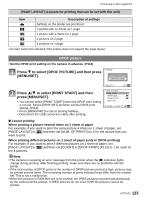
Connecting to other equipment Press 3/4 to select [PictBridge(PTP)], and then press [MENU/SET]. USB MODE PLEASE SELECT THE USB MODE PC PictBridge(PTP) SELECT SET MENU Note • Do not use any other USB connection cables except the supplied one. Use of cables other than the supplied USB connection cable may cause malfunction. • Turn the camera off before connecting or disconnecting the AC adaptor (P132). • Before inserting or removing a card, turn the camera off, and disconnect the USB connection cable. • HDMI connection is disabled and connection with the USB connection cable will take priority when you connect the USB connection cable while the HDMI mini cable is connected (P125). Single picture Press 3 to select [SINGLE PICTURE] and then press [MENU/SET]. PictBridge SINGLE PICTURE DPOF PICTURE SELECT SET MENU Press 2/1 to select the picture and then press 4. • The message disappears in about 2 seconds. PictBridge 100_0001 PLEASE SELECT THE PICTURE TO PRINT SELECT PRINT EXIT MENU Press 3/4 to select [PRINT START] and then press [MENU/SET]. • Press [MENU/SET] to cancel printing halfway. • Disconnect the USB connection cable after printing. SINGLE PICTURE PRINT START PRINT WITH DATE OFF NUM. OF PRINTS 1 PAPER SIZE PAGE LAYOUT CANCEL SELECT SET MENU Print Settings Select and set the items both on the screen in step 3 of the "Single picture" procedures. • When you want to print pictures in a paper size or a layout which is not supported by the camera, set [PAPER SIZE] or [PAGE LAYOUT] to [{] and then set the paper size or the layout on the printer. (For details, refer to the operating instructions of the printer.) SINGLE PICTURE PRINT START PRINT WITH DATE OFF NUM. OF PRINTS 1 PAPER SIZE PAGE LAYOUT CANCEL SELECT EXIT MENU VQT1U32 121
-
 1
1 -
2
-
3
-
4
-
5
-
6
-
7
-
8
-
9
-
10
-
11
-
12
-
13
-
14
-
15
-
16
-
17
-
18
-
19
-
20
-
21
-
22
-
23
-
24
-
25
-
26
-
27
-
28
-
29
-
30
-
31
-
32
-
33
-
34
-
35
-
36
-
37
-
38
-
39
-
40
-
41
-
42
-
43
-
44
-
45
-
46
-
47
-
48
-
49
-
50
-
51
-
52
-
53
-
54
-
55
-
56
-
57
-
58
-
59
-
60
-
61
-
62
-
63
-
64
-
65
-
66
-
67
-
68
-
69
-
70
-
71
-
72
-
73
-
74
-
75
-
76
-
77
-
78
-
79
-
80
-
81
-
82
-
83
-
84
-
85
-
86
-
87
-
88
-
89
-
90
-
91
-
92
-
93
-
94
-
95
-
96
-
97
-
98
-
99
-
100
-
101
-
102
-
103
-
104
-
105
-
106
-
107
-
108
-
109
-
110
-
111
-
112
-
113
-
114
-
115
-
 116
116 -
 117
117 -
 118
118 -
 119
119 -
 120
120 -
 121
121 -
 122
122 -
 123
123 -
 124
124 -
 125
125 -
 126
126 -
127
-
128
-
129
-
130
-
131
-
132
-
133
-
134
-
135
-
136
-
137
-
138
-
139
-
140
-
141
-
142
-
143
-
144
-
145
-
146
-
147
-
148
-
149
-
150
-
151
-
152
-
153
-
154
-
155
-
156
-
157
-
158
-
159
-
160
-
161
-
162
-
163
-
164
-
165
-
166
-
167
-
168
 |
 |
