Panasonic DMC-G1K Digital Still Camera - Page 93
Party], Baby1], Baby2
 |
UPC - 037988988334
View all Panasonic DMC-G1K manuals
Add to My Manuals
Save this manual to your list of manuals |
Page 93 highlights
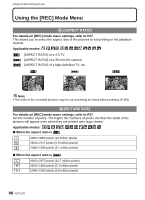
Advanced (Recording pictures) 2 [PARTY] Select this when you want to take pictures at a wedding reception, an indoor party etc. This allows you to take pictures of people and the background with near real-life brightness. ∫ Technique for Party mode • Open the flash. (You can set to [ ].) • We recommend using a tripod and the self-timer for taking pictures. • We recommend rotating the zoom ring to Wide (1k) and being about 1.5 m (4.92 feet) from the subject when taking pictures. Note • The initial setting for [AF MODE] is [š]. : [BABY1]/; [BABY2] This takes pictures of a baby with a healthy complexion. When you use the flash, the light from it is weaker than usual. You can set different birthdays in [BABY1] and [BABY2]. You can then display the ages when playing back the pictures. ∫ Age display setting • To have the age displayed, first set the birthday and then be sure to set [WITH AGE] before taking the pictures. ∫ Birthday setting 1 Press 3/4 to select [BIRTHDAY SET.] and then press [MENU/SET]. 2 Press 2/1 to select items (Year/Month/Day) and then press 3/4 to set them. • If [WITH AGE] is set when the birthday has not been registered, the setting screen appears automatically. 3 Press [MENU/SET] to set. • You can also use the front dial to set. ∫ To cancel [AGE] Set to [WITHOUT AGE] in step 1 of "Birthday setting". Note • The age can be printed out using the "PHOTOfunSTUDIO-viewer-" bundled software on the CD-ROM (supplied). • If the camera is set to [WITHOUT AGE], the age is not recorded even if the time and birthday are set. This means the age cannot be displayed even if camera is set to [WITH AGE] after taking the pictures. • Intelligent ISO sensitivity control is activated, and maximum ISO sensitivity level becomes [ISO400]. • If the camera is turned on with [BABY1]/[BABY2] set, the age is displayed at the lower left of the screen for about 5 seconds, along with the current date and time. • If the age is not properly displayed, check the clock and birthday settings. • The birthday setting can be reset with [RESET]. • The initial setting for [AF MODE] is [š]. VQT1U32 93
-
 1
1 -
2
-
3
-
4
-
5
-
6
-
7
-
8
-
9
-
10
-
11
-
12
-
13
-
14
-
15
-
16
-
17
-
18
-
19
-
20
-
21
-
22
-
23
-
24
-
25
-
26
-
27
-
28
-
29
-
30
-
31
-
32
-
33
-
34
-
35
-
36
-
37
-
38
-
39
-
40
-
41
-
42
-
43
-
44
-
45
-
46
-
47
-
48
-
49
-
50
-
51
-
52
-
53
-
54
-
55
-
56
-
57
-
58
-
59
-
60
-
61
-
62
-
63
-
64
-
65
-
66
-
67
-
68
-
69
-
70
-
71
-
72
-
73
-
74
-
75
-
76
-
77
-
78
-
79
-
80
-
81
-
82
-
83
-
84
-
85
-
86
-
87
-
 88
88 -
 89
89 -
 90
90 -
 91
91 -
 92
92 -
 93
93 -
 94
94 -
 95
95 -
 96
96 -
 97
97 -
 98
98 -
99
-
100
-
101
-
102
-
103
-
104
-
105
-
106
-
107
-
108
-
109
-
110
-
111
-
112
-
113
-
114
-
115
-
116
-
117
-
118
-
119
-
120
-
121
-
122
-
123
-
124
-
125
-
126
-
127
-
128
-
129
-
130
-
131
-
132
-
133
-
134
-
135
-
136
-
137
-
138
-
139
-
140
-
141
-
142
-
143
-
144
-
145
-
146
-
147
-
148
-
149
-
150
-
151
-
152
-
153
-
154
-
155
-
156
-
157
-
158
-
159
-
160
-
161
-
162
-
163
-
164
-
165
-
166
-
167
-
168
 |
 |
