Panasonic DMC-G1K Digital Still Camera - Page 31
Power Save], Auto Lcd Off], Auto Power Lcd], Power Lcd], Highlight], Economy], Monitor], Viewfinder] - reviews
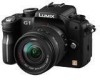 |
UPC - 037988988334
View all Panasonic DMC-G1K manuals
Add to My Manuals
Save this manual to your list of manuals |
Page 31 highlights
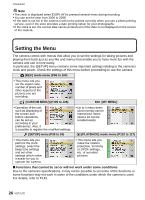
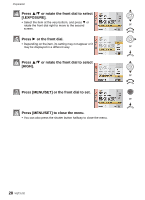
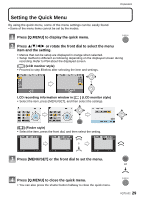
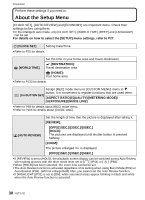
Preparation [HIGHLIGHT] When the Auto Review function is activated or when playing back, white saturated areas appear blinking in black and white. [OFF]/[ON] • If there are any white saturated areas, we recommend compensating the exposure towards [ON] [OFF] negative (P63) referring to the histogram (P56) and then taking the picture again. It may result in a better quality picture. • There may be white saturated areas if the distance between the camera and the subject is too close when taking pictures with the flash. If [HIGHLIGHT] is set to [ON] in this case, the area directly illuminated by the photo flash will become white saturated and appear blinking in black and white. You can conserve the battery life by setting these menus. Also, it will turn off the LCD monitor automatically when not in use to prevent discharge of the battery. q [ECONOMY] p [POWER SAVE]: The camera is automatically turned off if the camera has not been used for the time selected on the setting. [OFF]/[1MIN.]/[2MIN.]/[5MIN.]/[10MIN.] [AUTO LCD OFF]: The LCD monitor is automatically turned off if the camera has not been used for the time selected on the setting. [OFF]/[15SEC.]/[30SEC.] • Press the shutter button halfway or turn the camera off and on to cancel [POWER SAVE]. • [POWER SAVE] is set to [5MIN.] in the Intelligent auto mode. • [POWER SAVE] is fixed to [2MIN.] when [AUTO LCD OFF] is set to [15SEC.] or [30SEC.]. • Press any button to turn on the LCD monitor again. [MONITOR]/ [VIEWFINDER] Brightness and color of the LCD monitor/viewfinder can be adjusted in 7 steps. • Adjust the brightness of the screen with 3/4, contrast and saturation with 2/1 or the front dial. • It will adjust the LCD monitor when the LCD monitor is in use, and the viewfinder when the viewfinder is in use. LCD [LCD MODE] These menu settings make it easier to see the LCD monitor when you are in bright places. [OFF] „ [AUTO POWER LCD]: The brightness is adjusted automatically depending on how bright it is around the camera. ... [POWER LCD]: The LCD monitor becomes brighter and easier to see even when taking pictures outdoors. VQT1U32 31
-
 1
1 -
2
-
3
-
4
-
5
-
6
-
7
-
8
-
9
-
10
-
11
-
12
-
13
-
14
-
15
-
16
-
17
-
18
-
19
-
20
-
21
-
22
-
23
-
24
-
25
-
 26
26 -
 27
27 -
 28
28 -
 29
29 -
 30
30 -
 31
31 -
 32
32 -
 33
33 -
 34
34 -
 35
35 -
 36
36 -
37
-
38
-
39
-
40
-
41
-
42
-
43
-
44
-
45
-
46
-
47
-
48
-
49
-
50
-
51
-
52
-
53
-
54
-
55
-
56
-
57
-
58
-
59
-
60
-
61
-
62
-
63
-
64
-
65
-
66
-
67
-
68
-
69
-
70
-
71
-
72
-
73
-
74
-
75
-
76
-
77
-
78
-
79
-
80
-
81
-
82
-
83
-
84
-
85
-
86
-
87
-
88
-
89
-
90
-
91
-
92
-
93
-
94
-
95
-
96
-
97
-
98
-
99
-
100
-
101
-
102
-
103
-
104
-
105
-
106
-
107
-
108
-
109
-
110
-
111
-
112
-
113
-
114
-
115
-
116
-
117
-
118
-
119
-
120
-
121
-
122
-
123
-
124
-
125
-
126
-
127
-
128
-
129
-
130
-
131
-
132
-
133
-
134
-
135
-
136
-
137
-
138
-
139
-
140
-
141
-
142
-
143
-
144
-
145
-
146
-
147
-
148
-
149
-
150
-
151
-
152
-
153
-
154
-
155
-
156
-
157
-
158
-
159
-
160
-
161
-
162
-
163
-
164
-
165
-
166
-
167
-
168
 |
 |
