Panasonic DMC-G1K Digital Still Camera - Page 120
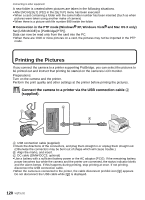
Printing the Pictures, Connect the camera to a printer via the USB connection cable, supplied.
 |
UPC - 037988988334
View all Panasonic DMC-G1K manuals
Add to My Manuals
Save this manual to your list of manuals |
Page 120 highlights
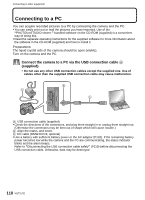
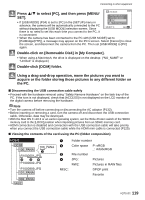
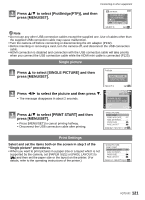
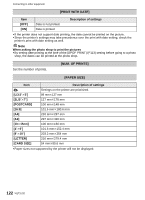
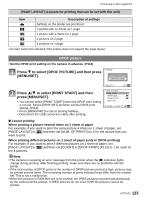
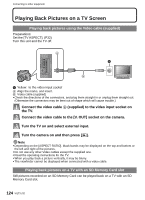
Connecting to other equipment A new folder is created when pictures are taken in the following situations. • After [NO.RESET] (P32) in the [SETUP] menu has been executed • When a card containing a folder with the same folder number has been inserted (Such as when pictures were taken using another make of camera) • When there is a picture with file number 999 inside the folder ∫ Connection in the PTP mode (WindowsR XP, Windows VistaR and Mac OS X only) Set [USB MODE] to [PictBridge(PTP)]. Data can now be read only from the card into the PC. • When there are 1000 or more pictures on a card, the pictures may not be imported in the PTP mode. Printing the Pictures If you connect the camera to a printer supporting PictBridge, you can select the pictures to be printed out and instruct that printing be started on the camera's LCD monitor. Preparations: Turn on the camera and the printer. Perform the print quality and other settings at the printer before printing the pictures. Connect the camera to a printer via the USB connection cable A (supplied). A USB connection cable (supplied) • Check the directions of the connectors, and plug them straight in or unplug them straight out. (Otherwise the connectors may be bent out of shape which will cause trouble.) B Align the marks, and insert. C DC cable (DMW-DCC3; optional) • Use a battery with a sufficient battery power or the AC adaptor (P132). If the remaining battery power becomes low while the camera and the printer are connected, the status indicator blinks and the alarm beeps. If this happens during printing, stop printing at once. If not printing, disconnect the USB connection cable. • When the camera is connected to the printer, the cable disconnect prohibit icon [å] appears. Do not disconnect the USB cable while [å] is displayed. 120 VQT1U32
-
 1
1 -
2
-
3
-
4
-
5
-
6
-
7
-
8
-
9
-
10
-
11
-
12
-
13
-
14
-
15
-
16
-
17
-
18
-
19
-
20
-
21
-
22
-
23
-
24
-
25
-
26
-
27
-
28
-
29
-
30
-
31
-
32
-
33
-
34
-
35
-
36
-
37
-
38
-
39
-
40
-
41
-
42
-
43
-
44
-
45
-
46
-
47
-
48
-
49
-
50
-
51
-
52
-
53
-
54
-
55
-
56
-
57
-
58
-
59
-
60
-
61
-
62
-
63
-
64
-
65
-
66
-
67
-
68
-
69
-
70
-
71
-
72
-
73
-
74
-
75
-
76
-
77
-
78
-
79
-
80
-
81
-
82
-
83
-
84
-
85
-
86
-
87
-
88
-
89
-
90
-
91
-
92
-
93
-
94
-
95
-
96
-
97
-
98
-
99
-
100
-
101
-
102
-
103
-
104
-
105
-
106
-
107
-
108
-
109
-
110
-
111
-
112
-
113
-
114
-
 115
115 -
 116
116 -
 117
117 -
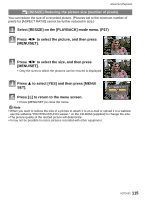
 118
118 -
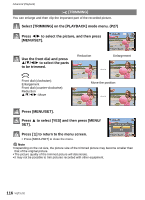
 119
119 -
 120
120 -
 121
121 -
 122
122 -
 123
123 -
 124
124 -
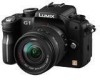
 125
125 -
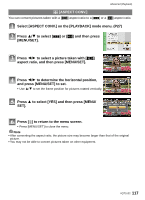
126
-
127
-
128
-
129
-
130
-
131
-
132
-
133
-
134
-
135
-
136
-
137
-
138
-
139
-
140
-
141
-
142
-
143
-
144
-
145
-
146
-
147
-
148
-
149
-
150
-
151
-
152
-
153
-
154
-
155
-
156
-
157
-
158
-
159
-
160
-
161
-
162
-
163
-
164
-
165
-
166
-
167
-
168
 |
 |
