Panasonic DP-190 Operating Instructions - Page 23
Print Data Led Green, Alarm Led Red - network
 |
View all Panasonic DP-190 manuals
Add to My Manuals
Save this manual to your list of manuals |
Page 23 highlights
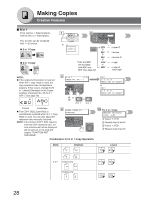
Before Starting No. Icon Contents No. Icon RESET Key Resets each selected copy/ 18 scan modes to default 19 settings. Contents Keypad Sets copy quantities or inputs the parameter(s) of Function settings. SET Key CLEAR Key 20 Sets the parameter(s) of Function settings. 21 Clears the copy count in the display. FUNCTION Key ACTIVE LED (GREEN) Use when changing the paper Flashes when machine is 22 size, initial function values (default values) and key 23 active. operator settings. ALARM LED (RED) PRINT DATA LED (GREEN) Lights/Flashes when trouble occurs. Flashes: When receiving printing data. Lights: Machine detected a trouble status Lights: While printing. ● No paper in the selected tray or toner has run out. 24 ● Machine detected trouble, 25 such as paper misfed or jammed. Flashes: Machine detected an alarm status ● No paper in the Tray. (Tray not selected) ● Toner is getting low, etc. Keyboard Inputs the Station, Machine name(s) of the parameter settings, etc. (See pages 47-51) When inputting a special character, press the "_/()..." Key and use the ( / ) 26 Cursor Keys to select a character. When changing the stored character, move the cursor ( ) back to the character and press the CLEAR Key then input a new character. DARKER/LIGHTER DUPLEX Key Keys Selects a 2-Sided copy. 27 To adjust the Manual Exposure. (See page 27) (See pages 25 and 46) 28 SCAN/FILE Key 29 Used for network scanning. (See pages 46-50) N in 1 Key DOUBLE EXPOSURE Key 30 Selects N in 1 copy mode. 31 Selects Double Exposure (See page 29) mode. (See page 30) REMOTE 32 COPY REMOTE COPY Key Selects Remote Copy mode. (See page 53) NOTE: To adjust the character brightness of the LCD display, press and while holding down the CLEAR Key, keep pressing the ORIGINAL SIZE or COPY SIZE Key until the desired brightness is achieved. ORIGINAL SIZE : Lighter COPY SIZE : Darker 23
-
 1
1 -
2
-
3
-
4
-
5
-
6
-
7
-
8
-
9
-
10
-
11
-
12
-
13
-
14
-
15
-
16
-
17
-
 18
18 -
 19
19 -
 20
20 -
 21
21 -
 22
22 -
 23
23 -
 24
24 -
 25
25 -
 26
26 -
 27
27 -
 28
28 -
29
-
30
-
31
-
32
-
33
-
34
-
35
-
36
-
37
-
38
-
39
-
40
-
41
-
42
-
43
-
44
-
45
-
46
-
47
-
48
-
49
-
50
-
51
-
52
-
53
-
54
-
55
-
56
-
57
-
58
-
59
-
60
-
61
-
62
-
63
-
64
-
65
-
66
 |
 |
