Panasonic DP-190 Operating Instructions - Page 46
Network Scanner, Document Scanning - network configuration
 |
View all Panasonic DP-190 manuals
Add to My Manuals
Save this manual to your list of manuals |
Page 46 highlights
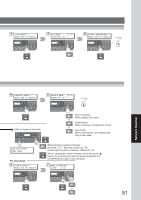
Network Scanner Document Scanning ■ Document Scanning When the Panasonic Document Management System 1 (Panasonic-DMS) is installed and configured on your PC, document(s) can be scanned from the machine to the PC. Direct Connection (with Crossover Cable, see page 54) ● Document Scanning directly from the machine to your PC using Windows "My Network Places" or "Network Neighborhood". NOTE: USB Port is used for printing only, and is not available for local scanning. 2 A B C or Select scanning mode Original Size (LGL and MIX: with ADF only) LTR INV MIX: Mixed size originals, INV such as LEGAL, LETTER-R, and LGL LEGAL are automatically detected MIX and scanned. NOTE If the PC's IP address is not shown on the LCD of the machine, register the PC's IP Address using the machine's Control Panel. (See page 48) ● ONE-TOUCH or ABBR No. Selecting the Scanning Resolution For Monochrome Scanning Monochrome/Color STANDARD: 150 x 150 dpi*/75 x 75 dpi * Only available when Original setting at TEXT mode. (See page 25) FINE : 300 x 300 dpi/150 x 150 dpi S-FINE : 600 x 600 dpi/300 x 300 dpi (STANDARD: When the FINE/S-FINE indicator is not lit.) 46 CONTRAST NO.= 1:CONTRAST 2:DENSITY For Color Scanning Color (lights) Monochrome 1 Press Exposure Keys (Darker/Lighter). 2 Select "1" for Contrast or "2" for Density. 3 Adjust Contrast or Density with Exposure Keys (Darker/Lighter). 4 Press SET Key. When adding a file name, selecting the compression format or gray scale mode. (See page 50) 4 SCANNING DOCUMENT PAGES=001 00% With the ADF (Skip to step 8) 5 On the Platen ANOTHER ORIGINAL? 1:YES 2:NO 1: YES or 2: No (Skip to step 8) Next Original
-
 1
1 -
2
-
3
-
4
-
5
-
6
-
7
-
8
-
9
-
10
-
11
-
12
-
13
-
14
-
15
-
16
-
17
-
18
-
19
-
20
-
21
-
22
-
23
-
24
-
25
-
26
-
27
-
28
-
29
-
30
-
31
-
32
-
33
-
34
-
35
-
36
-
37
-
38
-
39
-
40
-
 41
41 -
 42
42 -
 43
43 -
 44
44 -
 45
45 -
 46
46 -
 47
47 -
 48
48 -
 49
49 -
 50
50 -
 51
51 -
52
-
53
-
54
-
55
-
56
-
57
-
58
-
59
-
60
-
61
-
62
-
63
-
64
-
65
-
66
 |
 |
