Panasonic PT-AE1000U Hd Home Cinema Projector - Page 24
Adjusting the waveform of the input signal
 |
UPC - 791871111390
View all Panasonic PT-AE1000U manuals
Add to My Manuals
Save this manual to your list of manuals |
Page 24 highlights
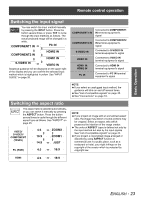
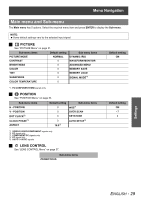
Remote control operation Basic Operation Adjusting the waveform of the input signal You can monitor if the brightness and contrast level of the input signal is in the recommended range by displaying it in the waveform monitor. See "WAVEFORM MONITOR" on page 32. 1. Project a commercial adjusting signal. 2. Press the WAVEFORM button to display the waveform monitor. OFF FULL SCAN SINGLE LINE SCAN Deactivate the waveform monitor. Monitoring the waveform of brightness and contrast of the whole image. Monitoring the waveform of detailed brightness and contrast in each horizontal line of the image. Press F G to select the required line. 3. Press ENTER button to select the required adjusting mode. FULL SCAN(Y) SINGLE LINE SCAN(B) FULL SCAN(R) SINGLE LINE SCAN(G) FULL SCAN(G) SINGLE LINE SCAN(R) FULL SCAN(B) SINGLE LINE SCAN(Y) 4. Press F G I H to adjust the displaying position of the waveform monitor. 5. Adjust the waveform in each menu. NOTE: When you adjust the SINGLE LINE SCAN, the position of the waveform is depends on the position of the selected line. When the WAVEFORM displayed, the COLOR MANAGEMENT is disabled. J Adjusting the waveform Make sure to adjust to the 0% line first. Any signal level below the recommended range will be forced to 0%. Q Adjusting in PICTURE menu Press PIC. ADJUST button to display the PICTURE menu and adjust BRIGHTNESS (-32 to +32) and CONTRAST (-64 to +64) with I H. BRIGHTNESS Adjust the bottom line of the waveform to 0 % (0/7.5 IRE). CONTRAST Adjust the top line of the waveform to 100 % (100 IRE). Q Adjusting in ADVANCED menu Press PIC. ADJUST twice to display the ADVANCED menu and adjust BRIGHTNESS (-16 to +16) and CONTRAST (-32 to +32) in red, green and blue with I H. In red BRIGHTNESS R Adjust the bottom line of the waveform to 0 % (0/7.5 IRE). CONTRAST R Adjust the top line of the waveform to 100 % (100 IRE). In green BRIGHTNESS G Adjust the bottom line of the waveform to 0 % (0/7.5 IRE). CONTRAST G Adjust the top line of the waveform to 100 % (100 IRE). In blue BRIGHTNESS B Adjust the bottom line of the waveform to 0 % (0/7.5 IRE). CONTRAST B Adjust the top line of the waveform to 100 % (100 IRE). NOTE: When the Main menu (except WAVEFORM and individually displayed menu item) is displayed, the waveform monitor will be halt. When the waveform monitor is displayed, the Main menu will be displayed in order not to interfere the waveform monitor. 100% PC/HDMI (Expand) 50% Adjust to 100% Adjust to 100% 0% 100% 100% ENTER Signal level Signal level 50% Optimal dynamic range 0% Monitor position Adjust to 0% 50% Optimal dynamic range 0% Monitor position Adjust to 0% 24 - ENGLISH
-
 1
1 -
2
-
3
-
4
-
5
-
6
-
7
-
8
-
9
-
10
-
11
-
12
-
13
-
14
-
15
-
16
-
17
-
18
-
 19
19 -
 20
20 -
 21
21 -
 22
22 -
 23
23 -
 24
24 -
 25
25 -
 26
26 -
 27
27 -
 28
28 -
 29
29 -
30
-
31
-
32
-
33
-
34
-
35
-
36
-
37
-
38
-
39
-
40
-
41
-
42
-
43
-
44
-
45
-
46
-
47
-
48
-
49
-
50
-
51
-
52
-
53
-
54
-
55
-
56
 |
 |
