Panasonic PT-AE1000U Hd Home Cinema Projector - Page 32
Dynamic Iris, Waveform Monitor, Advanced Menu, Gamma, Contrast, Brightness, Color Management
 |
UPC - 791871111390
View all Panasonic PT-AE1000U manuals
Add to My Manuals
Save this manual to your list of manuals |
Page 32 highlights
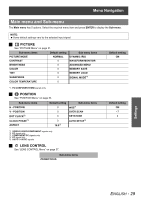
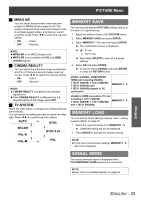
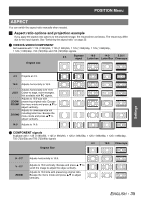
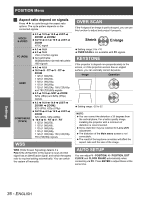
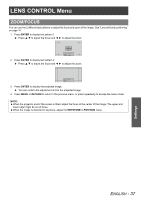
PICTURE Menu DYNAMIC IRIS ADVANCED MENU You can switch automatic adjustment of the lamp and the lens iris on/off. • ON: Automatic adjustment • OFF: No adjustment WAVEFORM MONITOR You can monitor whether or not the luminance level of the input signal is in the recommended range by displaying it in the waveform monitor. If the waveform is not in the range, adjust it for the best quality. See "Adjusting the waveform of the input signal" on page 24. OFF FULL SCAN(Y) FULL SCAN(R) FULL SCAN(G) FULL SCAN(B) SINGLE LINE SCAN(Y) SINGLE LINE SCAN(R) SINGLE LINE SCAN(G) SINGLE LINE SCAN(B) MONITOR POSITION UPPER LEFT 1. Press F G to move to the required waveform style. 2. Press ENTER to select. The WAVEFORM MONITOR will be displayed. 3. Adjust the WAVEFORM MONITOR. See "Adjusting the waveform of the input signal" on page 24. From the ADVANCED MENU, you can perform more detailed image adjustment manually. J GAMMA You can adjust linear intensity at 3 levels. Press I H to increase/decrease 1 point. Levels Default setting GAMMA HIGH 0 GAMMA MID 0 GAMMA LOW 0 Setting range: -8 to +8 J CONTRAST You can adjust the amount of contrast in RGB colors individually. Press I H to increase/decrease 1 point. RGB Default setting CONTRAST R 0 CONTRAST G 0 CONTRAST B 0 Setting range: -32 to +32 J BRIGHTNESS You can adjust the brightness in RGB colors individually. Press I H to increase/decrease 1 point. RGB Default setting BRIGHTNESS R 0 BRIGHTNESS G 0 BRIGHTNESS B 0 Setting range: -16 to +16 J COLOR MANAGEMENT You can manage your own defined color settings. See "Setting your own color profile" on page 26. J NR (Noise Reduction) You can switch the automatic noise reduction system on/off. Press I H to select the required setting. • ON: Automatic noise reduction • OFF: No noise reduction NOTE: Applying noise reduction may affect image quality. Settings 32 - ENGLISH
-
 1
1 -
2
-
3
-
4
-
5
-
6
-
7
-
8
-
9
-
10
-
11
-
12
-
13
-
14
-
15
-
16
-
17
-
18
-
19
-
20
-
21
-
22
-
23
-
24
-
25
-
26
-
 27
27 -
 28
28 -
 29
29 -
 30
30 -
 31
31 -
 32
32 -
 33
33 -
 34
34 -
 35
35 -
 36
36 -
 37
37 -
38
-
39
-
40
-
41
-
42
-
43
-
44
-
45
-
46
-
47
-
48
-
49
-
50
-
51
-
52
-
53
-
54
-
55
-
56
 |
 |