Panasonic PT-LB30 Lcd Projector - Multi-lang - Page 17
AUTO SETUP button, INDEX WINDOW button - pt lb30ntu
 |
UPC - 791871111154
View all Panasonic PT-LB30 manuals
Add to My Manuals
Save this manual to your list of manuals |
Page 17 highlights
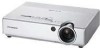
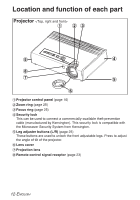
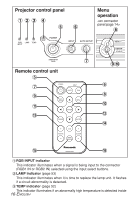
Preparation the projector or around it. If the temperature rises above a certain level, the power supply will be turned off automatically and the indicator will flash. & Illumination sensor (page 39) This sensor detects the luminance when the "DAYLIGHTVIEW" function is operating. Do not cover the projector and do not place any object on the projector when using it. ' POWER button (pages 24, 26 and 27) This button is used to turn the power on and off. This button on the projector illuminates red when the projector is in standby mode, and it illuminates green when a picture starts to be projected. ( INPUT buttons (page 25) These buttons are used to switch the input signals from the connected equipment. ) AUTO SETUP button (pages 25 and 28) If this button is pressed while a picture is being projected, the projection settings will be adjusted automatically in accordance with the signal being input. In addition, the angle of tilt of the projector will be automatically detected and adjusted in order to correct any keystone distortion. * MENU button (pages 32 and 34) This button is used to display the "MAIN MENU". When a menu screen is being displayed, this button can be used to return to a previous screen or to clear the screen. + Arrow (FGI and H) buttons (page 34) These buttons are used to select and adjust items in the on-screen menus. , ENTER button (page 34) This button is used to accept and to activate items selected in the on-screen menus. - FREEZE button (page 29) This button is used to momentarily freeze projection so that a still picture is displayed. . SHUTTER button (page 29) This button is used to momentarily turn off the picture and sound. / VOLUME +/- buttons (page 30) These buttons are used to adjust the volume of the sound that is output from the projector's built-in speakers and AUDIO OUT connector. Refer to page 33 for details on how to adjust the volume without using the remote control unit. 0 STD (standard) button (page 35) This button is used to reset the projector adjustment values to the factory default settings. 1 INDEX WINDOW button (page 31) This button can be used to split the image projection area into a still picture and a moving picture. When NETWORK is selected, the screen display will be switched between four window style, index style, and 16 Index style. (PT-LB30NTU only. Refer to the accessory CD-ROM for details.) 2 D.ZOOM +/- buttons (page 30) These buttons are used to enlarge the projected image. ENGLISH-17
-
 1
1 -
2
-
3
-
4
-
5
-
6
-
7
-
8
-
9
-
10
-
11
-
 12
12 -
 13
13 -
 14
14 -
 15
15 -
 16
16 -
 17
17 -
 18
18 -
 19
19 -
 20
20 -
 21
21 -
 22
22 -
23
-
24
-
25
-
26
-
27
-
28
-
29
-
30
-
31
-
32
-
33
-
34
-
35
-
36
-
37
-
38
-
39
-
40
-
41
-
42
-
43
-
44
-
45
-
46
-
47
-
48
-
49
-
50
-
51
-
52
-
53
-
54
-
55
-
56
-
57
-
58
-
59
-
60
-
61
-
62
-
63
-
64
-
65
-
66
-
67
-
68
-
69
-
70
-
71
-
72
-
73
-
74
-
75
-
76
-
77
-
78
-
79
-
80
-
81
-
82
-
83
-
84
-
85
-
86
-
87
-
88
-
89
-
90
-
91
-
92
-
93
-
94
-
95
-
96
-
97
-
98
-
99
-
100
-
101
-
102
-
103
-
104
-
105
-
106
-
107
-
108
-
109
-
110
-
111
-
112
-
113
-
114
-
115
-
116
-
117
-
118
-
119
-
120
-
121
-
122
-
123
-
124
-
125
-
126
-
127
-
128
-
129
-
130
-
131
-
132
-
133
-
134
-
135
-
136
-
137
-
138
-
139
-
140
-
141
-
142
-
143
-
144
 |
 |