Panasonic SDRS100 Sd Movie Camera - Page 11
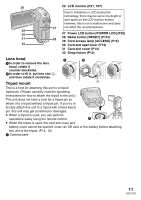
Lens hood, Tripod mount, Power LCD button [POWER LCD] P30
 |
View all Panasonic SDRS100 manuals
Add to My Manuals
Save this manual to your list of manuals |
Page 11 highlights
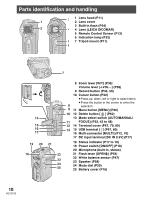
26 26 LCD monitor (P21, 107) Due to limitations in LCD production technology, there may be some tiny bright or dark spots on the LCD monitor screen. However, this is not a malfunction and does 27 not affect the recorded picture. 29 30 27 Power LCD button [POWER LCD] (P30) 31 28 28 Reset button [RESET] (P101) 29 Card access lamp [ACCESS] (P15) 32 30 Card slot open lever (P14) 31 Card slot cover (P14) 32 Strap fixture (P12) Lens hood 1In order to remove the lens hood, rotate it counter-clockwise. 2In order to fit it, put into slot A, and then rotate it clockwise. Tripod mount This is a hole for attaching this unit to a tripod (optional). (Please carefully read the operating instructions for how to attach the tripod to the unit.) This unit does not have a hole for a tripod pin so attach it to a tripod without a tripod pin. If you try to forcibly attach this unit to a tripod with a fixed tripod pin, this unit may get scratched or damaged. ≥ When a tripod is used, you can perform operations easily using the remote control. ≥ When the tripod is used, the card slot cover and battery cover cannot be opened. Insert an SD card or the battery before attaching this unit to the tripod. (P14, 16) 1 Camera base 11 VQT0T50
-
 1
1 -
2
-
3
-
4
-
5
-
 6
6 -
 7
7 -
 8
8 -
 9
9 -
 10
10 -
 11
11 -
 12
12 -
 13
13 -
 14
14 -
 15
15 -
 16
16 -
17
-
18
-
19
-
20
-
21
-
22
-
23
-
24
-
25
-
26
-
27
-
28
-
29
-
30
-
31
-
32
-
33
-
34
-
35
-
36
-
37
-
38
-
39
-
40
-
41
-
42
-
43
-
44
-
45
-
46
-
47
-
48
-
49
-
50
-
51
-
52
-
53
-
54
-
55
-
56
-
57
-
58
-
59
-
60
-
61
-
62
-
63
-
64
-
65
-
66
-
67
-
68
-
69
-
70
-
71
-
72
-
73
-
74
-
75
-
76
-
77
-
78
-
79
-
80
-
81
-
82
-
83
-
84
-
85
-
86
-
87
-
88
-
89
-
90
-
91
-
92
-
93
-
94
-
95
-
96
-
97
-
98
-
99
-
100
-
101
-
102
-
103
-
104
-
105
-
106
-
107
-
108
-
109
-
110
-
111
-
112
-
113
-
114
-
115
-
116
-
117
-
118
-
119
-
120
 |
 |
