Panasonic SDRS100 Sd Movie Camera - Page 12
Multi-connector [MULTI], Hand strap fixture, Remote control
 |
View all Panasonic SDRS100 manuals
Add to My Manuals
Save this manual to your list of manuals |
Page 12 highlights
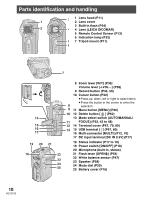
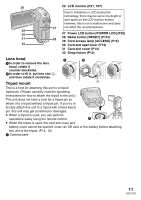
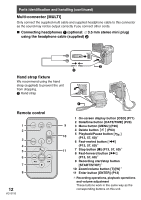
Parts identification and handling (continued) Multi-connector [MULTI] Only connect the supplied multi cable and supplied headphone cable to this connector as the sound may not be output correctly if you connect other cords. ∫ Connecting headphones 1 (optional: ‰ 3.5 mm stereo mini plug) using the headphone cable (supplied) 2 MULTI 2 1 Hand strap fixture We recommend using the hand strap (supplied) to prevent the unit from dropping. 1 Hand strap Remote control 1 OSD DATE/ TIME START/ STOP 2 3 MENU 4 5 6 ENTER 7 8 12 VQT0T50 1 1 On-screen display button [OSD] (P71) 2 Date/time button [DATE/TIME] (P29) 9 3 Menu button [MENU] (P26) 4 Delete button < > (P63) 5 Playback/Pause button [ ] 10 (P13, 57, 60)¢ 6 Fast-rewind button [:] (P13, 57, 60)¢ 11 7 Stop button [∫] (P13, 57, 60)¢ 8 Fast-forward button [9] (P13, 57, 60)¢ 9 Recording start/stop button [START/STOP]¢ 10 Zoom/volume button [T]/[W]¢ 11 Enter button [ENTER] (P13) ¢ Recording operations, playback operations and volume adjustment These buttons work in the same way as the corresponding buttons on this unit.
-
 1
1 -
2
-
3
-
4
-
5
-
6
-
 7
7 -
 8
8 -
 9
9 -
 10
10 -
 11
11 -
 12
12 -
 13
13 -
 14
14 -
 15
15 -
 16
16 -
 17
17 -
18
-
19
-
20
-
21
-
22
-
23
-
24
-
25
-
26
-
27
-
28
-
29
-
30
-
31
-
32
-
33
-
34
-
35
-
36
-
37
-
38
-
39
-
40
-
41
-
42
-
43
-
44
-
45
-
46
-
47
-
48
-
49
-
50
-
51
-
52
-
53
-
54
-
55
-
56
-
57
-
58
-
59
-
60
-
61
-
62
-
63
-
64
-
65
-
66
-
67
-
68
-
69
-
70
-
71
-
72
-
73
-
74
-
75
-
76
-
77
-
78
-
79
-
80
-
81
-
82
-
83
-
84
-
85
-
86
-
87
-
88
-
89
-
90
-
91
-
92
-
93
-
94
-
95
-
96
-
97
-
98
-
99
-
100
-
101
-
102
-
103
-
104
-
105
-
106
-
107
-
108
-
109
-
110
-
111
-
112
-
113
-
114
-
115
-
116
-
117
-
118
-
119
-
120
 |
 |
