Panasonic TG6500B KXTG6500B User Guide - Page 26
Ringer setting, Ringer tone, Line1, Line2
 |
UPC - 037988474813
View all Panasonic TG6500B manuals
Add to My Manuals
Save this manual to your list of manuals |
Page 26 highlights
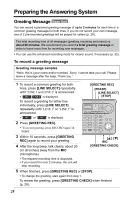
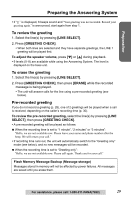
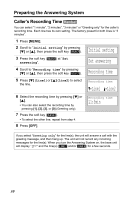
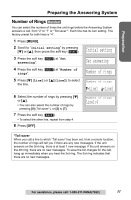
Programmable Settings Ringer Tone You can set the handset and base unit ringers to use one of 8 ringer patterns for each line. "Tone 1" to "Tone 4" are bell ringer patterns. "Melody 1" to "Melody 4" are melody patterns. LINE 1 is preset to "Tone 1". LINE 2 is preset to "Tone 2". • You cannot change the ringer tone for intercom calls. • If you subscribe to a Distinctive Ring Service (such as IDENTA-RING) from your telephone company with 2 or 3 consecutive rings, select a bell ringer pattern (Tone 1 to 4). If you select a melody pattern, you will not be able to distinguish lines by their ringers. • If you select one of the melody ringer patterns, the ringer will continue to sound for several seconds if: - the caller hangs up before you answer the call, or - another person answers the call using another phone connected on the same line. • If LINE 1 and LINE 2 have different ringer patterns and both lines receive calls simultaneously, both ringers will ring alternately. Handset ringer tone Handset 1 Press [MENU]. 2 Scroll to "Ringer setting" by pressing [d] or [B], then press the soft key ( SELECT ). Ringer setting Ringer tone 3 Scroll to "Ringer tone" by pressing [d] or [B], then press the soft key ( SELECT ). 4 Press [d] (Line1) or [B] (Line2) to select the line. Ringer tone d=Line1 B=Line2 5 Select the desired ringer tone by pressing [d] or [B]. • The handset will ring and the ringer tone will change. If the ringer volume has been turned off, the handset will not ring. Ringer tone L1 1:Tone 1 dB BACK VOLUME SAVE • You can also select the ringer tone by pressing [1] to [8]. [1] to [4]: Bell ringer patterns [5] to [8]: Melody patterns To adjust the ringer volume, press the soft key ( VOLUME ). Adjust the ringer volume by pressing [d] or [B]. See "Handset ringer volume" on page 24, step 5. 6 Press the soft key ( SAVE ). • To select the other line, repeat from step 3. 7 Press [OFF]. 26
-
 1
1 -
2
-
3
-
4
-
5
-
6
-
7
-
8
-
9
-
10
-
11
-
12
-
13
-
14
-
15
-
16
-
17
-
18
-
19
-
20
-
 21
21 -
 22
22 -
 23
23 -
 24
24 -
 25
25 -
 26
26 -
 27
27 -
 28
28 -
 29
29 -
 30
30 -
 31
31 -
32
-
33
-
34
-
35
-
36
-
37
-
38
-
39
-
40
-
41
-
42
-
43
-
44
-
45
-
46
-
47
-
48
-
49
-
50
-
51
-
52
-
53
-
54
-
55
-
56
-
57
-
58
-
59
-
60
-
61
-
62
-
63
-
64
-
65
-
66
-
67
-
68
-
69
-
70
-
71
-
72
-
73
-
74
-
75
-
76
-
77
-
78
-
79
-
80
-
81
-
82
-
83
-
84
-
85
-
86
-
87
-
88
-
89
-
90
-
91
-
92
-
93
-
94
-
95
-
96
-
97
-
98
-
99
-
100
-
101
-
102
-
103
-
104
-
105
-
106
-
107
-
108
 |
 |
