Panasonic WJHD500A WJHD500A User Guide - Page 28
Formatting The Hard Disk
 |
View all Panasonic WJHD500A manuals
Add to My Manuals
Save this manual to your list of manuals |
Page 28 highlights
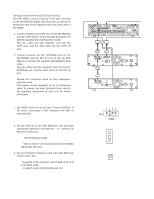
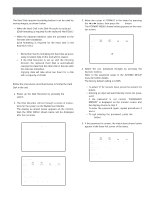
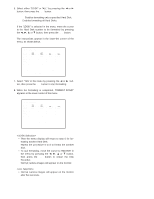
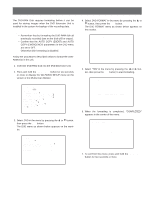
FORMATTING THE HARD DISK The Hard Disk requires formatting before it can be used for storing images, as shown below. • When the Hard Disk in the Disk Recorder is replaced. (Disk formatting is required for the replaced Hard Disk.) • When the optional extension units are operated for the first time after installation. (Disk formatting is required for the Hard Disk in the Extension Unit.) Notes: • Remember that by formatting the hard disk all previ- ously recorded data on the disk will be erased. • If the Disk Recorder is set up with the mirroring function, the replaced Hard Disk is automatically copying the data from the other disk of the pair after the disk was formatted. Copying data will take about two hours for a disk with a capacity of 30 GB. Follow the procedures described below to format the Hard Disk in the unit. 1. Power up the Disk Recorder by pressing the POWER switch. 2. The Disk Recorder will run through a series of instructions for the system on the Multiscreen Monitor. The display as shown below appears on the monitor, then the DISK MENU shown below will be displayed after five seconds. [ SYSTEM CHECK ] YOU HAVE TO CONFIGURE DISKS PLEASE WAIT DISK MENU MAIN 1:¢¢GB EXT5 1:¢¢GB EXT4 1:ADD EXT3 1:EXT2 1:EXT1 1:EXT0 1:EXT DVD:- 2:¢¢GB 2:¢¢GB 2:ADD 2:2:2:2:- 3:¢¢GB 3:ADD 3:3:3:3:- 4:¢¢GB 4:ADD 4:4:4:4:- REMOVE FORMAT RESTART SELECT ITEM AND PRESS [SET] KEY 3. Move the cursor to FORMAT in the menu by pressing the A or B button, then press the SET button. The FORMAT MENU shown below appears on the monitor screen. FORMAT MENU MAIN 1:¢¢GB EXT5 1:¢¢GB EXT4 1:ADD EXT3 1:EXT2 1:EXT1 1:EXT0 1:EXT DVD:- 2:¢¢GB 2:¢¢GB 2:ADD 2:2:2:2:- 3:¢¢GB 3:ADD 3:3:3:3:- 4:¢¢GB 4:ADD 4:4:4:4:- PASSWORDB----- 4. Select the ALL password (5-digit) by pressing the Numeric buttons (1 - 10). Refer to the password setup in the SYSTEM SETUP menu for further details. The factory default setting is 12345. • To select "0" for numeric input, press the numeric 10 button. • Entering an input will automatically check the password. If the password is not correct, "PASSWORD ERROR!" is displayed on the monitor screen and the display returns to step 2. To enter the password again, repeat procedures 3 and 4. • To quit entering the password, press the SETUP/ ESC button. 5. If the password is correct, the instructions shown below appear in the lower-left corner of the menu. FORMAT MENU MAIN 1:¢¢GB EXT5 1:¢¢GB EXT4 1:ADD EXT3 1:EXT2 1:EXT1 1:EXT0 1:EXT DVD:- 2:¢¢GB 2:¢¢GB 2:ADD 2:2:2:2:- 3:¢¢GB 3:ADD 3:3:3:3:- 4:¢¢GB 4:ADD 4:4:4:4:- 1DISK ALL ALL MIRROR RESTART SELECT ITEM AND PRESS [SET] KEY 29
-
 1
1 -
2
-
3
-
4
-
5
-
6
-
7
-
8
-
9
-
10
-
11
-
12
-
13
-
14
-
15
-
16
-
17
-
18
-
19
-
20
-
21
-
22
-
 23
23 -
 24
24 -
 25
25 -
 26
26 -
 27
27 -
 28
28 -
 29
29 -
 30
30 -
 31
31 -
 32
32 -
 33
33 -
34
-
35
-
36
-
37
-
38
-
39
-
40
-
41
-
42
-
43
-
44
-
45
-
46
-
47
-
48
-
49
-
50
-
51
-
52
-
53
-
54
-
55
-
56
-
57
-
58
-
59
-
60
-
61
-
62
-
63
-
64
-
65
-
66
-
67
-
68
-
69
-
70
-
71
-
72
-
73
-
74
-
75
-
76
-
77
-
78
-
79
-
80
-
81
-
82
-
83
-
84
-
85
-
86
-
87
-
88
-
89
-
90
-
91
-
92
-
93
-
94
-
95
-
96
-
97
-
98
-
99
-
100
-
101
-
102
 |
 |
