Panasonic WJHD500A WJHD500A User Guide - Page 94
Backup Function
 |
View all Panasonic WJHD500A manuals
Add to My Manuals
Save this manual to your list of manuals |
Page 94 highlights
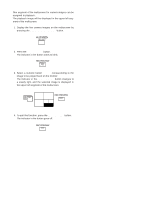
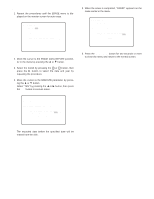
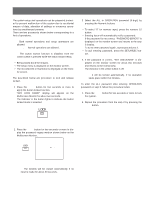
BACKUP FUNCTION The recorded images in the Disk Recorder can be stored on the DVD-RAM disk by copying the selected records when the system is equipped with the DVD Extension Unit. Notes: • This function is only available when the optional DVD Drive Unit (procured locally) is connected to the COPY port on the rear of the Disk Recorder. • It is recommended to backup the recorded data in case of a malfunction or accident. Follow the procedures described below to copy to the DVD-RAM disk. 1. Select the group to be played back by pressing the GROUP SELECT button. 2. Pressing the ALARM SEARCH button toggles the indicator in the button on and off. Selecting either mode will display the list as shown below. On: Displays only the Alarm and Emergency Record List of the selected group. Off: Displays all Record Lists for the selected group. 3. Press the INDEX button to display the list selected on the Multiscreen Monitor as shown below. Pressing the INDEX button will toggle the window between List and Thumbnail search. The backup function is enabled only the list table is displayed on the monitor. INDEX • Record List DATE MAY29.00 NO GROUP 000010009 G2 000010008 G1 000010007 G3 000010006 ALL 000010005 ALL 000010004 G4 000010003 ALL 000010002 G3 ALL GROUP TIME REC-MODE 23:59:59 T/L 22:15:40 M/S ALM-TRM12 21:00:07 O/S ALM-VMD3 17:33:05 T/L 7:23:11 T/L EMR 6:59:44 M/S ALM-PC4 8:55:28 T/L MAN 0:01:28 T/L ALM-TRM1 (TOTAL 2343RECORD) SEARCH: MAY29.00 0:01 G1 ALARM # SEARCH:[DISPLAY] SEL:←→ CHG:+- EXE:SET ESC:FSTOP Search Editing Area Note: The displayed list can be switched to the selected group by pressing the GROUP SELECT button. 4. Press the DISPLAY button to display the record list with the search (SEARCH) editing area as shown in the figure. DISPLAY 97 5. Move the cursor to the position to be edited in the search editing area by pressing the A, or B button. 6. Select the desired digit or month by pressing the + or - button. 7. Repeat procedures 5 and 6 to edit the other positions. 8. Press the PLAY/PAUSE button to start the search. A list of records including the most recent recording will appear on the monitor. 9. Rotate the JogDial clockwise or counterclockwise to move the cursor to the record to be stored on the disk. Multiple records can be selected for storing as shown below. • Select a record on the table by rotating the JogDial, then press the SET button. • Select the next record on the table by rotating the JogDial. The records placed between can be selected for storing by executing the following procedure. 10. Press the COPY button to start copying. The display "COPYING" appears on the lower-left corner in the menu. COPY DATE MAY29.00 NO GROUP 000010009 G2 000010008 G1 000010007 G3 000010006 ALL 000010005 ALL 000010004 G4 000010003 ALL 000010002 G3 ALL GROUP TIME REC-MODE 23:59:59 T/L 22:15:40 M/S ALM-TRM12 21:00:07 O/S ALM-VMD3 17:33:05 T/L 7:23:11 T/L EMR 6:59:44 M/S ALM-PC4 8:55:28 T/L MAN 0:01:28 T/L ALM-TRM1 (TOTAL 2343RECORD) COPYING MAY29.00 000003 PLAY:B ESC:FSTOP SEL:JOG SEARCH:DISPLAY 11. When the copying is completed the display "COPY DONE!" appears in the menu. DATE MAY29.00 NO GROUP 000010009 G2 000010008 G1 000010007 G3 000010006 ALL 000010005 ALL 000010004 G4 000010003 ALL 000010002 G3 ALL GROUP TIME REC-MODE 23:59:59 T/L 22:15:40 M/S ALM-TRM12 21:00:07 O/S ALM-VMD3 17:33:05 T/L 7:23:11 T/L EMR 6:59:44 M/S ALM-PC4 8:55:28 T/L MAN 0:01:28 T/L ALM-TRM1 (TOTAL 2343RECORD) COPY DONE! LEFT:20% PLAY:B ESC:FSTOP SEL:JOG SEARCH:DISPLAY 12. To quit copying, press the STOP button to exit from the menu.
-
 1
1 -
2
-
3
-
4
-
5
-
6
-
7
-
8
-
9
-
10
-
11
-
12
-
13
-
14
-
15
-
16
-
17
-
18
-
19
-
20
-
21
-
22
-
23
-
24
-
25
-
26
-
27
-
28
-
29
-
30
-
31
-
32
-
33
-
34
-
35
-
36
-
37
-
38
-
39
-
40
-
41
-
42
-
43
-
44
-
45
-
46
-
47
-
48
-
49
-
50
-
51
-
52
-
53
-
54
-
55
-
56
-
57
-
58
-
59
-
60
-
61
-
62
-
63
-
64
-
65
-
66
-
67
-
68
-
69
-
70
-
71
-
72
-
73
-
74
-
75
-
76
-
77
-
78
-
79
-
80
-
81
-
82
-
83
-
84
-
85
-
86
-
87
-
88
-
 89
89 -
 90
90 -
 91
91 -
 92
92 -
 93
93 -
 94
94 -
 95
95 -
 96
96 -
 97
97 -
 98
98 -
 99
99 -
100
-
101
-
102
 |
 |