Panasonic WJHD500A WJHD500A User Guide - Page 74
DVD DRIVE SETUP, DVD Format, Alarm Recording Backup
 |
View all Panasonic WJHD500A manuals
Add to My Manuals
Save this manual to your list of manuals |
Page 74 highlights
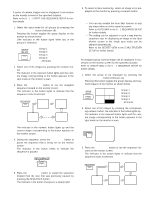
DVD DRIVE SETUP The procedures described below let you select the DVD Drive function when the specified DVD drive is installed in the system. 1. Move the cursor to DVD on the WJ-HD500 SETUP menu by pressing the C or D button, then press the SET button. The DVD menu shown below appears on the monitor screen. 10 DVD DVD FORMAT *AUTO COPY(EVENT) AUTO COPY(EMERGENCY) DVD DISKEND DVD FULL OFF OFF STOP 1% 2. Select an item or item parameter on the menu by pressing the D or C button. 3. To return to the previous setup menu, press the SETUP/ESC button. s DVD Format Refer to PREPARATIONS for details. s Alarm Recording Backup The alarm images recorded by the disk recorder can be automatically stored (back up) on the DVD-RAM disk by copying the records programmed in advance. The procedures described below let you enable or disable this function (alarm backup) on the DVD-RAM disk. 1. Move the cursor to AUTO COPY(EVENT) on the DVD menu by pressing the C or D button 2. Select either OFF or ON by pressing the + or - button, then press the SET button. OFF: Disables alarm data backup. ON: Enables alarm data backup. The factory default setting is OFF. The AUTO COPY(EVENT) menu shown below appears on the monitor. 10-2 AUTO COPY(EVENT) CAM COPY 1 OFF 2 OFF 3 OFF 4 OFF 5 OFF 6 OFF 7 OFF 8 OFF CAM COPY 9 OFF 10 OFF 11 OFF 12 OFF 13 OFF 14 OFF 15 OFF 16 OFF 3. Move the cursor to the appropriate COPY column by pressing the D, C, A or B button, then select either mode for a camera by pressing the + or - button. OFF: Disables camera alarm backup. ON: Enables camera alarm backup. 4. Repeat the above step 3 to program the settings for other cameras. 5. After completing the settings, press the SETUP/ESC button to return to the previous DVD menu. Notes: • Selecting ON for AUTO COPY(EVENT) will enable manual or automatic alarm data backup for the specified cameras. However, Timer Recording is required to program additional timer settings. Refer to AUTO COPY on the Program Timer menu for details on the selected recording method. • The following operations will be disabled by AUTO COPY(EVENT) ON. Formatting the DVD-RAM disk Displaying DVD-RAM disk recording list Playing back DVD-RAM disk recording list To enable the above functions, set the parameter to OFF. 76
-
 1
1 -
2
-
3
-
4
-
5
-
6
-
7
-
8
-
9
-
10
-
11
-
12
-
13
-
14
-
15
-
16
-
17
-
18
-
19
-
20
-
21
-
22
-
23
-
24
-
25
-
26
-
27
-
28
-
29
-
30
-
31
-
32
-
33
-
34
-
35
-
36
-
37
-
38
-
39
-
40
-
41
-
42
-
43
-
44
-
45
-
46
-
47
-
48
-
49
-
50
-
51
-
52
-
53
-
54
-
55
-
56
-
57
-
58
-
59
-
60
-
61
-
62
-
63
-
64
-
65
-
66
-
67
-
68
-
 69
69 -
 70
70 -
 71
71 -
 72
72 -
 73
73 -
 74
74 -
 75
75 -
 76
76 -
 77
77 -
 78
78 -
 79
79 -
80
-
81
-
82
-
83
-
84
-
85
-
86
-
87
-
88
-
89
-
90
-
91
-
92
-
93
-
94
-
95
-
96
-
97
-
98
-
99
-
100
-
101
-
102
 |
 |
