Panasonic WJHD500A WJHD500A User Guide - Page 48
Timer Recording Setup, Alarm Active Mode Manual, Recording, Program Timer
 |
View all Panasonic WJHD500A manuals
Add to My Manuals
Save this manual to your list of manuals |
Page 48 highlights
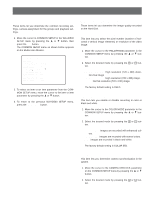
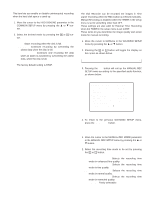
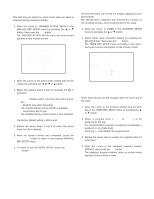
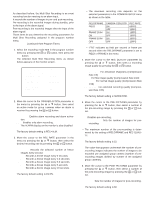
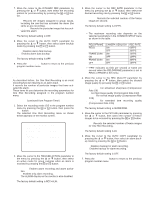
s Alarm Active Mode (Manual Recording) This item lets you select the active mode when an alarm is received during manual recording. 1. Move the cursor to TRIGGER ACTION SETUP in the MANUAL REC SETUP menu by pressing the D or C button, then press the SET button. The TRIGGER ACTION SETUP menu as shown below appears on the monitor screen. 2-1 TRIGGER ACTION SETUP CAM ACTION CAM ACTION 1 REC+ALM 9 REC+ALM 2 REC 10 REC+ALM 3 OFF 11 REC+ALM 4 REC+ALM 12 REC+ALM 5 REC+ALM 13 REC+ALM 6 REC+ALM 14 REC+ALM 7 REC+ALM 15 REC+ALM 8 REC+ALM 16 REC+ALM 2. Move the cursor to the active mode editing area for the camera by pressing the A, B,C or D button. 3. Select the desired active mode by pressing the + or - button. REC+ALM: Enables alarm recording and alarm activation. REC: Enables only alarm recording. The ALARM display on the monitor is disabled. OFF: Deactivates alarm input. The ALARM display on the monitor is also disabled. The factory default setting is REC+ALM. 4. Repeat the above steps 2 and 3 to select the active mode for other cameras. 5. When all camera modes are completed, press the SETUP/ESC button to return to the previous MANUAL REC SETUP menu. 6. To return to the WJ-HD500 SETUP, press the SETUP/ ESC button. Timer Recording Setup The Disk Recorder can record the images triggered by the internal timer. The internal timer comprises four event times common to the recording groups, and is programmed in the setup. 1. Move the cursor to TIMER in the WJ-HD500 SETUP menu by pressing the D or C button. 2. Select either audio recording display by pressing the + or - button, then press the SET button. The TIMER REC SETUP menu according to the specified audio function will appear on the monitor screen. 3 TIMER REC SETUP(WITHOUT AUDIO) SUNDAY MONDAY TUESDAY WEDNESDAY THURSDAY FRIDAY SATURDAY DAILY PROGRAM PROG1 TIMER SPECIAL DAY EXT REC MODE --- s Program Timer These items let you set the program timer for each day of the week. 1. Move the cursor to the program editing area for each day in the TIMER REC SETUP menu by pressing the D or C button. 2. Select a program timer (PROG1 to PROG4) to be assigned for the day. It is recommended to assign a program to a weekday, a weekend or on a daily basis. Selecting (---) will disable the program timer. 3. Repeat the above step to assign the program timer for other days. 4. Move the cursor to the assigned program number (PROG1), then press the SET button. The assigned program number menu as shown below appears on the monitor screen. 50
-
 1
1 -
2
-
3
-
4
-
5
-
6
-
7
-
8
-
9
-
10
-
11
-
12
-
13
-
14
-
15
-
16
-
17
-
18
-
19
-
20
-
21
-
22
-
23
-
24
-
25
-
26
-
27
-
28
-
29
-
30
-
31
-
32
-
33
-
34
-
35
-
36
-
37
-
38
-
39
-
40
-
41
-
42
-
 43
43 -
 44
44 -
 45
45 -
 46
46 -
 47
47 -
 48
48 -
 49
49 -
 50
50 -
 51
51 -
 52
52 -
 53
53 -
54
-
55
-
56
-
57
-
58
-
59
-
60
-
61
-
62
-
63
-
64
-
65
-
66
-
67
-
68
-
69
-
70
-
71
-
72
-
73
-
74
-
75
-
76
-
77
-
78
-
79
-
80
-
81
-
82
-
83
-
84
-
85
-
86
-
87
-
88
-
89
-
90
-
91
-
92
-
93
-
94
-
95
-
96
-
97
-
98
-
99
-
100
-
101
-
102
 |
 |
