Panasonic WVCS574 WVCS574 User Guide - Page 10
INSTALLATION PRECAUTIONS, cover. See Preparing the Camera and Decorative
 |
View all Panasonic WVCS574 manuals
Add to My Manuals
Save this manual to your list of manuals |
Page 10 highlights
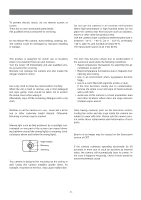
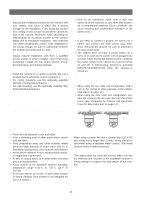
INSTALLATION PRECAUTIONS Warning: Discuss the installation location for the camera with your retailer, and select a place that is strong enough for the installation. If you install the camera on a ceiling or wall, except for accidents caused by fault in the camera, Panasonic holds absolutely no responsibility for accidents caused by the camera falling due to unsuitable installation. Take sufficient care when installing the camera. If the installation is not strong enough, be sure to sufficiently reinforce the location and check that it is safe. Warning: Always request installation work from a qualified service person or system installer. Lack of technical knowledge creates the risk of fire, electric shock, personal injury, and material damage. ■ Camera Installation Location • Install the camera on a ceiling (concrete, etc.) at a location that is sufficiently strong to support it. • For ceiling mounting, use the optionally available WV-Q117 Ceiling Mount Bracket. • For wall mounting, use the optionally available WVQ118 Wall Mount Bracket. ■ This camera is an indoor camera. It is not designed for outdoor use. ■ This camera is designed for use in a hanging configuration only. Using it in an upright or inclined configuration can cause malfunction and shorten the life of the camera. ■ Install the camera in a horizontal configuration, with the dome pointed downwards. ■ Never install or use the camera in the following locations. • Areas directly exposed to rain and water • Near a swimming pool or other areas where chemi- cals are used • Food preparation areas and other locations where there are large amounts of steam vapor and oil, in flammable atmospheres, other special environments • Areas where radiation, X-rays, strong electric waves, or magnetism is generated • At sea, in coastal areas, or in areas where corrosive gas is being generated • Areas outside of the allowable ambient operating temperature range (-10 °C to +50 °C {14 °F to 122 °F}) • In a motor vehicle, on a boat, or other areas subject to strong vibration (This camera is not designed for use in a vehicle.) • Near an air conditioner outlet, near a door that opens up to the outdoors, or any other area subjected to temperature extremes (Such conditions can cause clouding and condensation formation on the dome cover.) ■ Wiring the Camera • If you need to connect a ground, be sure to do it before you connect the main power plug. Also, when removing the ground, be sure to disconnect the main power plug. • The camera does not have a power switch, so it turns on as soon as the power cord is plugged into a power outlet. During the electrical work, configure the power supply to the camera so it can be turned on and off. A self-cleaning function is activated (PAN/TILT/ZOOM/FOCUS) when the camera is turned on. ■ When wiring the camera, its cables (power, video output, RS485, alarm in, alarm out) can exit out the side or the top of the camera. • When using the top cable exit configuration, drill a hole in the ceiling to allow passage of the cables. (See step 3 on page 15.) • When using the side cable exit configuration, prepare the cutout in the die cast case and decorative cover. (See "Preparing the Camera and Decorative Cover for Side Cable Exit" on page 14.) ■ Noise interference considerations When using a power line that is greater than 120 V AC and wiring that is longer than 1 meter, wiring should be performed using a separate metal conduit. (The metal conduit must be earth grounded.) ■ Screws should be ordered separately. The camera does not come with screws. Make sure that the materials and structure of the installation location is strong enough to support the total weight of the camera. -10-
-
 1
1 -
2
-
3
-
4
-
 5
5 -
 6
6 -
 7
7 -
 8
8 -
 9
9 -
 10
10 -
 11
11 -
 12
12 -
 13
13 -
 14
14 -
 15
15 -
16
-
17
-
18
-
19
-
20
-
21
-
22
-
23
-
24
-
25
-
26
-
27
-
28
-
29
-
30
-
31
-
32
-
33
-
34
-
35
-
36
-
37
-
38
-
39
-
40
-
41
-
42
-
43
-
44
-
45
-
46
-
47
-
48
-
49
-
50
-
51
-
52
-
53
-
54
-
55
-
56
-
57
-
58
-
59
-
60
 |
 |