Pentax A40 Operation Manual - Page 107
Select [AUTO] and press the, four-way controller
 |
View all Pentax A40 manuals
Add to My Manuals
Save this manual to your list of manuals |
Page 107 highlights
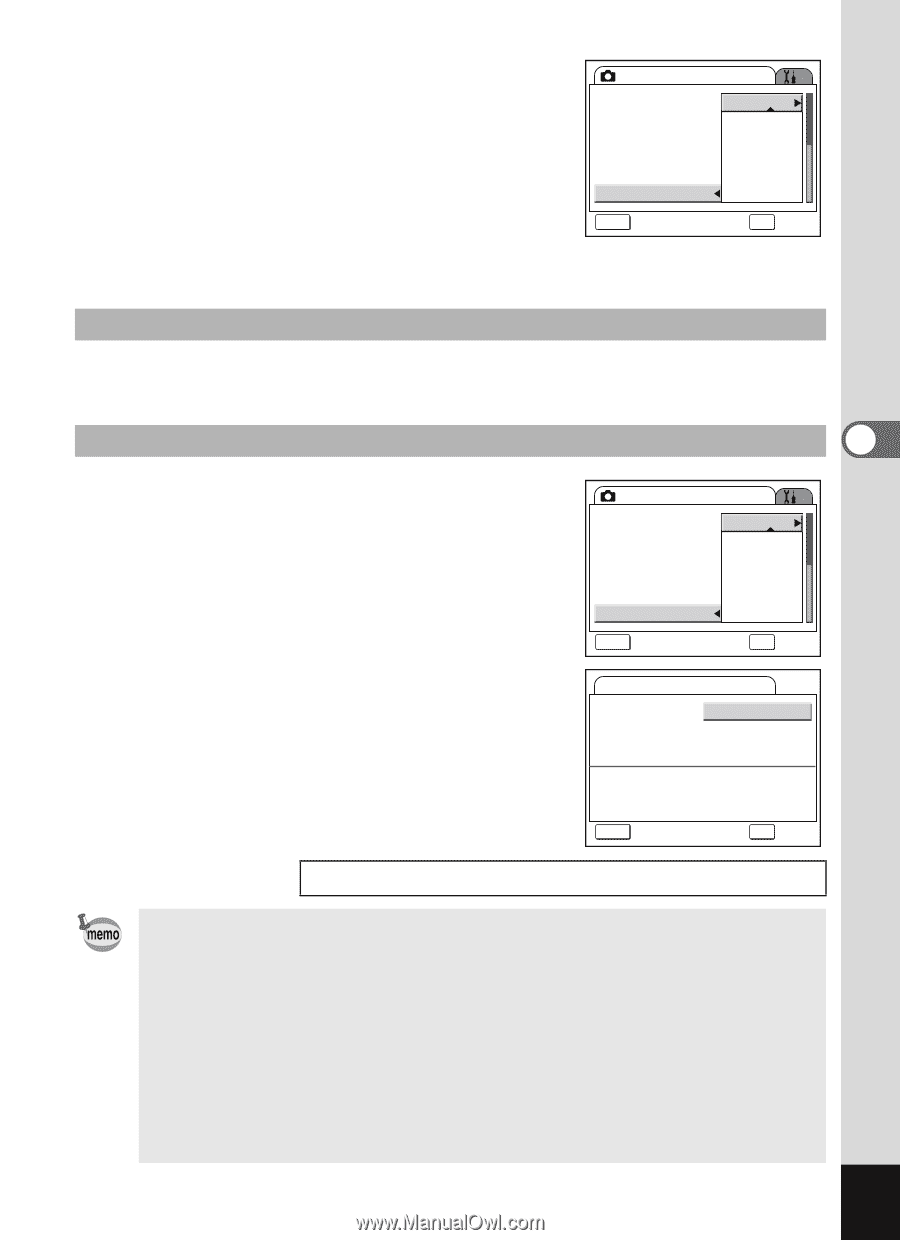
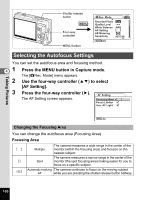
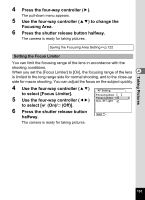
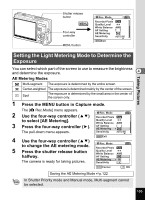
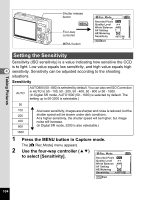
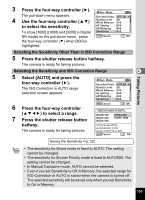
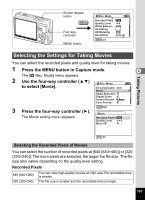
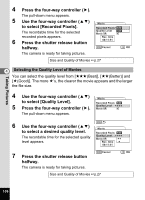
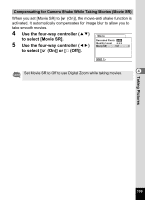
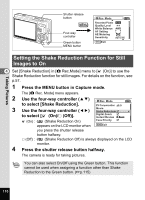
3 Press the four-way controller (5). Rec. Mode The pull-down menu appears. Recorded Pixels A1U0TMO 800 4 Use the four-way controller (23) Quality Level 50 White Balance A1W00B to select the sensitivity. AF Setting 200 AE Metering 400 To show [1600] ([1600] and [3200] in Digital Sensitivity A80ut0o SR mode) on the pull-down menu, press MENU Cancel OK OK the four-way controller (3) when [800] is highlighted. Selecting the Sensitivity Other Than in ISO Correction Range 5 Press the shutter release button halfway. The camera is ready for taking pictures. Selecting the Sensitivity and ISO Correction Range 4 5 Select [AUTO] and press the four-way controller (5). The ISO Correction in AUTO range selection screen appears. Rec. Mode Recorded Pixels Quality Level White Balance AF Setting AE Metering Sensitivity A1U0TMO 800 50 A1W00B 200 400 A80ut0o 6 Press the four-way controller (2345) to select a range. 7 Press the shutter release button halfway. The camera is ready for taking pictures. MENU Cancel OK OK ISO Correction in AUTO ISO50-100 ISO50-200 ISO50-400 ISO50-800 ISO50-1600 Corrects sensitivity automatically in the range of ISO 50 to 800 MENU Cancel OK OK Taking Pictures Saving the Sensitivity 1p.122 • The sensitivity for Movie mode is fixed to AUTO. The setting cannot be changed. • The sensitivity for Shutter Priority mode is fixed to AUTO800. The setting cannot be changed. • In Manual Exposure mode, AUTO cannot be selected. • Even if you set Sensitivity to Off in Memory, the selected range for ISO Correction in AUTO is saved when the camera is turned off. The selected sensitivity will be saved only when you set Sensitivity to On in Memory. 105
-
 1
1 -
2
-
3
-
4
-
5
-
6
-
7
-
8
-
9
-
10
-
11
-
12
-
13
-
14
-
15
-
16
-
17
-
18
-
19
-
20
-
21
-
22
-
23
-
24
-
25
-
26
-
27
-
28
-
29
-
30
-
31
-
32
-
33
-
34
-
35
-
36
-
37
-
38
-
39
-
40
-
41
-
42
-
43
-
44
-
45
-
46
-
47
-
48
-
49
-
50
-
51
-
52
-
53
-
54
-
55
-
56
-
57
-
58
-
59
-
60
-
61
-
62
-
63
-
64
-
65
-
66
-
67
-
68
-
69
-
70
-
71
-
72
-
73
-
74
-
75
-
76
-
77
-
78
-
79
-
80
-
81
-
82
-
83
-
84
-
85
-
86
-
87
-
88
-
89
-
90
-
91
-
92
-
93
-
94
-
95
-
96
-
97
-
98
-
99
-
100
-
101
-
 102
102 -
 103
103 -
 104
104 -
 105
105 -
 106
106 -
 107
107 -
 108
108 -
 109
109 -
 110
110 -
 111
111 -
 112
112 -
113
-
114
-
115
-
116
-
117
-
118
-
119
-
120
-
121
-
122
-
123
-
124
-
125
-
126
-
127
-
128
-
129
-
130
-
131
-
132
-
133
-
134
-
135
-
136
-
137
-
138
-
139
-
140
-
141
-
142
-
143
-
144
-
145
-
146
-
147
-
148
-
149
-
150
-
151
-
152
-
153
-
154
-
155
-
156
-
157
-
158
-
159
-
160
-
161
-
162
-
163
-
164
-
165
-
166
-
167
-
168
-
169
-
170
-
171
-
172
-
173
-
174
-
175
-
176
-
177
-
178
-
179
-
180
-
181
-
182
-
183
-
184
-
185
-
186
-
187
-
188
-
189
-
190
-
191
-
192
-
193
-
194
-
195
-
196
-
197
-
198
-
199
-
200
-
201
-
202
-
203
-
204
-
205
-
206
-
207
-
208
-
209
-
210
-
211
-
212
-
213
-
214
-
215
 |
 |