Pentax A40 Operation Manual - Page 43
Using the Button Functions, Capture Mode
 |
View all Pentax A40 manuals
Add to My Manuals
Save this manual to your list of manuals |
Page 43 highlights
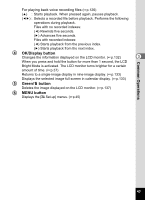
Using the Button Functions 1 2 3 4 5 3 6 7 Common Operations Capture Mode 1 Shake Reduction preview button Displays the compensated image on the LCD monitor while you are pressing the button. It allows you to preview the compensated image before shooting. (1p.57) 2 w/x Zoom button Changes the size of the subject. (1p.33, p.88) 3 Q Playback button Switches to the Playback mode. When pressed again, returns to Capture mode. (1p.37) 4 Four-way controller (2345) (q5) Changes the focus mode. (1p.90) (g2) Changes the drive mode. (1p.83 to p.87) (X 3) Displays the Capture Mode Palette. (1p.50) (b4) Changes the flash mode. (1p.93) 5 OK/Display button Changes the information displayed on the LCD monitor. (1p.53) When you press and hold the button for more than 1 second, the LCD Bright Mode is activated. The LCD monitor turns brighter for a certain amount of time. (1p.36) 6 Green/i button Enters Green Mode. (1p.59) You can assign a different function to the Green button by selecting [Green Button] in the [A Rec.Mode] menu. (1p.115) 7 MENU button Displays the [A Rec.Mode] menus. (1p.45) 41
-
 1
1 -
2
-
3
-
4
-
5
-
6
-
7
-
8
-
9
-
10
-
11
-
12
-
13
-
14
-
15
-
16
-
17
-
18
-
19
-
20
-
21
-
22
-
23
-
24
-
25
-
26
-
27
-
28
-
29
-
30
-
31
-
32
-
33
-
34
-
35
-
36
-
37
-
 38
38 -
 39
39 -
 40
40 -
 41
41 -
 42
42 -
 43
43 -
 44
44 -
 45
45 -
 46
46 -
 47
47 -
 48
48 -
49
-
50
-
51
-
52
-
53
-
54
-
55
-
56
-
57
-
58
-
59
-
60
-
61
-
62
-
63
-
64
-
65
-
66
-
67
-
68
-
69
-
70
-
71
-
72
-
73
-
74
-
75
-
76
-
77
-
78
-
79
-
80
-
81
-
82
-
83
-
84
-
85
-
86
-
87
-
88
-
89
-
90
-
91
-
92
-
93
-
94
-
95
-
96
-
97
-
98
-
99
-
100
-
101
-
102
-
103
-
104
-
105
-
106
-
107
-
108
-
109
-
110
-
111
-
112
-
113
-
114
-
115
-
116
-
117
-
118
-
119
-
120
-
121
-
122
-
123
-
124
-
125
-
126
-
127
-
128
-
129
-
130
-
131
-
132
-
133
-
134
-
135
-
136
-
137
-
138
-
139
-
140
-
141
-
142
-
143
-
144
-
145
-
146
-
147
-
148
-
149
-
150
-
151
-
152
-
153
-
154
-
155
-
156
-
157
-
158
-
159
-
160
-
161
-
162
-
163
-
164
-
165
-
166
-
167
-
168
-
169
-
170
-
171
-
172
-
173
-
174
-
175
-
176
-
177
-
178
-
179
-
180
-
181
-
182
-
183
-
184
-
185
-
186
-
187
-
188
-
189
-
190
-
191
-
192
-
193
-
194
-
195
-
196
-
197
-
198
-
199
-
200
-
201
-
202
-
203
-
204
-
205
-
206
-
207
-
208
-
209
-
210
-
211
-
212
-
213
-
214
-
215
 |
 |
