Pentax A40 Operation Manual - Page 117
Setting the Green Button
 |
View all Pentax A40 manuals
Add to My Manuals
Save this manual to your list of manuals |
Page 117 highlights
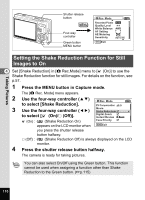
Taking Pictures Shutter release button MENU Four-way controller MENU button Rec. Mode Recorded Pixels Quality Level White Balance AF Setting AE Metering Sensitivity 12M AWB AUTO 800 MENU Exit Setting the Green Button You can assign one of the following functions to the Green button; [Green Mode] (p.59), [Face Priority] (p.112), [D-Range Comp.] (p.113), 4 [Shake Reduction] (p.57), and [Fn Setting] (p.116). You can activate the assigned function by just pressing the Green button. Assigning a Function (Green Mode/Face Priority/D-Range Comp./ Shake Reduction) 1 Press the MENU button in Capture mode. The [A Rec.Mode] menu appears. 2 Press the four-way controller (23) to select [Green Button]. Rec. Mode D-Range Comp. Off 3 Press the four-way controller (5). One push PF Memory The Green button setting screen appears. Green Button Sharpness Saturation MENU Exit 4 Use the four-way controller (23) to select the function you want to Green Button Green Mode register. Face Priority 5 Press the shutter release button D-Range Comp. Shake Reduction halfway. Fn Setting The camera is ready for taking pictures. MENU Cancel OK OK Green Mode is registered as the default setting. 115
-
 1
1 -
2
-
3
-
4
-
5
-
6
-
7
-
8
-
9
-
10
-
11
-
12
-
13
-
14
-
15
-
16
-
17
-
18
-
19
-
20
-
21
-
22
-
23
-
24
-
25
-
26
-
27
-
28
-
29
-
30
-
31
-
32
-
33
-
34
-
35
-
36
-
37
-
38
-
39
-
40
-
41
-
42
-
43
-
44
-
45
-
46
-
47
-
48
-
49
-
50
-
51
-
52
-
53
-
54
-
55
-
56
-
57
-
58
-
59
-
60
-
61
-
62
-
63
-
64
-
65
-
66
-
67
-
68
-
69
-
70
-
71
-
72
-
73
-
74
-
75
-
76
-
77
-
78
-
79
-
80
-
81
-
82
-
83
-
84
-
85
-
86
-
87
-
88
-
89
-
90
-
91
-
92
-
93
-
94
-
95
-
96
-
97
-
98
-
99
-
100
-
101
-
102
-
103
-
104
-
105
-
106
-
107
-
108
-
109
-
110
-
111
-
 112
112 -
 113
113 -
 114
114 -
 115
115 -
 116
116 -
 117
117 -
 118
118 -
 119
119 -
 120
120 -
 121
121 -
 122
122 -
123
-
124
-
125
-
126
-
127
-
128
-
129
-
130
-
131
-
132
-
133
-
134
-
135
-
136
-
137
-
138
-
139
-
140
-
141
-
142
-
143
-
144
-
145
-
146
-
147
-
148
-
149
-
150
-
151
-
152
-
153
-
154
-
155
-
156
-
157
-
158
-
159
-
160
-
161
-
162
-
163
-
164
-
165
-
166
-
167
-
168
-
169
-
170
-
171
-
172
-
173
-
174
-
175
-
176
-
177
-
178
-
179
-
180
-
181
-
182
-
183
-
184
-
185
-
186
-
187
-
188
-
189
-
190
-
191
-
192
-
193
-
194
-
195
-
196
-
197
-
198
-
199
-
200
-
201
-
202
-
203
-
204
-
205
-
206
-
207
-
208
-
209
-
210
-
211
-
212
-
213
-
214
-
215
 |
 |
