Pioneer AVIC N4 Owner's Manual - Page 32
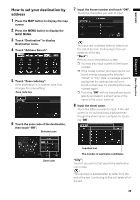
Searching your destination after, specifying the name of the city or area
 |
UPC - 012562863078
View all Pioneer AVIC N4 manuals
Add to My Manuals
Save this manual to your list of manuals |
Page 32 highlights
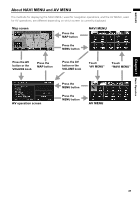
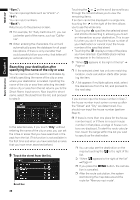
NAVI/AV Basic Operation Chapter 1 "Sym.": You can input symbols such as "&"and "+". "0-9": You can input numbers. "Back": Returns you to the previous screen. ❒ For example, for "Early California Ct", you can just enter part of the name, such as "California". ❒ When entering the characters, the unit will automatically query the database for all possible options. If there is only one letter that could possibly follow your entry, that letter will automatically be entered. Searching your destination after specifying the name of the city or area You can narrow down the search candidates by initially specifying the name of the city or area where your destination is located. Inputting the name of the city or area then selecting the destination city or area from the list returns you to the Street Name input screen. Now input the street name, select the street from the list, and proceed to step 9. In the selected area, if you touch "City" without entering the name of the city or area, you can set the cities or areas that you have searched in the past from the list. (This function is not available in the first time and when you have selected an area that you have never searched before.) 9 Touch the street from the list. Scroll bar Touching the or on the scroll bar scrolls you through the list and allows you to view the remaining items. If an item cannot be displayed in a single line, touching the to the right of the item allows you to see the whole line. • Touching the specifies the selected street and streets intersecting it, allowing you to set an intersection as your destination. This is useful when you don't know the house number of your destination or cannot input the house number of the specified street. • Touching the displays a map of the place you have selected. (Candidate place names may appear in the list screen.) ➲ "When appears to the right of the list" ➞ Page 41 ❒ If the selected street has only one matching location, route calculation starts after pressing the item. ❒ A list appears if multiple options exist, select the desired one from the list, and proceed to the next step. If you did not input the house number in Step 7, the house number input screen comes up after the "Street" and "City" are determined. You should now input the house number (perform Step 5). ❒ If there is more than one place for the house number input, or if there is no such house number in that place, a range of house numbers are displayed. To start the route calculation, touch the range within the list you wish to specify as the destination. ❒ You can also see the destination on the map by touching the to the right of the list. ➲ "When appears to the right of the list" ➞ Page 41 ❒ If you press the MENU button, the calculation is canceled. ❒ After the route calculation, the system start storing the map data around the route for "Memory navi mode". 30
-
 1
1 -
2
-
3
-
4
-
5
-
6
-
7
-
8
-
9
-
10
-
11
-
12
-
13
-
14
-
15
-
16
-
17
-
18
-
19
-
20
-
21
-
22
-
23
-
24
-
25
-
26
-
 27
27 -
 28
28 -
 29
29 -
 30
30 -
 31
31 -
 32
32 -
 33
33 -
 34
34 -
 35
35 -
 36
36 -
 37
37 -
38
-
39
-
40
-
41
-
42
-
43
-
44
-
45
-
46
-
47
-
48
-
49
-
50
-
51
-
52
-
53
-
54
-
55
-
56
-
57
-
58
-
59
-
60
-
61
-
62
-
63
-
64
-
65
-
66
-
67
-
68
-
69
-
70
-
71
-
72
-
73
-
74
-
75
-
76
-
77
-
78
-
79
-
80
-
81
-
82
-
83
-
84
-
85
-
86
-
87
-
88
-
89
-
90
-
91
-
92
-
93
-
94
-
95
-
96
-
97
-
98
-
99
-
100
-
101
-
102
-
103
-
104
-
105
-
106
-
107
-
108
-
109
-
110
-
111
-
112
-
113
-
114
-
115
-
116
-
117
-
118
-
119
-
120
-
121
-
122
-
123
-
124
-
125
-
126
-
127
-
128
-
129
-
130
-
131
-
132
-
133
-
134
-
135
-
136
-
137
-
138
-
139
-
140
-
141
-
142
-
143
-
144
-
145
-
146
-
147
-
148
-
149
-
150
-
151
-
152
-
153
-
154
-
155
-
156
-
157
-
158
-
159
-
160
-
161
-
162
-
163
-
164
-
165
-
166
-
167
-
168
-
169
-
170
-
171
-
172
-
173
-
174
-
175
-
176
-
177
-
178
-
179
-
180
 |
 |
