Pioneer DVR-640H-S Owner's Manual - Page 107
Black Setup
 |
UPC - 012562810300
View all Pioneer DVR-640H-S manuals
Add to My Manuals
Save this manual to your list of manuals |
Page 107 highlights
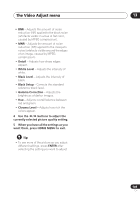
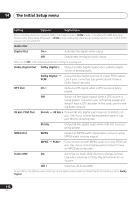
The Video Adjust menu 13 ENTER 3 adjust. Select the setting you want to Memory1 Prog. Motion PureCinema 3-D Y/C YNR CNR White AGC White Level 1 ch Motion Still Auto1 Motion Still Off Max Off Max Off Min Max You can adjust the following settings: • Prog. Motion - Adjusts the motion and still picture quality when video output is set to progressive. • PureCinema - This setting optimizes the picture for film material when the video output is set to progressive. Usually this is best left set to Auto 1; try switching to Auto 2, On or Off if the picture appears unnatural. • 3-D Y/C - Adjusts the brightness / color separation. • YNR - Adjusts the amount of noise reduction (NR) applied to the Y (brightness) component. • CNR - Adjusts the amount of noise reduction (NR) applied to the C (color) component. • White AGC - Turn on for automatic white level adjustment.1 • White Level - Adjusts the intensity of white. • Black Level - Adjusts the intensity of black. • Black Setup - Corrects the standard reference black level. • Hue - Adjusts overall balance between red and green. • Chroma Level - Adjusts how rich the colors appear. ENTER 4 setting. Adjust the currently selected HOME MENU 5 Press to exit. You can now use the preset for any other input or the built-in TV tuner. Tip • To see more of the picture as you adjust different settings, press ENTER after selecting the setting you want to adjust. Note 1 When White AGC is On, the White Level setting can't be adjusted. 107 En
-
 1
1 -
2
-
3
-
4
-
5
-
6
-
7
-
8
-
9
-
10
-
11
-
12
-
13
-
14
-
15
-
16
-
17
-
18
-
19
-
20
-
21
-
22
-
23
-
24
-
25
-
26
-
27
-
28
-
29
-
30
-
31
-
32
-
33
-
34
-
35
-
36
-
37
-
38
-
39
-
40
-
41
-
42
-
43
-
44
-
45
-
46
-
47
-
48
-
49
-
50
-
51
-
52
-
53
-
54
-
55
-
56
-
57
-
58
-
59
-
60
-
61
-
62
-
63
-
64
-
65
-
66
-
67
-
68
-
69
-
70
-
71
-
72
-
73
-
74
-
75
-
76
-
77
-
78
-
79
-
80
-
81
-
82
-
83
-
84
-
85
-
86
-
87
-
88
-
89
-
90
-
91
-
92
-
93
-
94
-
95
-
96
-
97
-
98
-
99
-
100
-
101
-
 102
102 -
 103
103 -
 104
104 -
 105
105 -
 106
106 -
 107
107 -
 108
108 -
 109
109 -
 110
110 -
 111
111 -
 112
112 -
113
-
114
-
115
-
116
-
117
-
118
-
119
-
120
-
121
-
122
-
123
-
124
-
125
-
126
-
127
-
128
-
129
-
130
-
131
-
132
-
133
-
134
-
135
 |
 |
