Pioneer DVR-640H-S Owner's Manual - Page 87
Select 'Dual Mono Audio
 |
UPC - 012562810300
View all Pioneer DVR-640H-S manuals
Add to My Manuals
Save this manual to your list of manuals |
Page 87 highlights
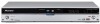
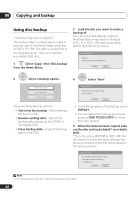
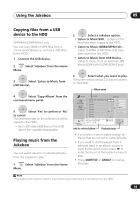
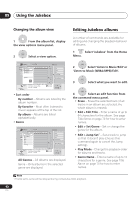
Copying and backup 08 Recording Mode Dual Mono Audio ENTER 1 Select 'Recording Mode' from the command menu panel. 1 Select the title containing the audio you want to change. ENTER 2 Select a recording mode for the copy. • High-Speed Copy1 - The Copy List is copied at the same recording quality as the original. • XP, SP, LP, EP, SLP, SEP, MN2 - The Copy List is copied at the specified recording quality in real-time. (Note that if you copy at a higher quality setting than the original, the copy will not be better quality than the original.) If you select MN above, you can also change the level setting (MN1 to MN323 or LPCM) from the Recording Quality box that appears. • Optimized2,4 - The recording quality is automatically adjusted so that the Copy List fits on to the space available on the disc. Copying is carried out in real-time. When you change the recording mode setting, you can see how much disc space it will require. If this is more than is available, it shows up in red and you won't be able to start copying. In this case, either change the recording quality, or press RETURN to go back to the Copy List screen and erase one or more titles from the Copy List. ENTER 2 Select 'Dual Mono Audio' from the command menu panel. ENTER 3 option. Select a dual mono audio Note 1 When copying to a Video mode DVD or DVD+R/+RW, the chapter markers in the copy may not be in exactly the same position as the original. 2 When the copy mode is set to something other than High-Speed Copy for copying to a Video mode DVD or DVD+R/+RW, the chapter markers of the original are not copied. Chapter markers are put into the copy at regular intervals, according to the Auto Chapter setting (see also Auto Chapter (Video)) and Auto Chapter (DVD+R/ +RW) on page 115. 3 When copying to a DVD+R/+RW, MN1 to MN3 and SEP modes are not available. 4 Optimized mode only available when copying to DVD. 87 En
-
 1
1 -
2
-
3
-
4
-
5
-
6
-
7
-
8
-
9
-
10
-
11
-
12
-
13
-
14
-
15
-
16
-
17
-
18
-
19
-
20
-
21
-
22
-
23
-
24
-
25
-
26
-
27
-
28
-
29
-
30
-
31
-
32
-
33
-
34
-
35
-
36
-
37
-
38
-
39
-
40
-
41
-
42
-
43
-
44
-
45
-
46
-
47
-
48
-
49
-
50
-
51
-
52
-
53
-
54
-
55
-
56
-
57
-
58
-
59
-
60
-
61
-
62
-
63
-
64
-
65
-
66
-
67
-
68
-
69
-
70
-
71
-
72
-
73
-
74
-
75
-
76
-
77
-
78
-
79
-
80
-
81
-
 82
82 -
 83
83 -
 84
84 -
 85
85 -
 86
86 -
 87
87 -
 88
88 -
 89
89 -
 90
90 -
 91
91 -
 92
92 -
93
-
94
-
95
-
96
-
97
-
98
-
99
-
100
-
101
-
102
-
103
-
104
-
105
-
106
-
107
-
108
-
109
-
110
-
111
-
112
-
113
-
114
-
115
-
116
-
117
-
118
-
119
-
120
-
121
-
122
-
123
-
124
-
125
-
126
-
127
-
128
-
129
-
130
-
131
-
132
-
133
-
134
-
135
 |
 |
