Pioneer PRO-1010HD Owner's Manual - Page 28
Select INPUT1 D-sub, or INPUT5. - resolution
 |
View all Pioneer PRO-1010HD manuals
Add to My Manuals
Save this manual to your list of manuals |
Page 28 highlights
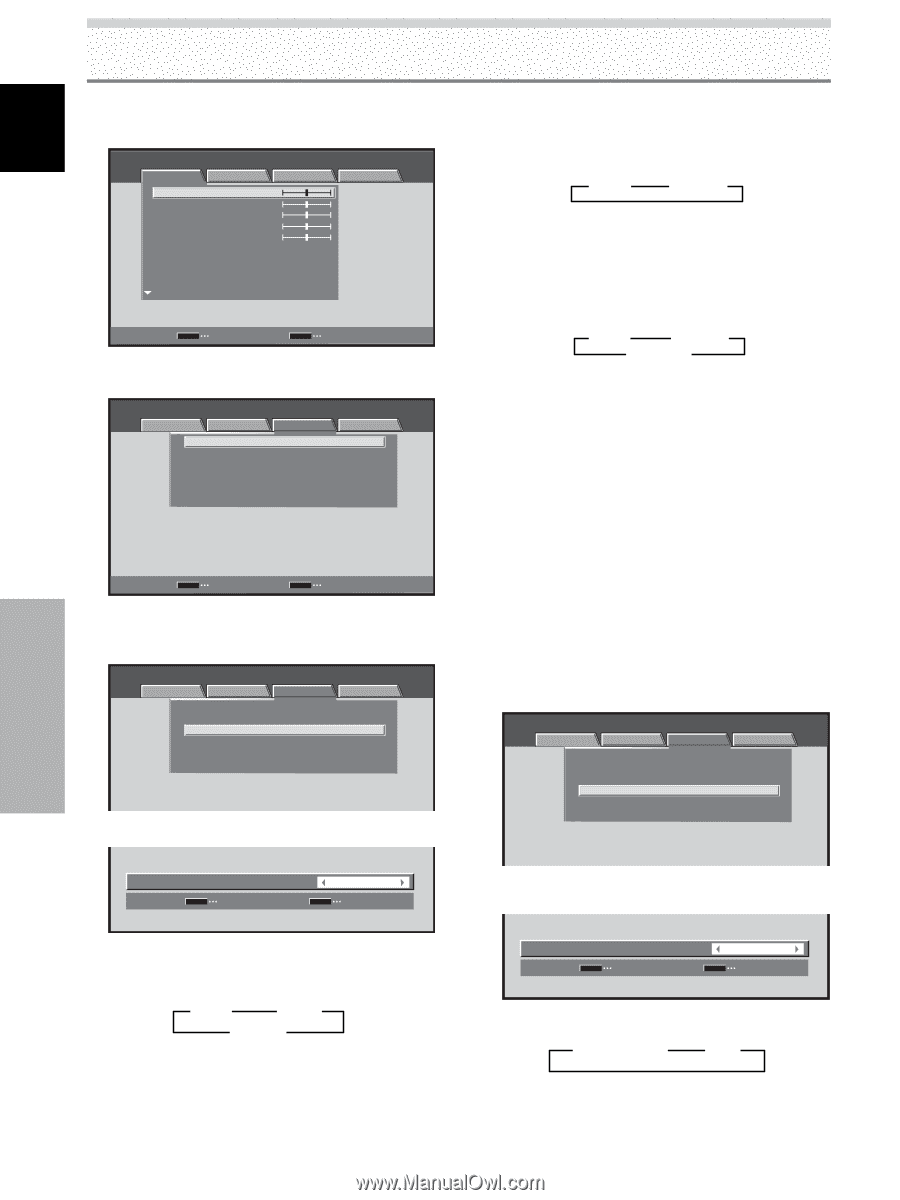
System Settings English System Settings 1 Select INPUT1 (D-sub), or INPUT5. 2 Press the MENU button to display the menu screen. S TA N D A R D PICTURE SCREEN SETUP CONTRAST BRIGHTNESS COLOR TINT SHARPNESS MPEG NR DNR CTI :0 :0 :0 :0 :0 : MID : MID : ON INPUT1 OPTION PICTURE RESET SET ENTER MENU EXIT 3 Use the 2/3 buttons to select [SETUP]. S TA N D A R D INPUT1 PICTURE SCREEN SETUP OPTION PURECINEMA CLAMP POSITION SIGNAL FORMAT COLOR DECODING HDMI INPUT BRT. ENHANCE : OFF : AUTO : 480p : COMPONENT : ON SET ENTER MENU EXIT 4 Use the 5/∞ buttons to select [SIGNAL FORMAT], then press the SET button. S TA N D A R D INPUT1 PICTURE SCREEN SETUP OPTION PURECINEMA CLAMP POSITION SIGNAL FORMAT COLOR DECODING HDMI INPUT BRT. ENHANCE : OFF : AUTO : 480p : COMPONENT : ON 5 Use the 2/3 buttons to select the display mode. SIGNAL FORMAT SET S E T : 480p MENU E X I T 1 When the input signal has a refresh rate of 31.5 kHz horizontal / 60 Hz vertical, pressing 2/3 will cause the display mode to change alternately as follows: 3 480p 2 3 VGA 2 3 WVGA 2 24 EN 2 When providing input signals with refresh rates of 45 kHz horizontal / 60 Hz Vertical, pressing the 2/3 buttons causes the display mode to alternate as follows: 3 720p 2 3 720-PC 2 [720-PC] indicates resolution of 1280 x 720. 3 When the input signal has a refresh rate of 48.4 kHz horizontal / 60 Hz vertical, or 56.1 kHz horizontal / 70 Hz vertical, pressing 2/3 will cause the display mode to change alternately as follows: 3 XGA 2 3 WXGA 2 3 PC AUTO 2 If the [PC AUTO] setting is selected, screen resolution will automatically switch between [XGA] and [WXGA] as required. Notes ÷ The [PC AUTO] setting supports automatic signal selection only when using RGB separate SYNC inputs. ÷ When G ON SYNC or Composite SYNC signals are input, selecting [PC AUTO] will cause the screen resolution to be set to [XGA] only. ÷ When using G ON SYNC or Composite SYNC with WXGA inputs, set [SIGNAL FORMAT] manually to [WXGA]. 6 Press the SET button. The setting is stored in memory and the screen returns to that shown in step 4. 7 When a component other than a computer is connected, use the 5/∞ buttons to select [COLOR DECODING] then press the SET button (INPUT1 (D-sub) or INPUT5). S TA N D A R D INPUT1 PICTURE SCREEN SETUP OPTION PURECINEMA CLAMP POSITION SIGNAL FORMAT COLOR DECODING HDMI INPUT BRT. ENHANCE : OFF : AUTO : 480p : COMPONENT : ON 8 Use the 2/3 buttons to select the input signal format. COLOR DECODING SET S E T : COMPONENT MENU E X I T Each time you press the 2/3 buttons, the setting changes as follows: 3 COMPONENT 2 3 RGB 2 The table below shows what settings are appropriate and available for the type of connections made.
-
 1
1 -
2
-
3
-
4
-
5
-
6
-
7
-
8
-
9
-
10
-
11
-
12
-
13
-
14
-
15
-
16
-
17
-
18
-
19
-
20
-
21
-
22
-
 23
23 -
 24
24 -
 25
25 -
 26
26 -
 27
27 -
 28
28 -
 29
29 -
 30
30 -
 31
31 -
 32
32 -
 33
33 -
34
-
35
-
36
-
37
-
38
-
39
-
40
-
41
-
42
-
43
-
44
-
45
-
46
-
47
-
48
-
49
-
50
-
51
-
52
-
53
-
54
-
55
-
56
-
57
-
58
-
59
-
60
-
61
-
62
-
63
-
64
-
65
-
66
-
67
-
68
-
69
-
70
-
71
-
72
-
73
-
74
-
75
-
76
-
77
-
78
-
79
-
80
-
81
-
82
-
83
-
84
-
85
-
86
-
87
-
88
-
89
-
90
-
91
-
92
-
93
-
94
-
95
-
96
-
97
-
98
-
99
-
100
-
101
-
102
-
103
-
104
-
105
-
106
-
107
-
108
-
109
-
110
-
111
-
112
-
113
-
114
-
115
-
116
-
117
-
118
-
119
-
120
-
121
-
122
-
123
-
124
-
125
-
126
-
127
-
128
-
129
-
130
-
131
-
132
-
133
-
134
-
135
-
136
-
137
-
138
-
139
-
140
-
141
-
142
-
143
-
144
-
145
-
146
-
147
-
148
-
149
-
150
-
151
-
152
-
153
-
154
-
155
-
156
-
157
-
158
-
159
-
160
-
161
-
162
-
163
-
164
-
165
-
166
-
167
-
168
-
169
-
170
-
171
-
172
-
173
-
174
 |
 |