Pioneer PRO-1010HD Owner's Manual - Page 7
About operations in this manual - plasma
 |
View all Pioneer PRO-1010HD manuals
Add to My Manuals
Save this manual to your list of manuals |
Page 7 highlights
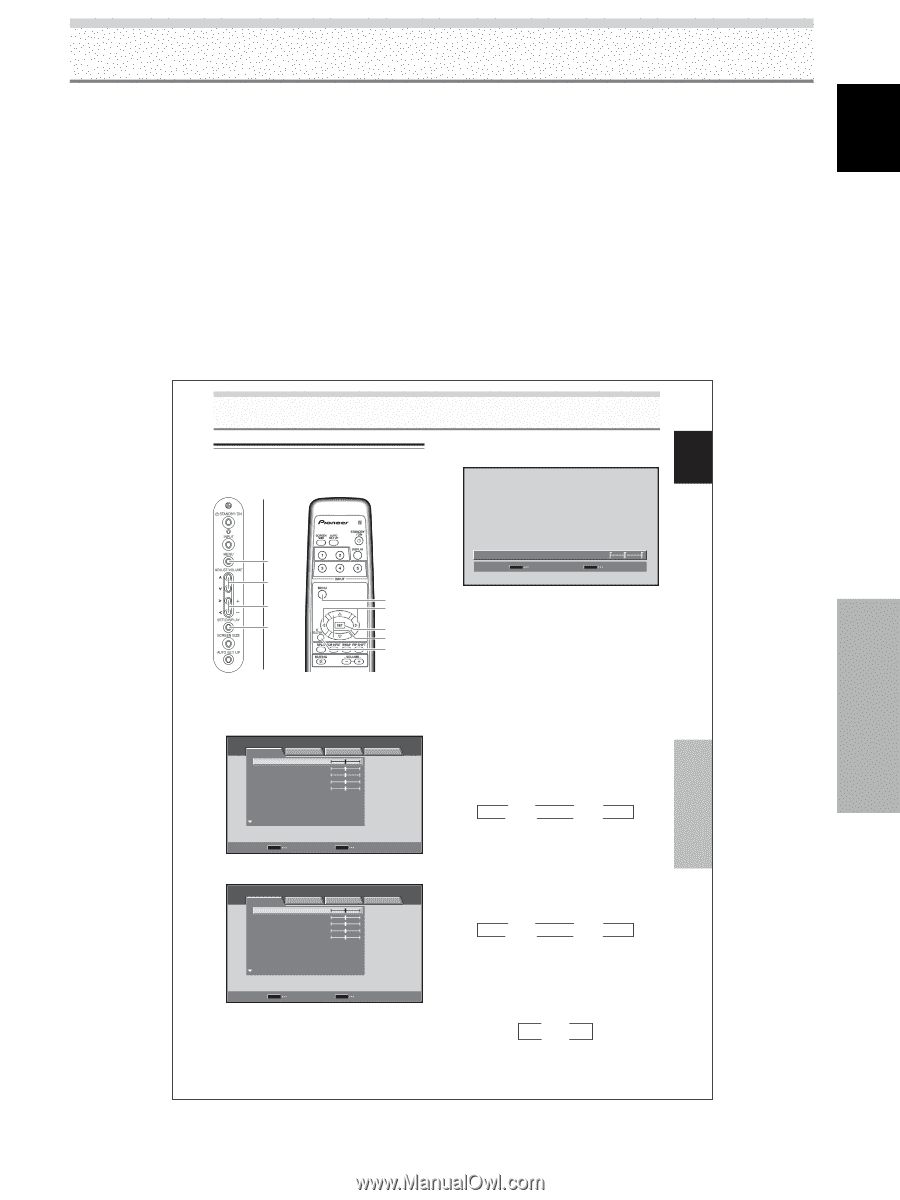
English About operations in this manual Each operation is described in its proper operating order. These Operating Instructions will refer to the operating controls found on the remote control unit, with the exception of those buttons found only on the main plasma display itself. When the plasma display controls include equivalent buttons to those found on the remote control unit, the commands can be performed on the main unit as well. The following illustrations are an example of the actual operations used for the section "PICTURE adjustment". The examples are provided to allow you to confirm whether the operation is performed correctly or not. Before Proceeding Note The screen images depicted in these Operating Instructions should be considered typical images; some difference will be seen in practice, depending on the screen item displayed and its contents, the input source and various other control settings. English Picture and Screen Adjustment Picture Adjustment (1) You can save picture adjustment setting values for each INPUT and each AV SELECTION mode. 4 Use the 2/3 buttons to adjust picture quality to the desired setting. Picture and Screen Adjustment Before Proceeding MENU 5/∞ 2/3 SET MENU 2/3 SET 5/∞ AV SELECTION Display operating panel Remote control unit 1 Press the AV SELECTION button to select the desired mode (Refer to page 33). 2 Press the MENU button to display the menu. S TA N D A R D PICTURE SCREEN SETUP CONTRAST BRIGHTNESS COLOR TINT SHARPNESS MPEG NR DNR CTI :0 :0 :0 :0 :0 : MID : MID : ON INPUT1 OPTION PICTURE RESET SET ENTER MENU EXIT 3 Use the 5/∞ buttons to select the item, then press the SET button. S TA N D A R D PICTURE SCREEN SETUP CONTRAST BRIGHTNESS COLOR TINT SHARPNESS MPEG NR DNR CTI :0 :0 :0 :0 :0 : MID : MID : ON INPUT1 OPTION PICTURE RESET SET ENTER MENU EXIT CS RO+NMTROADSET SET S E T : : 0ON MENU E X I T 5 Press the SET button. Adjustment values are saved, and you return to the display shown in step 3. 6 After completing settings, press the MENU button to return to the normal display. ¶ Adjustment and setting items during video signal input Decrease Increase CONTRAST ... Contrast becomes weaker Contrast becomes stronger BRIGHTNESS ... Picture becomes darker Picture becomes brighter COLOR ........ Colors become weaker Colors become stronger TINT Skin tones become purplish Skin tones become greenish SHARPNESS ... Picture becomes softer Picture becomes sharper MPEG NR Use when there is mosquito noise in the picture when viewing a digital broadcast, playing a DVD etc. Each time you press the 2/3 buttons, the setting changes as follows: 3 OFF 2 3 LOW 2 3 HIGH 2 3 MID 2 ¶ As you change from LOW 3 MID 3 HIGH, the effect becomes stronger. DNR This function reduced graininess to provide a clearer picture. Each time you press the 2/3 buttons, the setting changes as follows: 3 OFF 2 3 LOW 2 3 HIGH 2 3 MID 2 ¶ As you change from LOW 3 MID 3 HIGH, the effect becomes stronger. CTI This lets you brighten color contour as desired. Each time you press the 2/3 buttons, the setting changes as follows: 3 OFF 2 3 ON 2 ¶ ON .... CTI is operating. ¶ OFF ... CTI is not operating. 35 EN 3 EN
-
 1
1 -
 2
2 -
 3
3 -
 4
4 -
 5
5 -
 6
6 -
 7
7 -
 8
8 -
 9
9 -
 10
10 -
 11
11 -
 12
12 -
13
-
14
-
15
-
16
-
17
-
18
-
19
-
20
-
21
-
22
-
23
-
24
-
25
-
26
-
27
-
28
-
29
-
30
-
31
-
32
-
33
-
34
-
35
-
36
-
37
-
38
-
39
-
40
-
41
-
42
-
43
-
44
-
45
-
46
-
47
-
48
-
49
-
50
-
51
-
52
-
53
-
54
-
55
-
56
-
57
-
58
-
59
-
60
-
61
-
62
-
63
-
64
-
65
-
66
-
67
-
68
-
69
-
70
-
71
-
72
-
73
-
74
-
75
-
76
-
77
-
78
-
79
-
80
-
81
-
82
-
83
-
84
-
85
-
86
-
87
-
88
-
89
-
90
-
91
-
92
-
93
-
94
-
95
-
96
-
97
-
98
-
99
-
100
-
101
-
102
-
103
-
104
-
105
-
106
-
107
-
108
-
109
-
110
-
111
-
112
-
113
-
114
-
115
-
116
-
117
-
118
-
119
-
120
-
121
-
122
-
123
-
124
-
125
-
126
-
127
-
128
-
129
-
130
-
131
-
132
-
133
-
134
-
135
-
136
-
137
-
138
-
139
-
140
-
141
-
142
-
143
-
144
-
145
-
146
-
147
-
148
-
149
-
150
-
151
-
152
-
153
-
154
-
155
-
156
-
157
-
158
-
159
-
160
-
161
-
162
-
163
-
164
-
165
-
166
-
167
-
168
-
169
-
170
-
171
-
172
-
173
-
174
 |
 |