Pioneer PRO 111FD Owner's Manual - Page 48
Tools, Home Menu, Display
 |
UPC - 012562887111
View all Pioneer PRO 111FD manuals
Add to My Manuals
Save this manual to your list of manuals |
Page 48 highlights
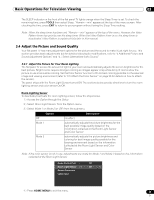
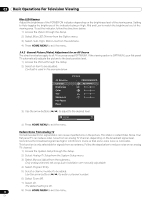
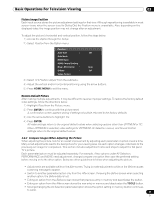
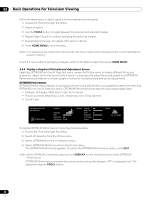
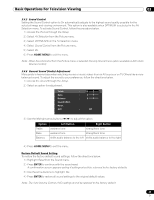
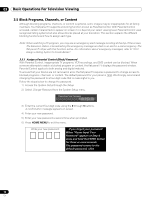
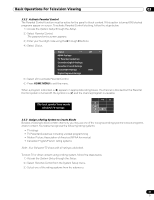
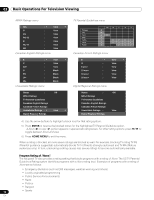
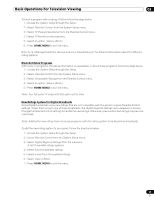
03 Basic Operations For Television Viewing Follow the steps below to adjust options for the preferred picture quality. 1 ) Access the Picture through the Setup. 2 ) Select an option. 3 ) Use the TOOLS button to toggle between the previous and adjusted images. 4 ) Repeat Steps 2 and 3 to continue adjusting the option as needed. 5 ) Repeat Steps 2 through 4 to adjust other picture options. 6 ) Press HOME MENU to exit the menu. Note: if no selections are made within 60 seconds, the menu closes automatically and the current settings are saved to memory. To exit the menu without saving the changes, switch to the Before screen then press HOME MENU. 3.4.4 Display a Graphical Picture/Sound Adjustment Screen Selecting OPTIMUM from the AV Selection menu causes the Picture menu to display different AV source submenus. Select On for the Sound Control option to automatically adjust the sound quality, and OPTIMUM Performance provides an on-screen graphic monitor for multiple picture and sound adjustments. OPTIMUM Performance OPTIMUM Performance displays on-going picture and sound adjustments using graphical data when selecting OPTIMUM from the AV Selection menu. OPTIMUM Performance provides the following bar graph data: • Analyzer: Histogram, RGB, Room Light, Color Sensor • Picture: Contrast, Brightness, Color, Sharpness, Color Temp, Gamma • Sound: Level OPTIMUM Performance [OPTIMUM] On OPTIMUM On/Off [Analyzer] Histogram RGB Room Light Color Sensor : Disable [Picture] Contrast Brightness Color Sharpness Color Temp Gamma [Sound] 60 1k 12k(Hz) To display OPTIMUM Performance, follow the procedure below. 1 ) Access the Picture through the Setup. 2 ) Select AV Selection from the Picture menu. 3 ) Select OPTIMUM from the AV Selection menu. 4 ) Select OPTIMUM Performance from the Picture menu. The OPTIMUM Performance appears. To cancel the OPTIMUM Performance option, press EXIT. Note: When OPTIMUM is selected, press and hold DISPLAY on the remote control to show OPTIMUM Performance. OPTIMUM Performance compares the picture and sound quality between "Off" (unadjusted) and "On" (adjusted using the TOOLS button). 48 En
-
 1
1 -
2
-
3
-
4
-
5
-
6
-
7
-
8
-
9
-
10
-
11
-
12
-
13
-
14
-
15
-
16
-
17
-
18
-
19
-
20
-
21
-
22
-
23
-
24
-
25
-
26
-
27
-
28
-
29
-
30
-
31
-
32
-
33
-
34
-
35
-
36
-
37
-
38
-
39
-
40
-
41
-
42
-
 43
43 -
 44
44 -
 45
45 -
 46
46 -
 47
47 -
 48
48 -
 49
49 -
 50
50 -
 51
51 -
 52
52 -
 53
53 -
54
-
55
-
56
-
57
-
58
-
59
-
60
-
61
-
62
-
63
-
64
-
65
-
66
-
67
-
68
-
69
-
70
-
71
-
72
-
73
-
74
-
75
-
76
-
77
-
78
-
79
-
80
-
81
-
82
-
83
-
84
-
85
-
86
-
87
-
88
-
89
-
90
-
91
-
92
-
93
-
94
-
95
-
96
-
97
-
98
-
99
-
100
-
101
-
102
-
103
-
104
-
105
-
106
-
107
-
108
-
109
-
110
-
111
-
112
-
113
-
114
-
115
-
116
-
117
-
118
-
119
-
120
-
121
-
122
-
123
-
124
-
125
-
126
-
127
-
128
-
129
-
130
-
131
-
132
-
133
-
134
-
135
-
136
-
137
-
138
-
139
-
140
-
141
-
142
-
143
-
144
-
145
-
146
-
147
-
148
-
149
-
150
-
151
-
152
-
153
-
154
-
155
-
156
-
157
-
158
-
159
-
160
-
161
-
162
-
163
-
164
-
165
-
166
-
167
 |
 |