Pioneer PRO 111FD Owner's Manual - Page 96
The Home Media Gallery supports Auto IP and DHCP Dynamic Host Configuration Protocol. If the system - service manual
 |
UPC - 012562887111
View all Pioneer PRO 111FD manuals
Add to My Manuals
Save this manual to your list of manuals |
Page 96 highlights
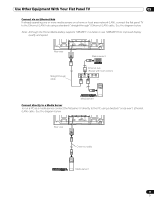
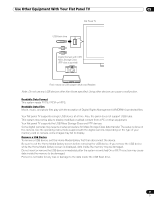
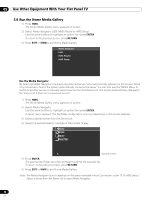
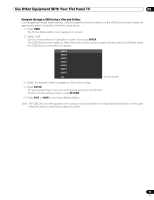
05 Use Other Equipment With Your Flat Panel TV Confirm the IP Address After making the network connection, follow the instructions below to confirm the IP Address before accessing the network. (The setup is effective for Auto only. To perform the procedure, DHCP on your server or router must be valid. See "5.10 HMG Setup") 1 ) Press HMG on the remote control. The Home Media Gallery menu appears on screen. 2 ) Select HMG Setup. Use the arrow buttons to highlight an option. 3 ) Press ENTER. 4 ) Select Network Setup. 5 ) Select Auto DHCP. The screen turns from "Select" mode to "Input" mode. 6 ) Select Yes. 7 ) Press RETURN. The HMG Setup screen returns. The IP Address is assigned. The Home Media Gallery supports Auto IP and DHCP (Dynamic Host Configuration Protocol). If the system failed to assign the IP Address or if you want to obtain different addresses, select No then enter IP Address and Subnet mask. See Network Setup or HMG Setup to enter an address manually. For information on DHCP, refer to network device's operating instructions. You may need to contact your service provider or network administrator when manually entering an IP Address. Some media servers block or are programmed to block access to client servers. When connecting the flat panel TV, check the media server for client server access rights. 5.7.2 Connect a USB Device You can also enjoy content stored on memory cards by connecting a USB device to the flat panel TV. The root directory or Device List screen appears as soon as a USB flash drive or a multi-card reader is connected to the USB port. Another option is to connect your digital camera directly to the flat panel TV using a commercially available USB connector cable. If for any reason, the Folder/Content List or Device List fails to appear, follow the steps below. 1 ) Press HMG. The Home Media Gallery menu appears on screen. 2 ) Select USB. Use the arrow buttons to highlight an option. 3 ) Press ENTER to confirm the selection. 4 ) Select the desired device. The USB Device screen must be displayed. 5 ) Press ENTER to navigate to a folder or play a file/content. To return to the previous screen, press RETURN. 6 ) Press EXIT or HMG to exit Home Media Gallery. Note: The flat panel TV displays the USB Device screen or root directory immediately after inserting a USB device. In this case, start from Step 5. When a multi-card reader is inserted, the USB Device screen is displayed. In this case, start from Step 4. 96 En
-
 1
1 -
2
-
3
-
4
-
5
-
6
-
7
-
8
-
9
-
10
-
11
-
12
-
13
-
14
-
15
-
16
-
17
-
18
-
19
-
20
-
21
-
22
-
23
-
24
-
25
-
26
-
27
-
28
-
29
-
30
-
31
-
32
-
33
-
34
-
35
-
36
-
37
-
38
-
39
-
40
-
41
-
42
-
43
-
44
-
45
-
46
-
47
-
48
-
49
-
50
-
51
-
52
-
53
-
54
-
55
-
56
-
57
-
58
-
59
-
60
-
61
-
62
-
63
-
64
-
65
-
66
-
67
-
68
-
69
-
70
-
71
-
72
-
73
-
74
-
75
-
76
-
77
-
78
-
79
-
80
-
81
-
82
-
83
-
84
-
85
-
86
-
87
-
88
-
89
-
90
-
 91
91 -
 92
92 -
 93
93 -
 94
94 -
 95
95 -
 96
96 -
 97
97 -
 98
98 -
 99
99 -
 100
100 -
 101
101 -
102
-
103
-
104
-
105
-
106
-
107
-
108
-
109
-
110
-
111
-
112
-
113
-
114
-
115
-
116
-
117
-
118
-
119
-
120
-
121
-
122
-
123
-
124
-
125
-
126
-
127
-
128
-
129
-
130
-
131
-
132
-
133
-
134
-
135
-
136
-
137
-
138
-
139
-
140
-
141
-
142
-
143
-
144
-
145
-
146
-
147
-
148
-
149
-
150
-
151
-
152
-
153
-
154
-
155
-
156
-
157
-
158
-
159
-
160
-
161
-
162
-
163
-
164
-
165
-
166
-
167
 |
 |