Pioneer VSX-49TX Owner's Manual - Page 15
Assigning the Digital Inputs, Setting up the Main Unit - power supply
 |
View all Pioneer VSX-49TX manuals
Add to My Manuals
Save this manual to your list of manuals |
Page 15 highlights
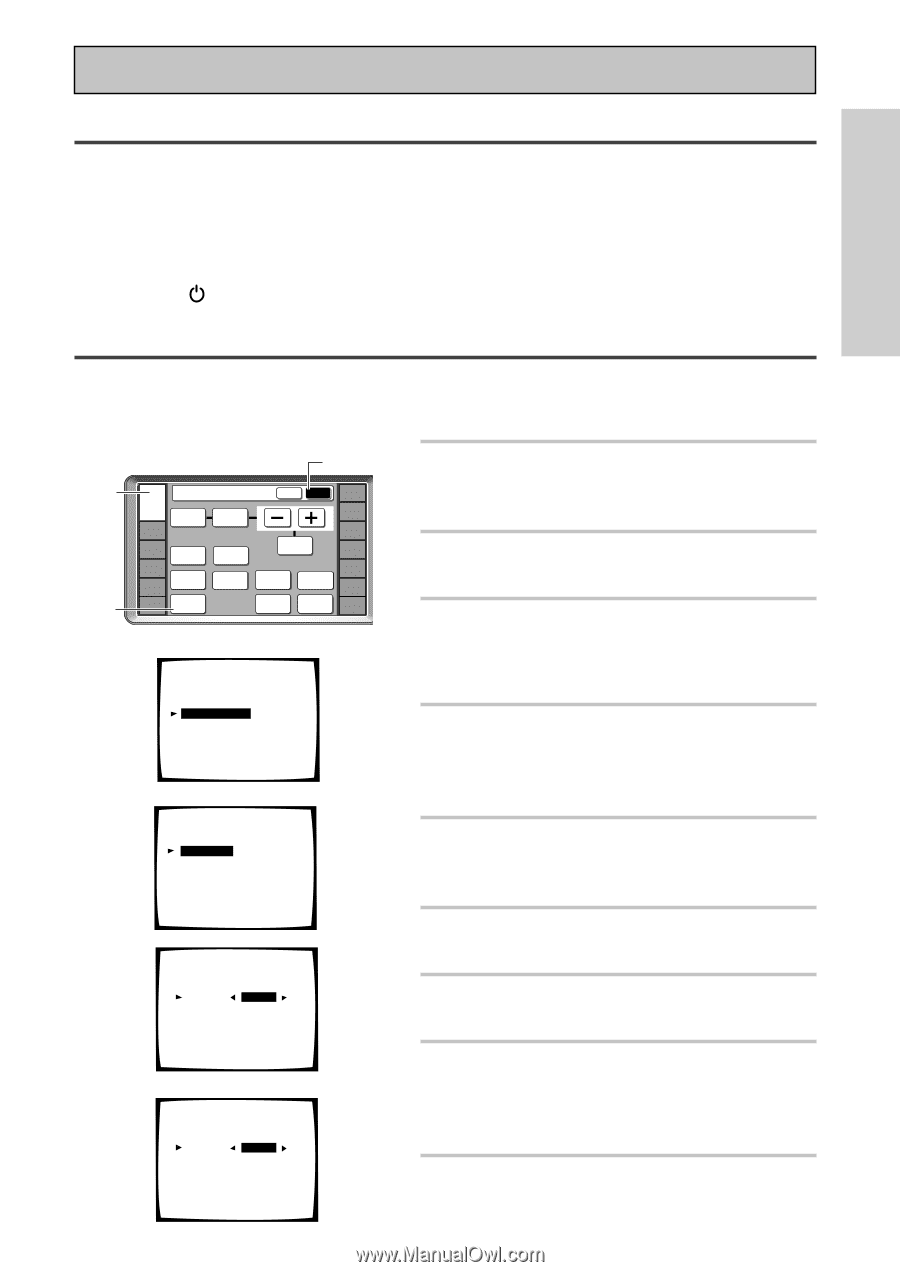
3 Setting up the Main Unit Quick Start Guide Part1 QUICK START GUIDE 1 Connect the supplied AC power cord to the back of the main unit and plug the other end into a wall outlet (don't use any other power cord than the one that came with this receiver). 2 Press the POWER ON/OFF button to put the receiver in ON mode. 3 Press the STANDBY/ON button to switch the receiver ON. 4 Assigning the Digital Inputs This is only necessary if you did not hook up your DVD player to DIGITAL IN 1 using a coaxial cable, as in the first diagram on p.13, but rather connected it to one of the optical digital inputs (for example, DIGITAL IN 4). The following example shows how to assign the DIGITAL IN 4 jack to DVD. 1 3 2 RECEIVER DVD/LD Receiver TONE BASS/ ATREBLE VCR1 /DVR VCR2 VCR3 TV DISPLAY DIMMER STATUS SYSTEM SETUP VIDEO SELECT SPEAKER A/B MAIN SUB EFFECT/ CH SEL. LOUDNESS TAPE 2 MONITOR INPUT ATT. SIGNAL SELECT REMOTE SETUP CD CD-R/ TAPE1 TUNER VIDEO SAT TV CONTROL 4 System Setup [ Auto Surround Setup ] [1. Input Assign ] [2. Surround Setup] [3. Expert Setup] [4. THX Audio Setup] [Exit] 5 1.Input Assign [ 1.Digital-In ] [ 2.Component Video In ] [ 3.i.LINK Input ] [Return] 6 7 1.1. Digital-In Digital-1 [ DVD/LD ] Digital-2 [ TV ] Digital-3 [ CD ] Digital-4 [ SAT ] Digital-5 [ VCR1 ] Digital-6 [ VCR2 ] Digital-7 [ CD-R ] RF IN [ DVD/LD ] [Return] 1.1. Digital-In Digital-1 [ OFF ] Digital-2 [ TV ] Digital-3 [ CD ] Digital-4 [ DVD/LD ] Digital-5 [ VCR1 ] Digital-6 [ VCR2 ] Digital-7 [ CD-R ] RF IN [ DVD/LD ] [Return] 1 Turn on the receiver and your TV, press RECEIVER on the remote control. 2 Press the SUB button on the RECEIVER remote control screen. 3 Press the SYSTEM SETUP button. The SYSTEM SETUP menu appears on your TV (if it doesn't, refer to page 13 to make sure you have properly connected the receiver to your TV). 4 Looking at the on-screen display on your TV, use the 5∞ buttons to select INPUT ASSIGN. Press the ENTER button. 5 DIGITAL IN should be selected, if not use the 5∞ buttons to select it. Press the ENTER button. 6 The default setting for the DIGITAL-4 jack is SAT. 7 Use the 2 3 buttons to select DVD/ LD. 8 Select RETURN with the 5∞ buttons and press ENTER. Select RETURN and press ENTER again. You will return to the SYSTEM SETUP menu. 9 Choose EXIT with the 5∞ buttons and press ENTER. The receiver exits the setup process. 15
-
 1
1 -
2
-
3
-
4
-
5
-
6
-
7
-
8
-
9
-
 10
10 -
 11
11 -
 12
12 -
 13
13 -
 14
14 -
 15
15 -
 16
16 -
 17
17 -
 18
18 -
 19
19 -
 20
20 -
21
-
22
-
23
-
24
-
25
-
26
-
27
-
28
-
29
-
30
-
31
-
32
-
33
-
34
-
35
-
36
-
37
-
38
-
39
-
40
-
41
-
42
-
43
-
44
-
45
-
46
-
47
-
48
-
49
-
50
-
51
-
52
-
53
-
54
-
55
-
56
-
57
-
58
-
59
-
60
-
61
-
62
-
63
-
64
-
65
-
66
-
67
-
68
-
69
-
70
-
71
-
72
-
73
-
74
-
75
-
76
-
77
-
78
-
79
-
80
-
81
-
82
-
83
-
84
-
85
-
86
-
87
-
88
-
89
-
90
-
91
-
92
-
93
-
94
-
95
-
96
-
97
-
98
-
99
-
100
-
101
-
102
-
103
-
104
-
105
-
106
-
107
-
108
-
109
-
110
-
111
-
112
-
113
-
114
-
115
-
116
-
117
-
118
-
119
-
120
 |
 |