Pioneer VSX-49TX Owner's Manual - Page 31
Creating an i.LINK Network
 |
View all Pioneer VSX-49TX manuals
Add to My Manuals
Save this manual to your list of manuals |
Page 31 highlights
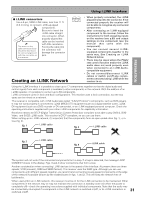
PREPARATION PREPARATION Using i.LINK Interface 7 i.LINK connectors Use a 4-pin, S400 i.LINK cable, less than 11 ft. (3.5 m) long, to connect i.LINK-equipped components. Be sure to insert the i.LINK cable straight into connector. When properly aligned the cable can be inserted The arrow on the cable connector body should be face down for corrrect alignment with the connector on with little resistance. Forcing the cable into the connector will damage the connector pins. the receiver. Creating an i.LINK Network memo • When properly connected, the i.LINK plug will snap into the connector. If not connected properly the receiver will not be able to recognize any connected components. • After connecting an i.LINK-equipped component to the receiver, follow the instructions for both assigning inputs on the receiver (see p.95) and output settings on the component (see the manual that came with the component). • You can connect several i.LINKequipped components together in the same way. See Creating an i.LINK Network below. • There may be cases where the PQLS/ rate control function and/or the i.LINK audio does not work properly even when connected to an i.LINK-Audiocompatible equipment. • Do not connect/disconnect i.LINK cables or switch on/off any components connected using i.LINK while the receiver is on. Using the i.LINK interface it is possible to chain up to 17 components together so that the digital audio and control signals from each component is available to other components in the network. With the addition of an i.LINK repeater, it's possible to connect up to 63 components. i.LINK connectors come in 4-pin and 6-pin configurations. This receiver uses a 4-pin connection, but the two types can be mixed on a network. This receiver is compatible with i.LINK Audio (also called "A & M Protocol") components, such as DVD players. It may not work properly if connected to i.LINK MPEG-II TS equipment (such as a digital satellite tuner), i.LINK DV equipment (such as a DVD recorder or DV camcorder), or an i.LINK-equipped personal computer. Check the operating instructions supplied with your other i.LINK components for capatibility information. Receivers need to be DTCP (Digital Transmission Content Protection) compliant to be able to play DVD-A, DVDVideo, and SACD i.LINK audio. This receiver is DTCP compliant, so you can use them. When setting up an i.LINK network, it's important that the components form an open ended chain (fig. 1), or a tree (fig. 2). fig. 1 i.LINK cable fig. 3 i.LINK cable fig. 2 i.LINK cable fig. 4 i.LINK cable The system will not work if the connected components form a loop. If a loop is detected, the message LOOP CONNECT shows in the display. Figs. 3 and 4 show connections that form a loop. Another consideration when connecting i.LINK devices is the speed of the interface. At present there are three speeds; S100 (slowest), S200 and S400 (fastest). This receiver uses the S400 type. Although you can use components with different speeds together, we recommend connecting slower-speed components at the edge of the network if possible (shown by the shaded boxes in figs. 1 and 2). This will keep the network free of bottlenecks. When used within an i.LINK network, this receiver must be on for the i.LINK connection to be maintained. Other components in the network may or may not maintain the connection in standby (none will when the power is completely off)-check the operating instructions supplied with individual components. Note that the audio may 31 be momentarily inturrupted if a component in the i.LINK network is switched on/off, or its i.LINK connection is switched on/off.
-
 1
1 -
2
-
3
-
4
-
5
-
6
-
7
-
8
-
9
-
10
-
11
-
12
-
13
-
14
-
15
-
16
-
17
-
18
-
19
-
20
-
21
-
22
-
23
-
24
-
25
-
 26
26 -
 27
27 -
 28
28 -
 29
29 -
 30
30 -
 31
31 -
 32
32 -
 33
33 -
 34
34 -
 35
35 -
 36
36 -
37
-
38
-
39
-
40
-
41
-
42
-
43
-
44
-
45
-
46
-
47
-
48
-
49
-
50
-
51
-
52
-
53
-
54
-
55
-
56
-
57
-
58
-
59
-
60
-
61
-
62
-
63
-
64
-
65
-
66
-
67
-
68
-
69
-
70
-
71
-
72
-
73
-
74
-
75
-
76
-
77
-
78
-
79
-
80
-
81
-
82
-
83
-
84
-
85
-
86
-
87
-
88
-
89
-
90
-
91
-
92
-
93
-
94
-
95
-
96
-
97
-
98
-
99
-
100
-
101
-
102
-
103
-
104
-
105
-
106
-
107
-
108
-
109
-
110
-
111
-
112
-
113
-
114
-
115
-
116
-
117
-
118
-
119
-
120
 |
 |
