Pioneer VSX-49TX Owner's Manual - Page 49
Stereo and Multichannel Playback
 |
View all Pioneer VSX-49TX manuals
Add to My Manuals
Save this manual to your list of manuals |
Page 49 highlights
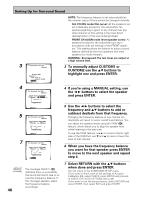
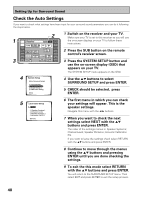
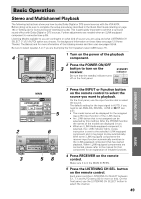
Basic Operation Stereo and Multichannel Playback The following instructions show you how to play Dolby Digital or DTS sound sources with the VSX-49TX. Before doing so be sure to complete the setup procedures described in the Quick Start Guide (starting on page 16) or "Setting Up for Surround Sound" (starting on p.40). This is particularly important to achieve a surround sound effect with Dolby Digital or DTS sources. Further adjustments are needed when an i.LINK-equipped component is connected (see p.95). Listening Modes available to you are contingent on what kind of source you are using and what LISTENING CH SELECT (7.1/5.1/AUTO) option you choose. For background information on these ideas see page 12 (Home Theater: The Basics) and for more information of the listening modes and their uses see pages 52-55. Be sure to select speaker A or if you are bi-amping the front speakers select A&B (see p.77). 4 LIGHT RECEIVER DVD/LD VCR1 /DVR VCR2 VCR3 TV REMOTE SETUP CD CD-R/ TAPE1 TUNER VIDEO SAT TV CONTROL use lock TV CONTROL FUNCTION CH + CH - VOL + VOL - FUNCTION 1 Turn on the power of the playback component. 2 Press the POWER ON/OFF 3 button to turn on the receiver. STANDBY indicator ENTER STANDBY/ON MULTI SYSTEM OPERATION OFF MUTING MASTER VOLUME + - Be sure that the standby indicator turns off on the front panel. SURROUND SETUP BASIC MAIN Receiver MAIN SUB LISTENING MODE SURROUND STEREO /DIRECT THX STANDARD (DVD-A /SACD) MULTI CH IN ADVANCED ADVANCED LISTENING CINEMA CONCERT CH SEL. 5 MIDNIGHT DIGITAL NR ACOUSTIC CAL. 2 6 3 58 3 Press the INPUT or Function button on the remote control to select the source you want to playback. On the front panel, use the input function dial to select the source. The default setting for the input signal is AUTO, if you need to set ANALOG, DIGITAL, i.LINK or 2 RF see p.51. • The model name will be displayed for the assigned (see p.95) input function of the i.LINK device. • An i.LINK device that is not assigned can be selected by this method. After the PHONO function the names of the models are displayed in turn. • When an i.LINK-Audio-equipped component is selected, the i.LINK indicator lights. A play instruction is sent to the selected i.LINK-equipped component and it may begin to play automatically. With some i.LINK-equipped components the receiver input function automatically switches to the i.LINK-equipped component that has started playback. When i.LINK-equipped components are connected, please refer to the manual for that component for an explanation of linkable functions. 4 Press RECEIVER on the remote control. Make sure it is in the MAIN SCREEN. 5 Press the LISTENING CH SEL. button on the remote control. Each press switches LISTENING CH SELECT between 5,1, 7.1 and AUTO (see p.50 for more on this). On the front panel, use the LISTENING CH SELECT button to select the channel. 49
-
 1
1 -
2
-
3
-
4
-
5
-
6
-
7
-
8
-
9
-
10
-
11
-
12
-
13
-
14
-
15
-
16
-
17
-
18
-
19
-
20
-
21
-
22
-
23
-
24
-
25
-
26
-
27
-
28
-
29
-
30
-
31
-
32
-
33
-
34
-
35
-
36
-
37
-
38
-
39
-
40
-
41
-
42
-
43
-
 44
44 -
 45
45 -
 46
46 -
 47
47 -
 48
48 -
 49
49 -
 50
50 -
 51
51 -
 52
52 -
 53
53 -
 54
54 -
55
-
56
-
57
-
58
-
59
-
60
-
61
-
62
-
63
-
64
-
65
-
66
-
67
-
68
-
69
-
70
-
71
-
72
-
73
-
74
-
75
-
76
-
77
-
78
-
79
-
80
-
81
-
82
-
83
-
84
-
85
-
86
-
87
-
88
-
89
-
90
-
91
-
92
-
93
-
94
-
95
-
96
-
97
-
98
-
99
-
100
-
101
-
102
-
103
-
104
-
105
-
106
-
107
-
108
-
109
-
110
-
111
-
112
-
113
-
114
-
115
-
116
-
117
-
118
-
119
-
120
 |
 |
