Pioneer VSX-49TX Owner's Manual - Page 75
Recording from Audio/Video Components
 |
View all Pioneer VSX-49TX manuals
Add to My Manuals
Save this manual to your list of manuals |
Page 75 highlights
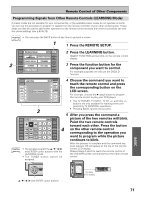
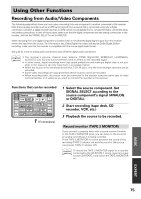
Using Other Functions Recording from Audio/Video Components The following explanations show you how make a recording from one component to another connected to this receiver. Note that an analog recorder (such as a VCR) cannot record from a source that is connected using only a digital connection. Likewise, a digital recorder (such as a CD-R) cannot record digitally from a component that is connected using only analog connections. In both of these cases, make sure that the digital component also has analog connections to the receiver, and that the SIGNAL SELECT is set to ANALOG. When recording from one digital component to another, bear in mind that the digital signal output from this receiver mirrors the input from the source. So if the input is, say, Dolby Digital, the output will also be Dolby Digital. Before recording, make sure that the recorder is compatible with the source digital audio format. See p.23 for more on analog audio connections and p.25-26 for digital audio connections. memo • The receiver's volume, channel level, balance, TONE, Digital NR, MIDNIGHT, LOUDNESS, ACOUSTIC CAL EQ and surround effects have no effect on the recorded signal. • In some cases, digital recordings have copy guard protections and making a digital copy is not possible. In this case you can only copy them in an analog manner. • When the source is the connected to the MULTI CH IN jacks, only the front left/right channels can be recorded. • Some video recordings are copy-protected; these sources cannot be recorded. • When recording video, the source must be connected to the receiver using the same type of video cord (composite, or S video) as you used to connect the recorder to the receiver. Functions that can be recorded RECEIVER DVD/LD Receiver TONE BASS/ ATREBLE VCR1 /DVR VCR2 VCR3 TV DISPLAY DIMMER STATUS SYSTEM SETUP VIDEO SELECT SPEAKER A/B MAIN SUB EFFECT/ CH SEL. LOUDNESS TAPE 2 MONITOR INPUT ATT. SIGNAL SELECT REMOTE SETUP CD CD-R/ TAPE1 TUNER VIDEO SAT TV CONTROL 1 (if necessary) 1 Select the source component. Set SIGNAL SELECT according to the source component's signal (ANALOG or DIGITAL). 2 Start recording (tape deck, CD recorder, VCR, etc.) 3 Playback the source to be recorded. Record monitor (TAPE 2 MONITOR) If you connect a cassette deck with a record monitor function to the TAPE 2 MONITOR jacks, you can listen to the sound of an analog recording as it is being recorded. Press TAPE 2 MONITOR to switch between the sound of the recording (TAPE 2 indicator on) and the sound of the source component (TAPE 2 indicator off). memo To record the TAPE 2 MONITOR signal to a recorder connected to the CD-R/TAPE 1 inputs, select any input except CD-R/TAPE 1 and switch the TAPE 2 MONITOR on. BASIC EXPERT 75
-
 1
1 -
2
-
3
-
4
-
5
-
6
-
7
-
8
-
9
-
10
-
11
-
12
-
13
-
14
-
15
-
16
-
17
-
18
-
19
-
20
-
21
-
22
-
23
-
24
-
25
-
26
-
27
-
28
-
29
-
30
-
31
-
32
-
33
-
34
-
35
-
36
-
37
-
38
-
39
-
40
-
41
-
42
-
43
-
44
-
45
-
46
-
47
-
48
-
49
-
50
-
51
-
52
-
53
-
54
-
55
-
56
-
57
-
58
-
59
-
60
-
61
-
62
-
63
-
64
-
65
-
66
-
67
-
68
-
69
-
 70
70 -
 71
71 -
 72
72 -
 73
73 -
 74
74 -
 75
75 -
 76
76 -
 77
77 -
 78
78 -
 79
79 -
 80
80 -
81
-
82
-
83
-
84
-
85
-
86
-
87
-
88
-
89
-
90
-
91
-
92
-
93
-
94
-
95
-
96
-
97
-
98
-
99
-
100
-
101
-
102
-
103
-
104
-
105
-
106
-
107
-
108
-
109
-
110
-
111
-
112
-
113
-
114
-
115
-
116
-
117
-
118
-
119
-
120
 |
 |