Pioneer VSX-49TX Owner's Manual - Page 23
Connecting Analog Audio Components - amplifier
 |
View all Pioneer VSX-49TX manuals
Add to My Manuals
Save this manual to your list of manuals |
Page 23 highlights
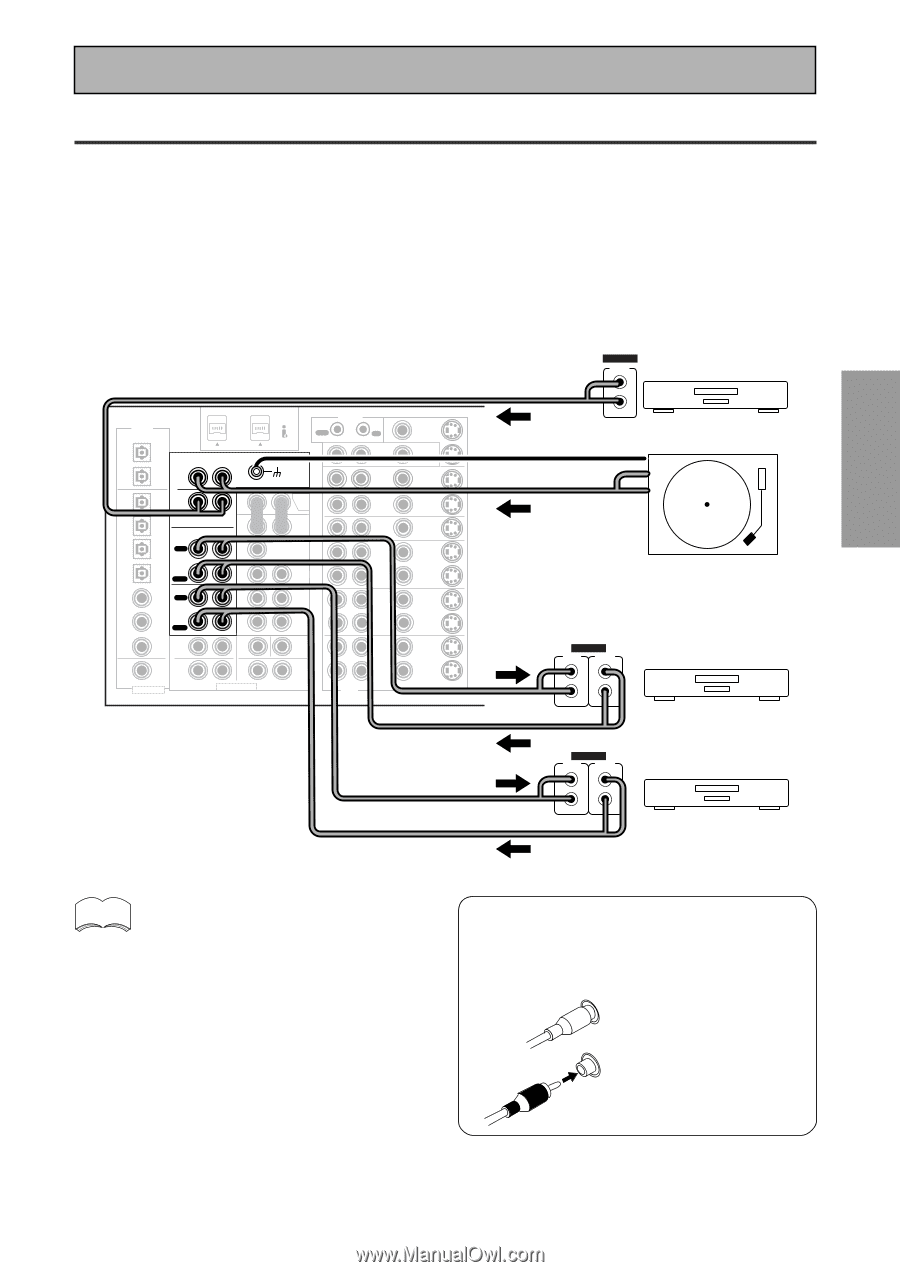
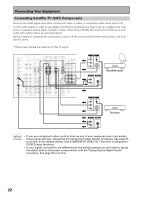
PREPARATION PREPARATION Connecting Your Equipment Connecting Analog Audio Components Connect your audio components to the jacks as shown below. These are all analog connections and your analog audio components (turntable, cassette deck) use these jacks. Remember that for components you want to record with you need to hook up four plugs (a set of stereo ins and a set of stereo outs), but for components that only play (like a turntable) you only need to hook up one set of stereo plugs (two plugs). If you want to record to/from digital components (like a CD-R) to/from analog components you must hook up your digital equipment with these analog connections. Before making or changing the connections, switch off the power and disconnect the power cord from the AC outlet. *The arrows indicate the direction of the audio signal. DIGITAL PCM/2DIGITAL /DTS 2 OUT S400 (AUDIO) OUT 1 PHONO R AUDIO L OUT IN 7 (CD-R/ CD TAPE1 IN /MD) IN 6 (VCR2) IN R 5 OUT (VCR1 REC IN /DVR) CD-R/ TAPE1 4 /MD (SAT) IN IN PLAY 3 IN OUT (CD) REC TAPE2 MONITOR 2 IN (TV) IN PLAY 1 IN (DVD /LD) 2RF IN (DVD /LD) (For LD) ASSIGNABLE FRONT R SURROUND R AUDIO POWER AMP R L IN FRONT L R L CENTER 1 (Single) R R SUB W. L LR MULTI CH INPUT SUB W. PRE OUT 2 SURROUND L SURROUND BACK L (Single) CENTER SURROUND BACK L (Single) CONTROL IN MULTIROOM & SOURCE DVD /LD IN TV IN SAT IN OUT VCR1 /DVR IN MONITOR OUT OUT IN IN IN OUT IN OUT OUT VCR2 IN IN R L AUDIO OUT OUT VCR3 IN IN VIDEO S2 VIDEO ANALOG OUTPUT L R CD player ANALOG INPUT (REC) OUTPUT (PLAY) L L R R ANALOG INPUT (REC) OUTPUT (PLAY) L L R R Turntable If your turntable has a ground wire, connect it to the SIGNAL GND terminal. Recorder 1 (CD-R/TAPE/MD) Recorder 2 (CD-R/TAPE/MD) memo Don't hook up any other component to the PHONO jacks other than a turntable. It could damage the equipment. If your turntable has a phono pre-amplifier (most do not) please hook it up to an input other than PHONO. 7 Audio cords Use audio cords (not supplied) to connect the audio components. Connect red plugs to L R (right) and white plugs to L (left). R Be sure to insert completely. 23
-
 1
1 -
2
-
3
-
4
-
5
-
6
-
7
-
8
-
9
-
10
-
11
-
12
-
13
-
14
-
15
-
16
-
17
-
 18
18 -
 19
19 -
 20
20 -
 21
21 -
 22
22 -
 23
23 -
 24
24 -
 25
25 -
 26
26 -
 27
27 -
 28
28 -
29
-
30
-
31
-
32
-
33
-
34
-
35
-
36
-
37
-
38
-
39
-
40
-
41
-
42
-
43
-
44
-
45
-
46
-
47
-
48
-
49
-
50
-
51
-
52
-
53
-
54
-
55
-
56
-
57
-
58
-
59
-
60
-
61
-
62
-
63
-
64
-
65
-
66
-
67
-
68
-
69
-
70
-
71
-
72
-
73
-
74
-
75
-
76
-
77
-
78
-
79
-
80
-
81
-
82
-
83
-
84
-
85
-
86
-
87
-
88
-
89
-
90
-
91
-
92
-
93
-
94
-
95
-
96
-
97
-
98
-
99
-
100
-
101
-
102
-
103
-
104
-
105
-
106
-
107
-
108
-
109
-
110
-
111
-
112
-
113
-
114
-
115
-
116
-
117
-
118
-
119
-
120
 |
 |