Pioneer VSX-816-S Operating Instructions - Page 49
Controlling the rest of your system, Selecting preset codes directly, Erasing all of the remote
 |
View all Pioneer VSX-816-S manuals
Add to My Manuals
Save this manual to your list of manuals |
Page 49 highlights
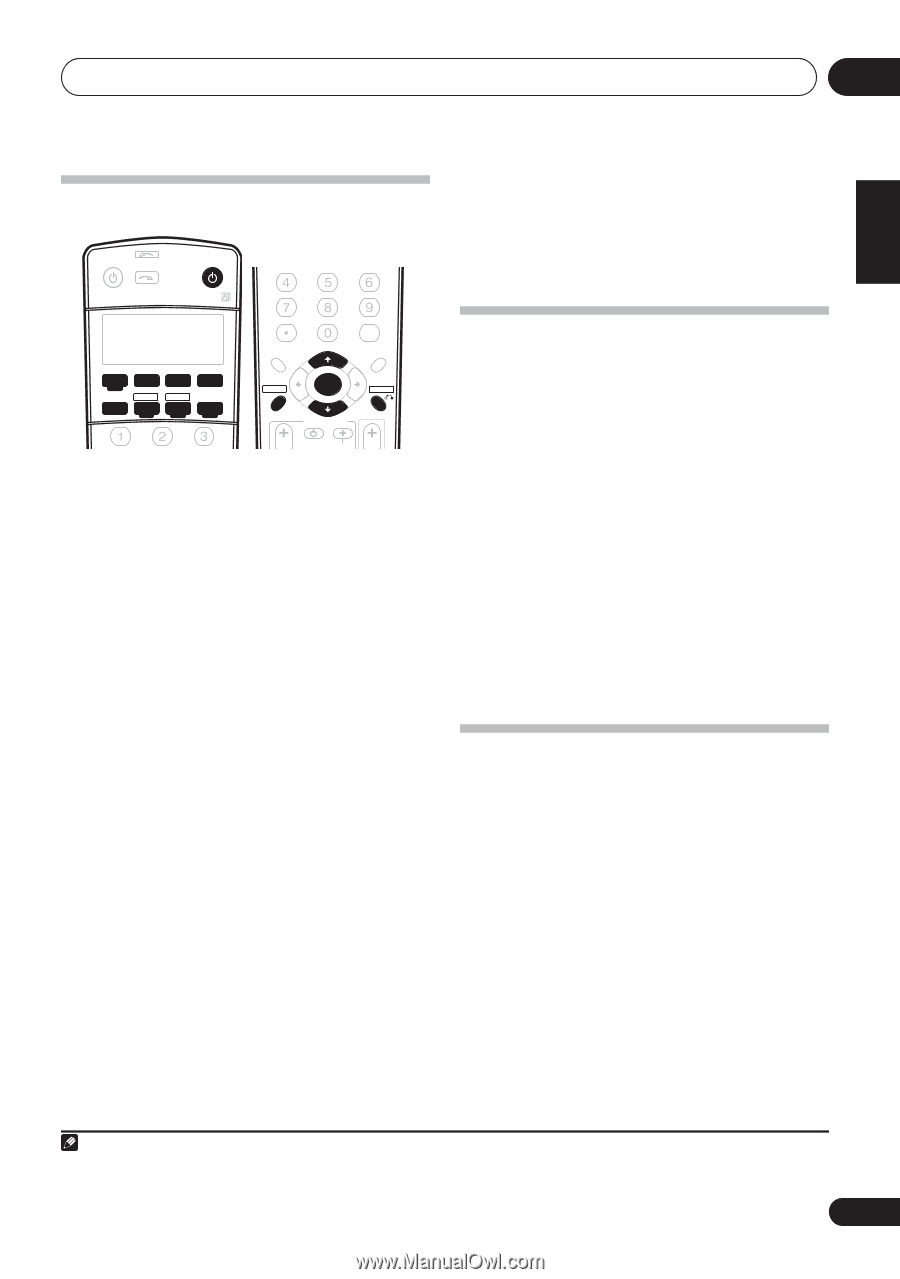
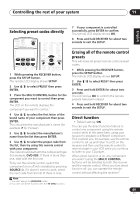
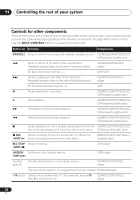
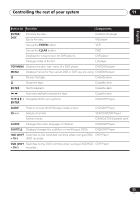
Controlling the rest of your system 11 English Deutsch Français Italiano Nederlands Español Selecting preset codes directly RECEIVER INPUT SELECT SOURCE AUDIO/VIDEO PRE-PROGRAMMED REMOTE CONTROL UNIT SR+ DIMMER MIDNIGHT/ LOUDNESS DVD CD TV CD-R/TAPE FM SLEEP DVR TVCTRL USB AM RECEIVER SB ch ANALOG ATT D.ACCESS +10 CLASS DISC ENTER TOP MENU TUNE DTV MENU ST SETUP ENTER MENU ST T.EDIT RETURN GUIDE TUNE TV CONTROL TV VOL INPUT SELECT TV CH VOL 1 While pressing the RECEIVER button, press the SETUP button. The remote LCD display shows SETUP. 2 Use / to select PRESET then press ENTER. 3 Press the MULTI CONTROL button for the component you want to control then press ENTER. The LCD on the remote displays the component you want to control.1 4 Use / to select the first letter of the brand name of your component then press ENTER. This should be the manufacturer's name (for example, P for Pioneer). 5 Use / to select the manufacturer's name from the list then press ENTER. 6 Use / to select the proper code from the list, then try using this remote control with your component. The code should start with the component type (for example, DVD 009). If there is more than one, start with the first one. To try out the remote control, switch the component on or off (into standby) by pressing SOURCE . If it doesn't seem to work, select the next code from the list (if there is one). Note 1 You can't assign the RECEIVER button. 2 You can't use direct function with the TV CTRL function. 7 If your component is controlled successfully, press ENTER to confirm. The remote LCD display shows OK. 8 Press and hold RECEIVER for about two seconds to exit the SETUP. Erasing all of the remote control presets This will erase all preset remote control preset codes. 1 While pressing the RECEIVER button, press the SETUP button. The remote LCD display shows SETUP. 2 Use / to select RESET then press ENTER. 3 Press and hold ENTER for about two seconds. The LCD shows OK to confirm the remote presets have been erased. 4 Press and hold RECEIVER for about two seconds to exit the SETUP. Direct function • Default setting: ON You can use the direct function feature to control one component using the remote control while at the same time, using your receiver to playback a different component. This could let you, for example, use the remote control to set up and listen to a CD on the receiver and then use the remote control to rewind a tape in your VCR while you continue to listen to your CD player. When direct function is on, any component you select (using the MULTI CONTROL buttons) will be selected by both the receiver and the remote control. When you turn direct function off, you can operate the remote control without affecting the receiver.2 49 En
-
 1
1 -
2
-
3
-
4
-
5
-
6
-
7
-
8
-
9
-
10
-
11
-
12
-
13
-
14
-
15
-
16
-
17
-
18
-
19
-
20
-
21
-
22
-
23
-
24
-
25
-
26
-
27
-
28
-
29
-
30
-
31
-
32
-
33
-
34
-
35
-
36
-
37
-
38
-
39
-
40
-
41
-
42
-
43
-
 44
44 -
 45
45 -
 46
46 -
 47
47 -
 48
48 -
 49
49 -
 50
50 -
 51
51 -
 52
52 -
 53
53 -
 54
54 -
55
-
56
-
57
-
58
-
59
-
60
-
61
-
62
-
63
-
64
-
65
-
66
 |
 |