Pioneer VSX-816-S Operating Instructions - Page 58
Other Settings
 |
View all Pioneer VSX-816-S manuals
Add to My Manuals
Save this manual to your list of manuals |
Page 58 highlights
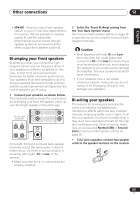
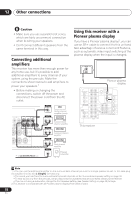
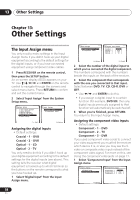
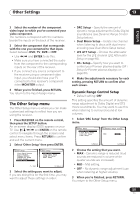
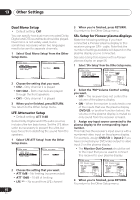
13 Other Settings Chapter 13: Other Settings The Input Assign menu You only need to make settings in the Input Assign menu if you didn't hook up your digital equipment according to the default settings for the digital inputs, or if you have connected equipment using component video cables. 1 Press RECEIVER on the remote control, then press the SETUP button. An on-screen display (OSD) appears on your TV. Use / / / and ENTER on the remote control to navigate through the screens and select menu items. Press RETURN to confirm and exit the current menu. 2 Select 'Input Assign' from the System Setup menu. System Setup 1.Surr Back System 2.Auto MCACC 3.Manual MCACC 4.Manual SP Setup 5.Input Assign 6.Other Setup 5.Input Assign a.Digital Input b.Component Input : Exit :Return Assigning the digital inputs • Default settings: Coaxial - 1 - DVD Coaxial - 2 - DVR Optical - 1 - CD Optical - 2 - TV You only need to do this if you didn't hook up your digital equipment according to the default settings for the digital inputs (see above). This setting tells the receiver what digital equipment is hooked up to which terminal so the buttons on the remote correspond to what you have hooked up. 1 Select 'Digital Input' from the Input Assign menu. 5.Input Assign a.Digital Input b.Component Input 5a.Digital Input Setup Coaxial - 1 Coaxial - 2 Optical - 1 Optical - 2 DVD [ DVR ] [ CD ] [ TV ] :Return :Finish 2 Select the number of the digital input to which you've connected the digital component. The numbers correspond with the numbers beside the inputs on the back of the receiver. 3 Select the component that corresponds with the one you connected to that input. Select between DVD, TV, CD, CD-R, DVR or OFF. • Use / and ENTER to do this. • If you assign a digital input to a certain function (for example, DVD/LD) then any digital inputs previously assigned to that function will automatically be switched off. 4 When you're finished, press RETURN. You return to the Input Assign menu. Assigning the component video inputs • Default settings: Component - 1 - DVD Component - 2 - TV Component - 3 - DVR If you used component video cords to connect your video equipment you must tell the receiver which device it is, or else you may see the Svideo or composite video input instead of the component video signal. For more on this, see Using the component video jacks on page 17. 1 Select 'Component Input' from the Input Assign menu. 5. Input Assign a.Digital Input b.Component Input 5b.Component Input Component - 1 DVD Component - 2 [ TV ] Component - 3 [ DVR ] :Return :Finish 58 En
-
 1
1 -
2
-
3
-
4
-
5
-
6
-
7
-
8
-
9
-
10
-
11
-
12
-
13
-
14
-
15
-
16
-
17
-
18
-
19
-
20
-
21
-
22
-
23
-
24
-
25
-
26
-
27
-
28
-
29
-
30
-
31
-
32
-
33
-
34
-
35
-
36
-
37
-
38
-
39
-
40
-
41
-
42
-
43
-
44
-
45
-
46
-
47
-
48
-
49
-
50
-
51
-
52
-
 53
53 -
 54
54 -
 55
55 -
 56
56 -
 57
57 -
 58
58 -
 59
59 -
 60
60 -
 61
61 -
 62
62 -
 63
63 -
64
-
65
-
66
 |
 |