Pioneer VSX-917V-S User Manual - Page 56
Other connections - hdmi not useful
 |
View all Pioneer VSX-917V-S manuals
Add to My Manuals
Save this manual to your list of manuals |
Page 56 highlights
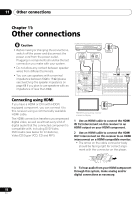
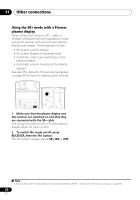
11 Other connections Chapter 11: Other connections Caution • Before making or changing the connections, switch off the power and disconnect the power cord from the power outlet. Plugging in components should be the last connection you make with your system. • Do not allow any contact between speaker wires from different terminals. • You can use speakers with a nominal impedance between 6 Ω to 16 Ω (please see Switching the speaker impedance on page 68 if you plan to use speakers with an impedance of less than 8 Ω). Connecting using HDMI If you have a HDMI or DVI (with HDCP) equipped component, you can connect it to this receiver using a commercially available HDMI cable. The HDMI connection transfers uncompressed digital video, as well as almost every kind of digital audio that the connected component is compatible with, including DVD-Video, DVD-Audio (see below for limitations), Video CD/Super VCD, CD and MP3. HDMI/DVI-equipped component AUDIO OUT R AUDIO L DIGITAL OUT HDMI OUT DIGITAL OUT IN OPT IN OPT 2 (TV/ SAT) IN OPT 1 (CD) OUT ASSIGNABLE DIGITAL IN IN ASSIGNABLE DIGITAL IN IN COAX 2 (DVR / VCR) IN COAX 1 (DVD/LD) OUT R AUDIO AUX FM UNBAL 75 Ω CD DVR / VCR TV / SAT AM LOOP ANTENNA VIDEO IN DVD / LD IN FRONT PLAY CD-R D V D 5.1CH INPUT IN / TAPE / MD REC L CEN- SUB TER WOOFER MONITOR OUT OUT CONTROL IN R SURROUND L DVD 5.1CH INPUT OUT OUT MONITOR OUT DVR / VCR IN TV / SAT IN SR P E SUB WOOFER A DVD / LD A PREOUT IN K S-VIDEO E R S FRONT ASSIGNABLE (DVD/LD) IN 1 (TV/SAT) IN 2 OUT HDMI IN 3 IN 1 Y PB PR ASSIGNABLE Y PB PR MONITOR OUT COMPONENT VIDEO IN 2 LR SURROUND L CENTER R SURROUND BACK L B HDMI IN HDMI/DVI-compatible monitor or plasma display 1 Use an HDMI cable to connect the HDMI IN 1/2 interconnect on this receiver to an HDMI output on your HDMI component. 2 Use an HDMI cable to connect the HDMI OUT interconnect on this receiver to an HDMI interconnect on a HDMI-compatible monitor. • The arrow on the cable connector body should be facing right for correct alignment with the connector on the player. 3 To hear audio from your HDMI component through this system, make analog and/or digital connections as necessary. 56 En
-
 1
1 -
2
-
3
-
4
-
5
-
6
-
7
-
8
-
9
-
10
-
11
-
12
-
13
-
14
-
15
-
16
-
17
-
18
-
19
-
20
-
21
-
22
-
23
-
24
-
25
-
26
-
27
-
28
-
29
-
30
-
31
-
32
-
33
-
34
-
35
-
36
-
37
-
38
-
39
-
40
-
41
-
42
-
43
-
44
-
45
-
46
-
47
-
48
-
49
-
50
-
 51
51 -
 52
52 -
 53
53 -
 54
54 -
 55
55 -
 56
56 -
 57
57 -
 58
58 -
 59
59 -
 60
60 -
 61
61 -
62
-
63
-
64
-
65
-
66
-
67
-
68
-
69
-
70
 |
 |
